1

Overview

You can send conversation messages from the Converse Desk as well as from your record detail thus establishing one to one conversation with your customers. You can send single SMS or bulk messages to multiple users as part of a bulk SMS campaign. Messages, once created, may be sent at a time and frequency that is suitable for your business need. Therefore, you can schedule messages accordingly.

Here are the prerequisites to trigger any SMS:

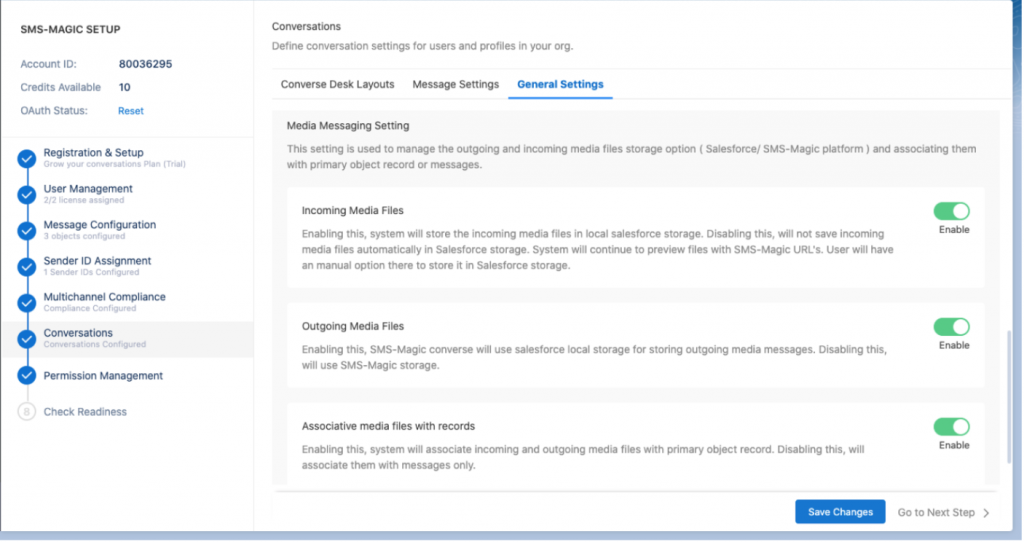
  • Make sure your admin has configured objects on which you want to trigger SMS.
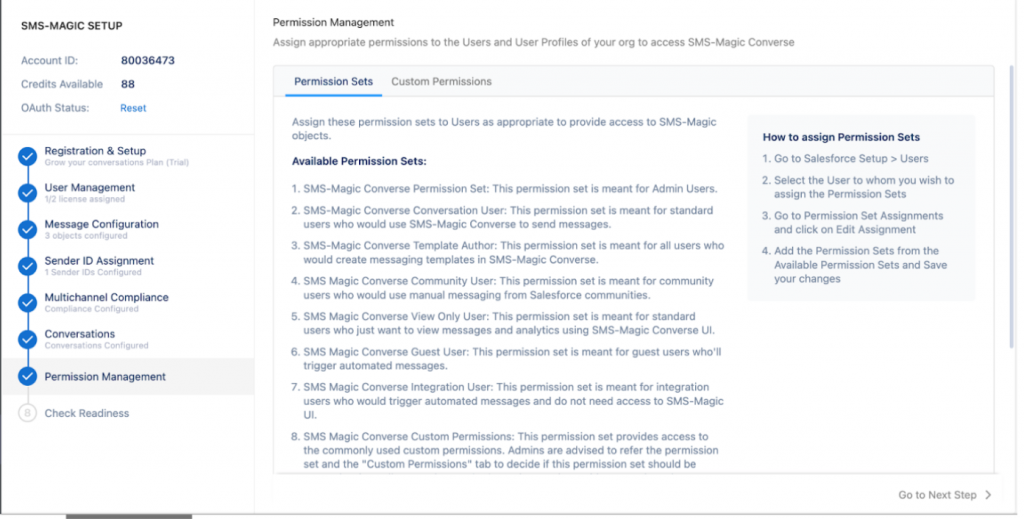
  • Make sure you have required permission sets and custom settings.
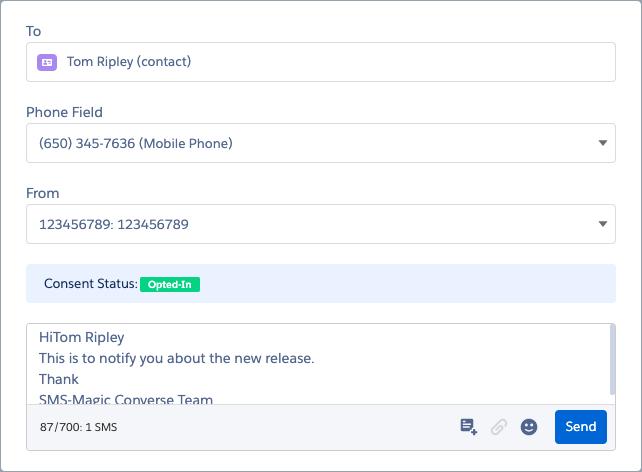
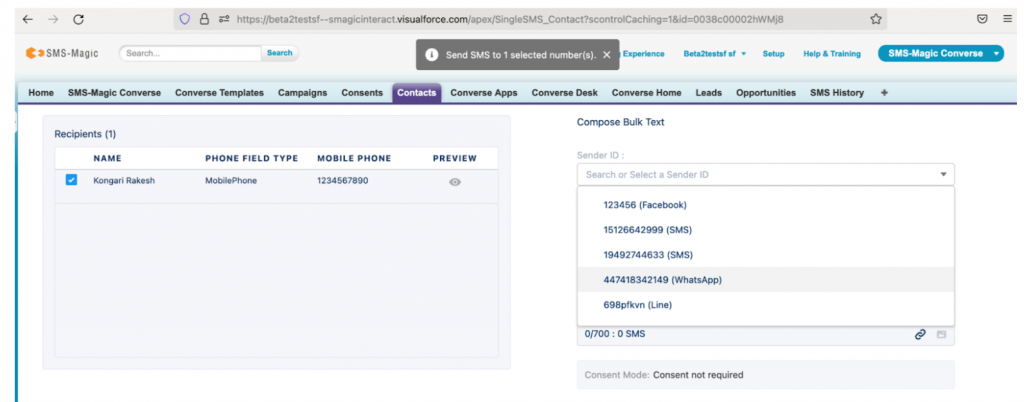
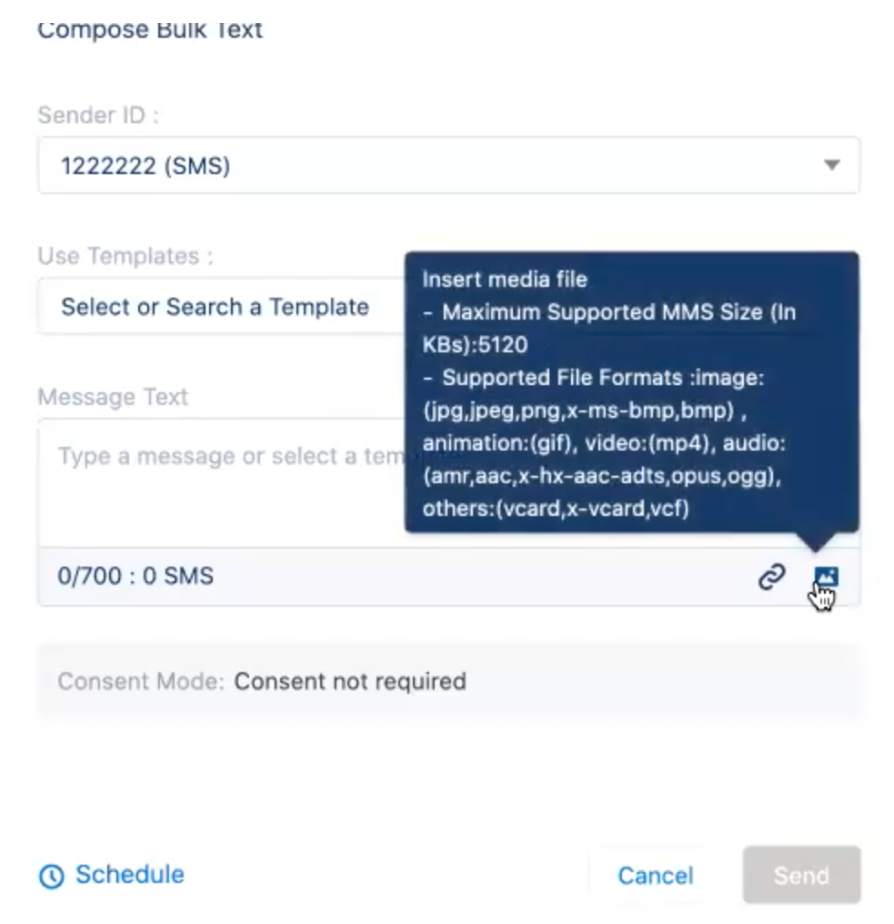
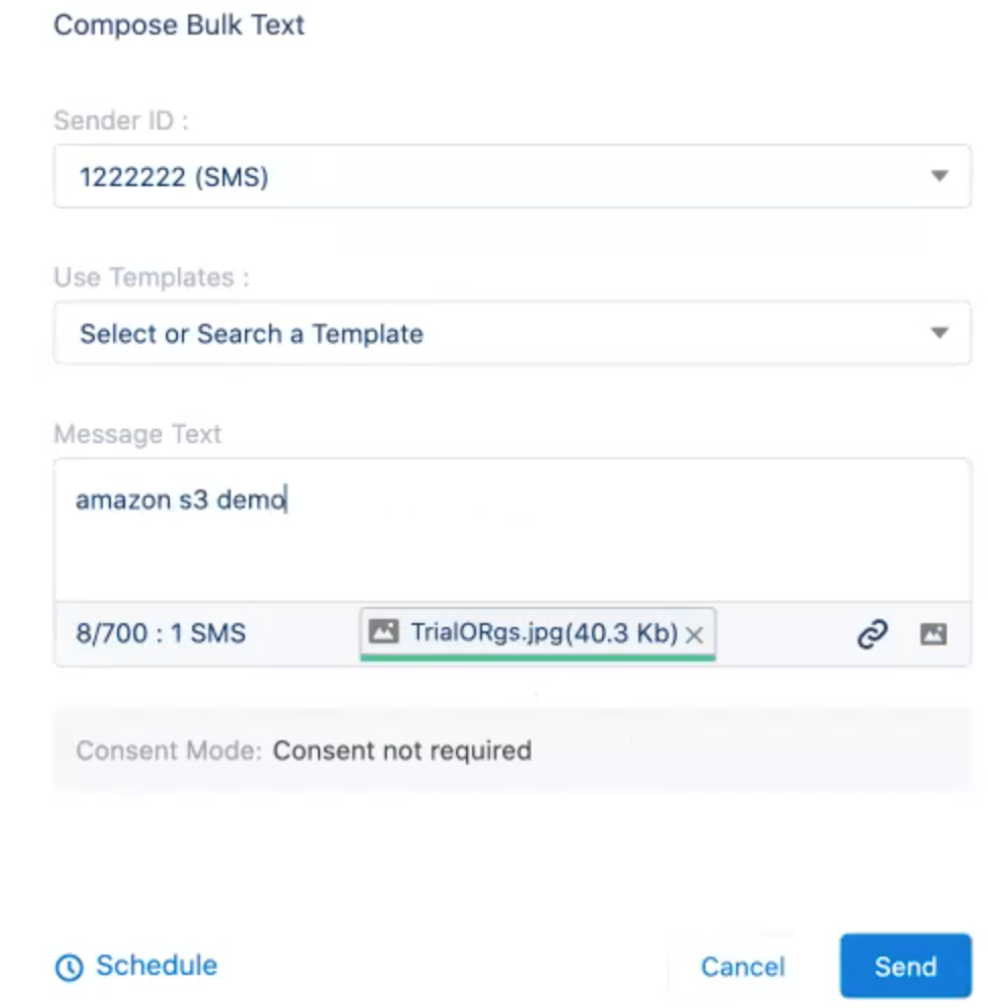
  • Mandatory inputs to trigger any SMS are the recipient’s phone number, your sender ID, and text message ( text/media/templates).

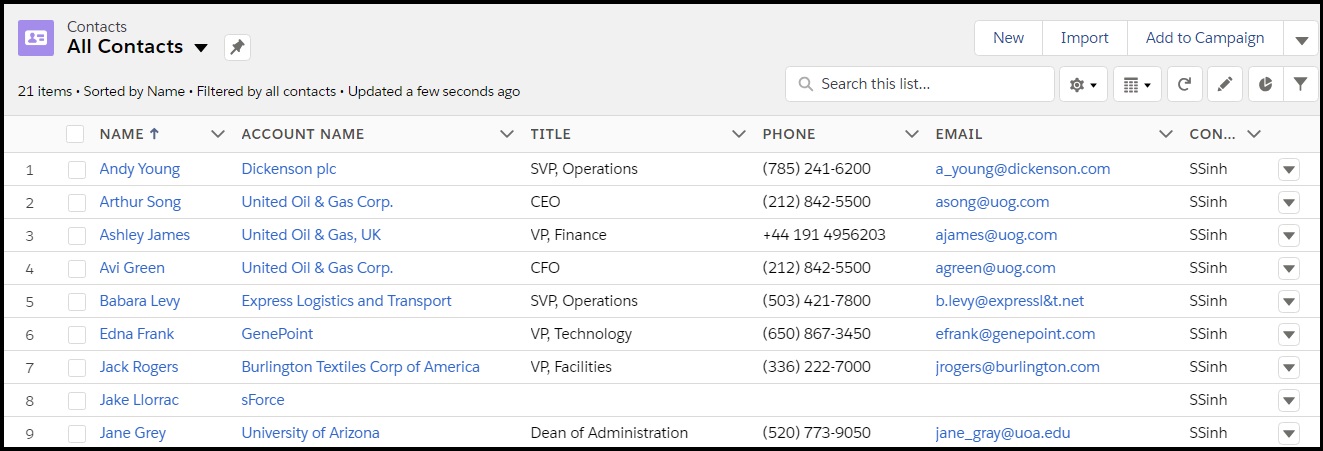
You can send Single and Bulk SMS from the following sources:
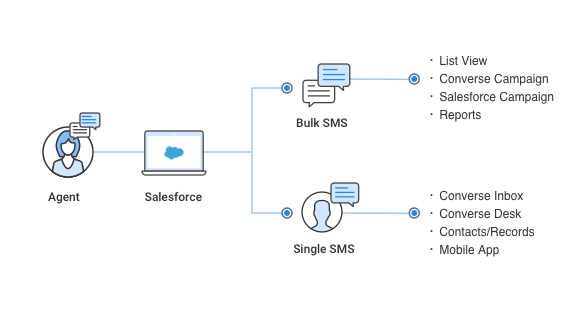
Messaging Methods
Single SMS
  • Converse Desk for Sales, Service consoles and Omnichannel.
  • Record Detail Page Layout (Send SMS Button & Conversation View).
  • Converse Desk/Inbox for Salesforce1 Mobile App.
  • Converse Inbox in Lightning Utility Bar for lightning users and Notifications on the sidebar for classic users
Bulk SMS
  • List View
  • Converse Campaign Manager
  • Salesforce Campaigns
  • Reports
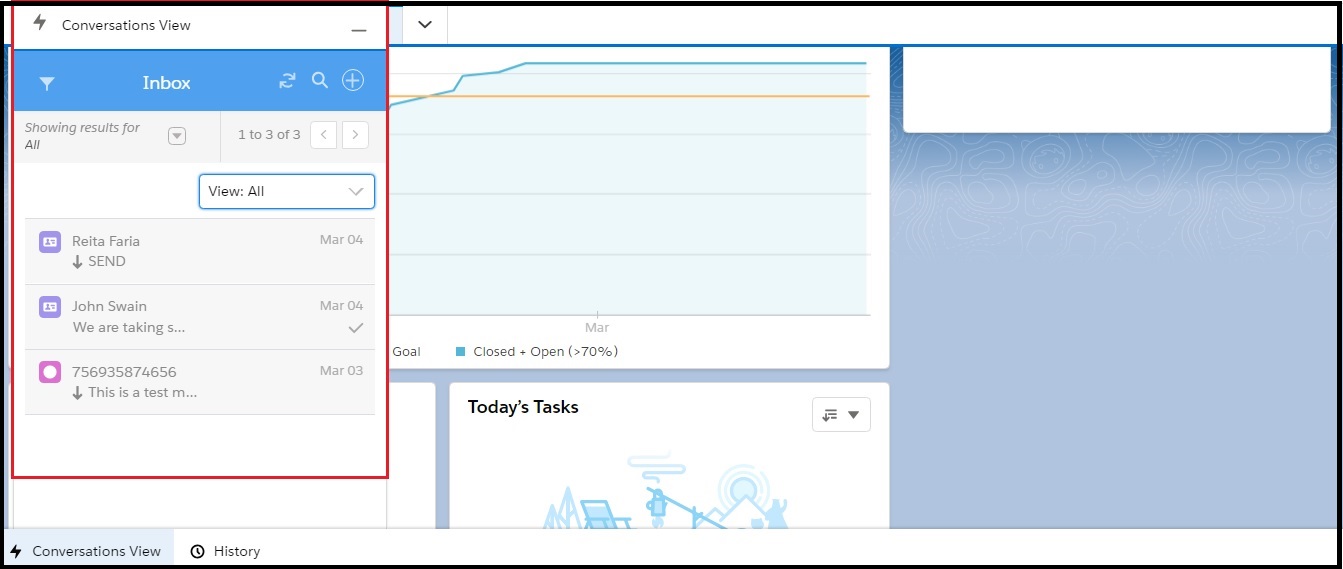
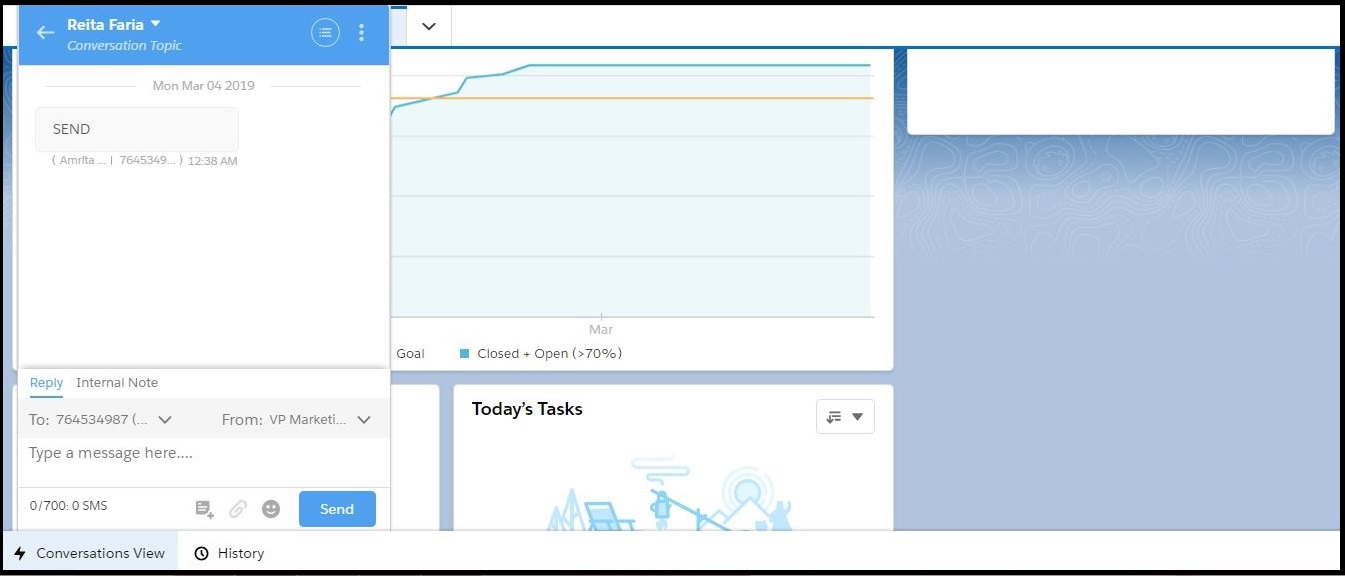
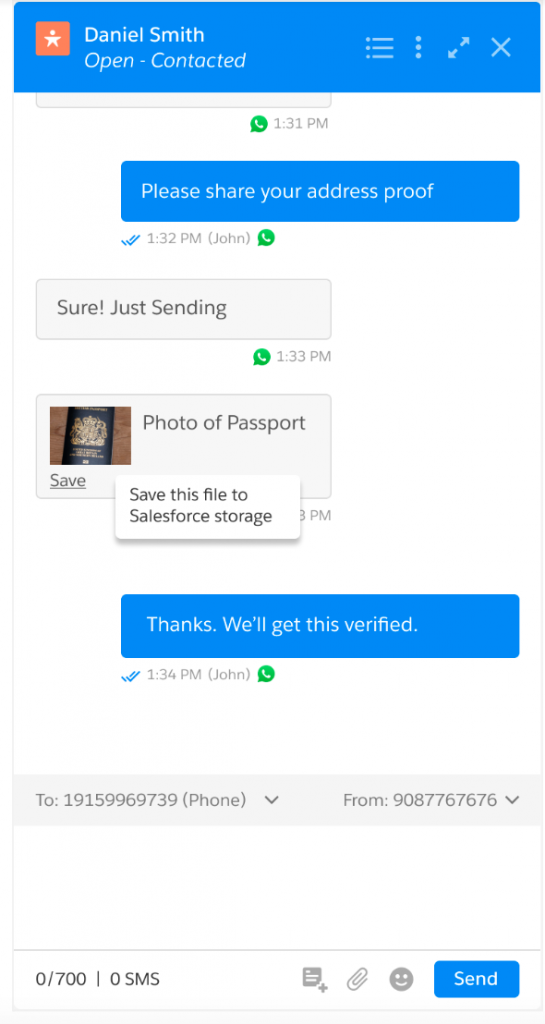
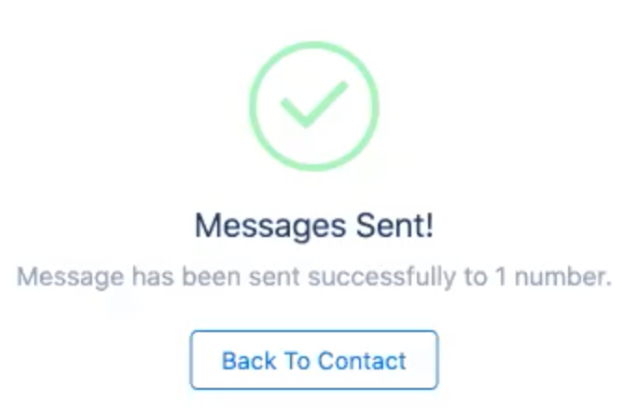
  • Sending Message from Converse Desk – You can send new messages or reply to older messages from the Converse Desk. All messages you send will be available under the Sent folder under your Global Filter. Responses to those messages will be available in your Inbox. The My Inbox list will display all messages for which you are the conversation owner. All other conversations belonging to your organization will be available in the relevant Object folders.
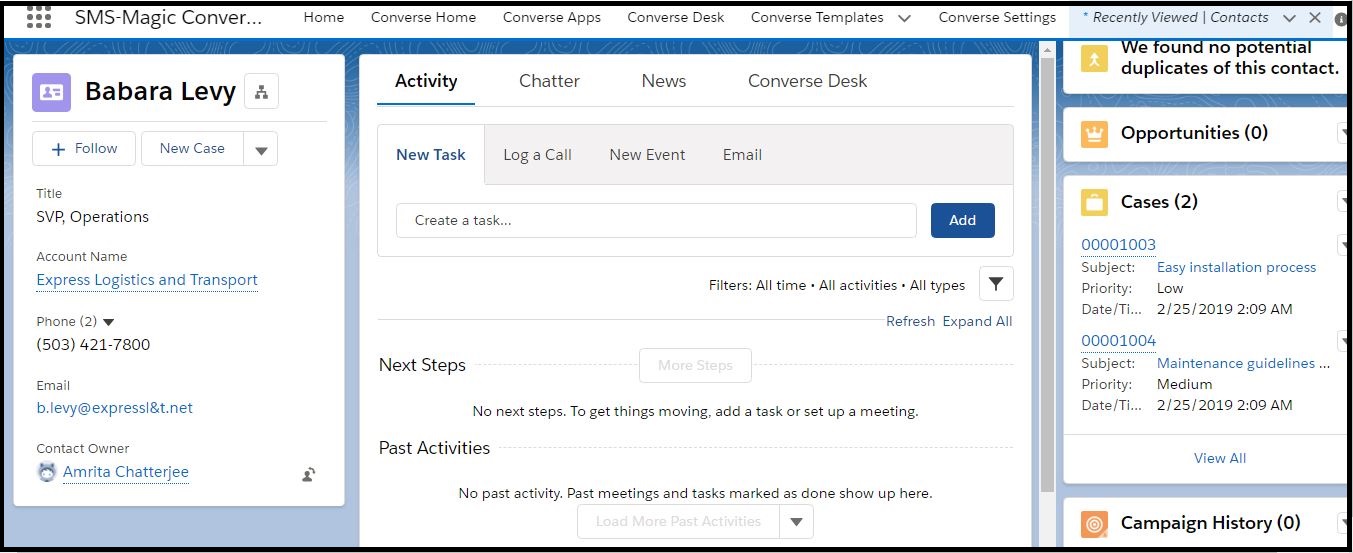
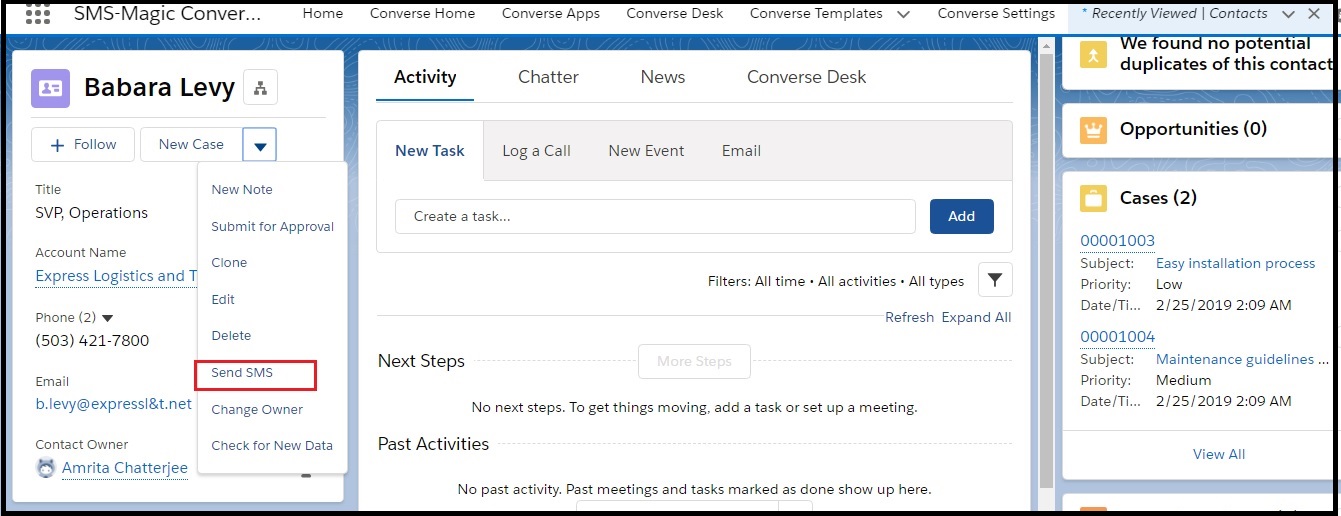
  • Sending Message from Record Details – You can also send a message from the object record details. The Send SMS button should be enabled for the object record.
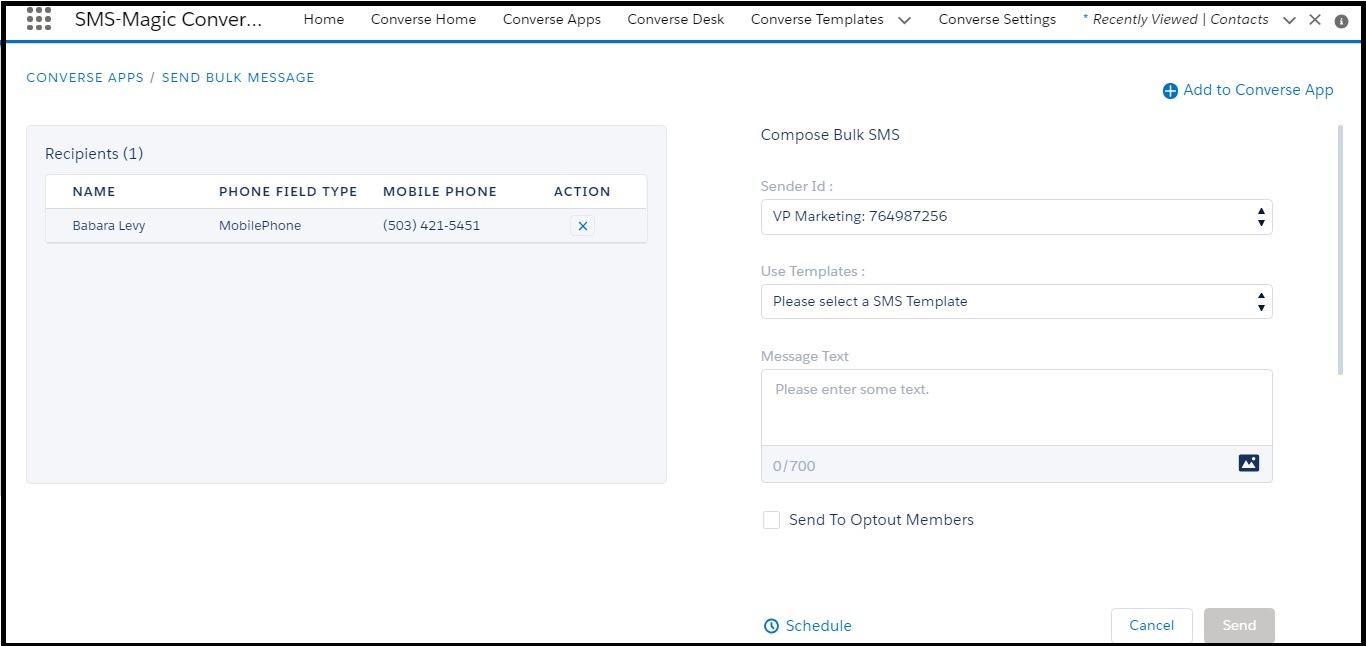
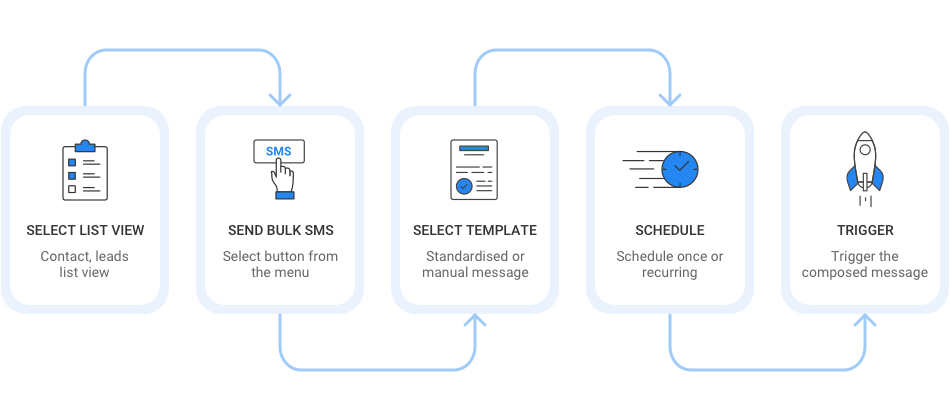
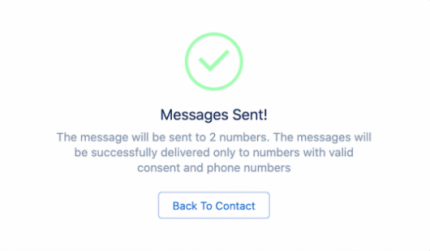
  • Sending Bulk Messages – You can run a campaign or send SMS messages to multiple recipients at a time. To start a bulk SMS distribution, you need to prepare a list of recipients, specify the Sender ID, and choose the SMS template. You can also schedule a bulk SMS to be sent at a specific time.
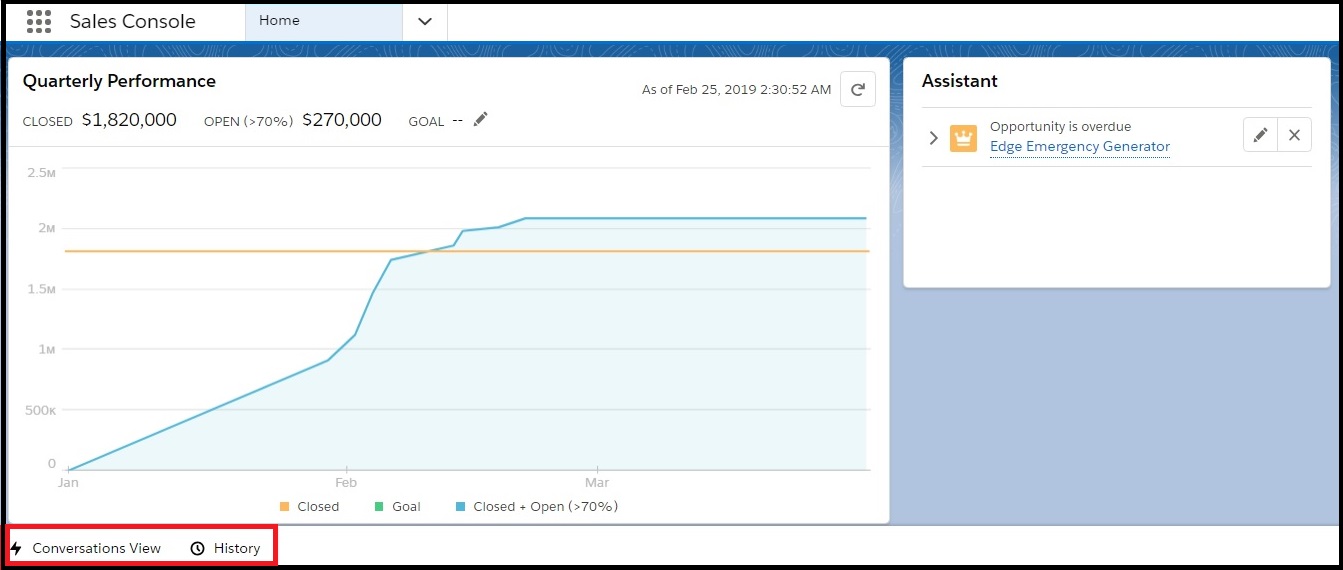
  • Send Messages from Converse Inbox – You can also send messages from Converse Inbox displayed on the utility bar of the Home page.
  • Send Messages from Converse Inbox on Record Page – You can also send messages from the object record page. All messages sent will be part of an existing conversation that the object is involved in. You can also perform various CRM actions on that conversation.
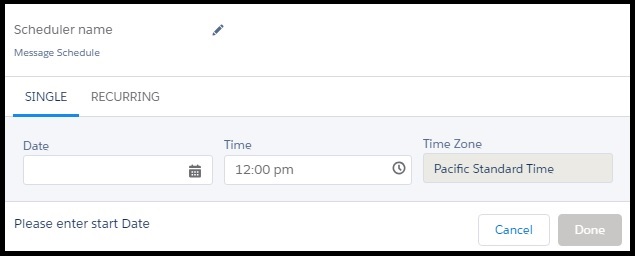
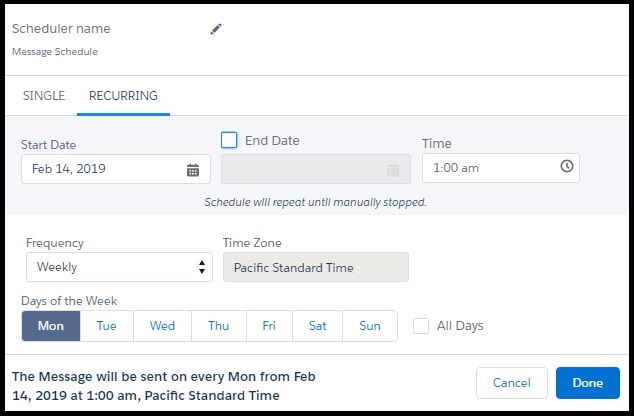
  • Scheduling Bulk Messages – You can define a schedule for sending out a bulk SMS to the selected recipients at a time and day appropriate for your business. You can configure SMS to be sent out once or on a recurring frequency.
  • The Converse Desk also allows you to save your last used phone number and Sender ID details for a contact or lead based on the last message sent. This information will be pre-selected while responding to the earlier message.
  • In order to send messages to single records, you need to configure new buttons in the Salesforce Setup and assign them to the Visualforce page. Get in touch with your System Administrator to create new buttons.


Send a New Message

  1. On the Converse Desk, click located above the Global search icon. The Send SMS pop-up window appears.
  2. Enter the following details:
  3. Fields Description
    To Enter the Recipient Name or number.
    Phone Field Select the phone field defined for the Recipient.
    From Select the Sender ID.
    Message Area Type the message text.
    Select a template for your message.
    Attach media with your message.
    Attach emojis with your message. Emojis take 2-character space.
    • You can only type custom messages that fall within the defined character limit. For longer messages, select a template.
    • The message composer area automatically increases in width to accommodate the message length.
  4. Click Send.


Send a Multimedia Message

Users exchange documents and files with a record (e.g. insurance application docs on contact object) by attaching them with respective records. SMS-Magic Converse application has been using SMS-Magic storage to store the media files. Many times, the documents were lost in the conversations, as they did not get attached to the record. 

Also, irrespective of what is configured at the account level, in terms of file size support, from Salesforce, we have been supporting only 2.5 MB as the max size. This was considered to be a known limitation of the SMS-Magic Salesforce application. 

Hence in order to enable sharing of higher size media files and to consider the data privacy issue, we brought in the media file exchange via Salesforce storage. So now, by enabling  Salesforce storage, you need not worry about the media files being lost, you can send higher size media files, and also associate files with a record.

Multimedia Files Salesforce Storage

Users have an option to store incoming and outgoing media files in Salesforce storage manually. While sending messages from Salesforce, users can also upload the media files as per the support available against each Sender ID. Admin users can associate MMS with records or messages.

  • Click on ‘Converse Settings’ on the Converse Home Page the following page will appear:
  • Click on ‘Conversations’ the following page will appear:
  • Click on ‘General Settings’ and scroll down to Media Messaging Settings. This setting is used to manage the incoming and outgoing files storage option. 

Incoming Media Files

By enabling this option, the system will store all incoming media files in local Salesforce storage. The system will continue to store the outgoing media files in SMS-Magic storage.

Outgoing Media Files

By enabling this option, SMS-Magic converse will use Salesforce local storage to store all outgoing media files. However, the system will continue to store the incoming media files in SMS-Magic storage.

Associate Media Files with Records

If this option is enabled, the system will associate all incoming and outgoing media files with the primary object record. For this, either of the two options namely, ‘Incoming Media Files’ and ‘Outgoing Media Files’ should be enabled.

  • As you can see here in the conversation window, you will find the option Save this file to Salesforce Storage’. The following page will appear before saving the file:
  • Once you click on the ‘Save as File’ button, the file gets saved and the following page will appear:

The media files will be saved in Salesforce storage.

Associate Media Files with Records

Now by enabling Salesforce storage, it is simple for users to associate media files with records. Follow the steps below:

Here, there is a particular contact that has been selected to associate media files with records

  • Choose the appropriate Sender ID from the drop-down list
  • Once the appropriate Sender ID is selected from the drop-down list you can see that this Sender ID is SMS enabled
  • Enter the  message text in the ‘Message Text’ field
  • Choose the appropriate file that you want to upload
  • Here, you can see that the file is getting attached. Once the file is attached, click on the ‘Send’ button and the following message will appear:

Here, under ‘SMS History’ you can see that the new MMS has been associated. As the Associate Media Files with Records was enabled under General settings it gave us the option to attach the File.

Disable Outgoing Media File

  • Disable the Outgoing Media Files to store files on Amazon Server and click on ‘Save Changes’
  • Choose the appropriate file and click on ‘Save’ to upload the selected file

Here you can see that the file is getting uploaded. 

  • Enter the message text in the ‘Message Text’ field 
  • Click on the ‘Send’ button and the following message will appear:

Here, you can see that under SMS History the new SMS is associated with the contact. 

  • Click on the new ‘SMS’ which is created and the following page will appear:

Here, you can see the S3 MMS URL has been created which means the files will be stored in S3.

  • As per the channel level, media files can be exchanged
  • Across all interfaces now all channel-specific will be supported storage along with different file types and file size


Reply to a Message

    1. Search for the message to which you want to send a reply.
Refer to the section Work with Converse Desk for more details about searching the message.
    1. Click the message. The message reply pane appears displaying all the related conversations.
Click individual icons displayed on the top right corner of the message reply panel for more details.

Click 
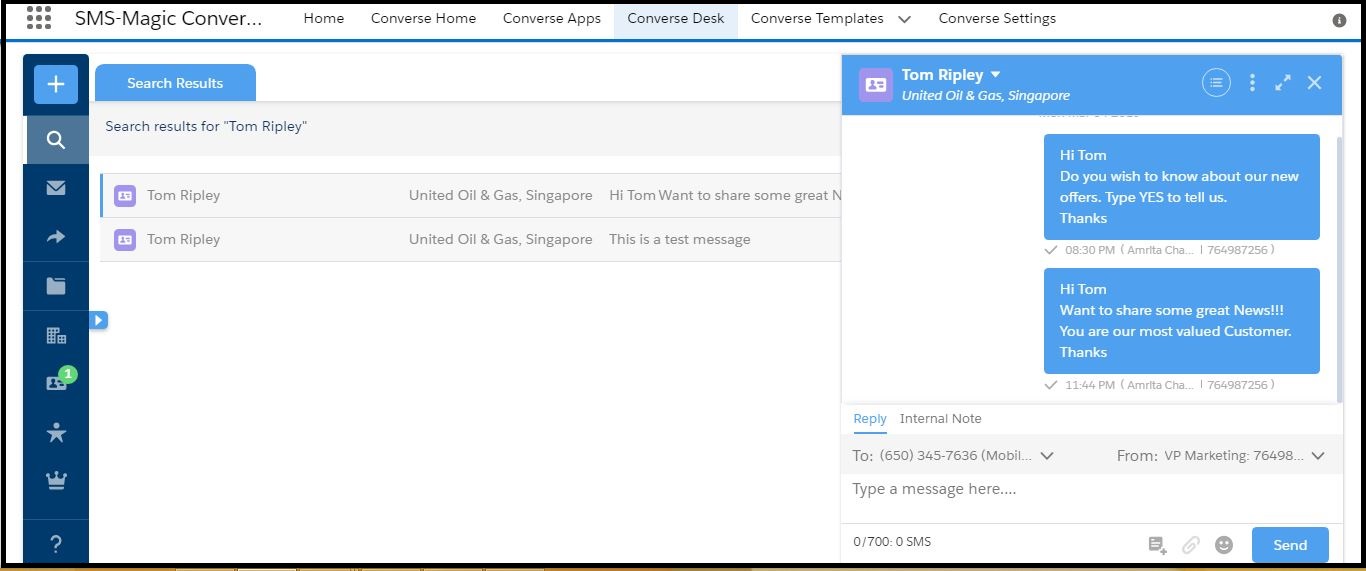
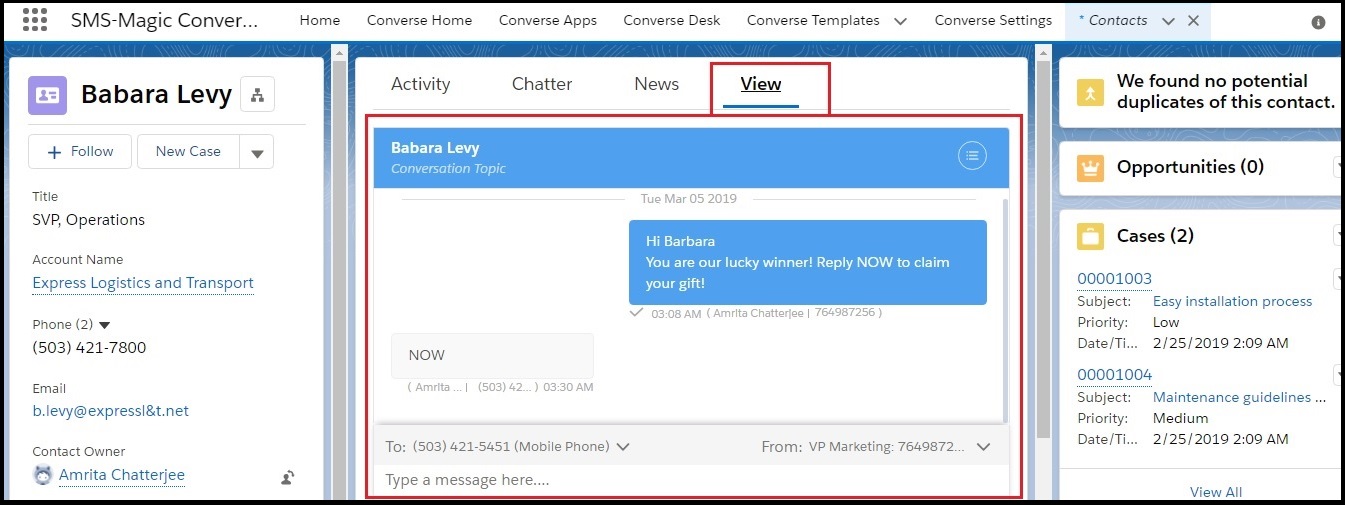
next to the contact name and then click Show All Messages Sent/Received, To/From from the drop-down menu that appears. The reply pane will display all the relevant messages belonging to the selected contact. You can click Reset to revert to the default view.
    1. Review the message trail, and type a reply.
All other features and character limit restrictions shown during sending a new message remain the same while replying to a message as well.
Fields Description
Click to execute CRM actions on a record. You can do the following:

  • View Contacts
  • Edit Contacts
  • Create New Task
  • Create an Opportunity
  • Create an Event
  • Create a Case
CRM Actions that are made available to you may vary depending on your organizational requirements and the configurations made by your Administrator.
Click to select from any of the following actions:

  • Assign Conversations – Click to assign a conversation to another user. Refer to section on Assign Conversations for more details.
  • Close Conversations – Click to close a conversation.
  • Related Conversation – Click to view all the related conversations.
icon_expvu Click to expand the conversation thread details and view it as a separate thread.
Click to close the message reply panel.
    1. Click Send.

You have succesfully replied to the message.


Send a Message from Converse Inbox

  1. On the Salesforce Home page, click . The App Launcher page appears.
  2. Click Sales Console. The Console page appears displaying a narrow panel at the bottom of the screen comprising the Conversation View and the History tab.
  3. Click Conversations View. The conversation list appears.
  4. Click individual icons displayed on the top right corner of the message reply panel for more details.

  5. Click an individual record to view the conversation details for that record.
  6. Click individual icons displayed on the top right corner of the message reply panel for more details.

    Fields

    Description


    Click to view the Converse Desk Filters. Refer to the section View Conversations using Global and Conversation Filters for more details.


    Click to create a new message.
    Refer to the section on Send New Message for more details.


    Click to execute CRM actions on a record. You can do the following:

    • View Contacts
    • Edit Contacts
    • Create New Task
    • Create an Opportunity
    • Create an Event
    • Create a Case

    CRM Actions that are made available to you may vary depending on your organizational requirements and the configurations made by your Administrator.


    Click to search for a conversation.


    Click to refresh the screen.


    Click to select from any of the following actions:

    • Assign Conversations – Click to assign a conversation to another user. Refer to the section on Assign Conversations for more details.
    • Close Conversations – Click to close a conversation.
    • Related Conversation – Click to view all the related conversations.
  7. Type the message and click Send.


Send a Message from Record Details

  1. On the Salesforce Home page, click . The App Launcher page appears.
  2. Click the object name. The object record list appears.
  3. Under Contacts click and then select All Contacts from the drop-down menu to view the complete contact record list.
  4. Click a record name. The Record details appear.
  5. Under Contact Details, click . The drop-down menu appears.
  6. Click Send SMS. The Send SMS window appears.
  7. Enter the following details:
    • Sender ID
    • Message Template
    • Message Text
  8. If you do not wish to select a template, type your own message.
  9. Click Send.
  10. You can also schedule your message. Refer to the section on Schedule Messages for more detail.


Send a Message from Conversation View on a Record Page

  1. On the Contact Details page, click the contact record whose conversations you want to access. The Contact Details page appears.
  2. Click the section in which you have added the Converse Inbox. The Message reply panel appears.
  3. Refer to the section on Work with Converse Desk for more details on adding the Converse Inbox.

  4. In the message text area, type your response.
  5. The sender ID and recipient phone number displayed are retrieved from the details used when the message was last sent. You can edit this information if required.&nbsp
  6. Click Send.


Send Bulk SMS

Every text messaging initiative geared to drive sales typically would begin with a Bulk messaging activity. You may need to address a group of people within a geographic region or community and send out a bulk message to all or a few of them from the list.

The messages can be text (SMS) or Multimedia (MMS) based and follow the same mechanisms to set up and send as a single SMS.

For sending MMS from Salesforce, make sure that your Org is setup for MMS. Contact your Org admin for the details.

Bulk Messaging can be done manually as well as in an automated way. See Create and Schedule Bulk Message Campaigns for more information about automated bulk messaging.

Bulk messages from a List

You can send the bulk messages from the List View of the Salesforce for Contacts or Leads.

Similarly, you can send bulk messages from Campaign Manager, Salesforce Campaign, and Reports.

To send bulk messages from the List View of Salesforce:

  1. On the Salesforce Home page, click . The App Launcher page appears.
  2. Click the object name. The object record list appears.
  3. Under Contacts click and then select All Contacts from the drop-down menu to view the complete contact record list.
  4. Select multiple records from the list.
  5. Click on the top right corner and then click Send Bulk SMS. The Send Bulk SMS page appears.

  6.  

    Prior to selecting records to whom you wish to send the SMS, ensure that valid phone numbers are displayed in the phone fields. Moreover, the phone fields selected for the record should be the same ones that are configured in the message object settings. For example, if you select mobile as a phone field for the record, the same should also be configured in the message settings with a valid phone number as its value.
    Contact your System Administrator for more details on the phone fields that have been configured for that record.
  7. Under Sender ID, select the ID from which you want to send the SMS.
  8. Under Use Template select from the list of default templates.
  9. Under Message Text, type the message you want to send as the SMS message. This field is already populated if you select a predefined template in the previous step.
  10. Under Schedule, you can schedule when you want to send the message.
  11. Click Send.
  12. The SMS will be sent and following message will appear.


Schedule Bulk SMS

  1. On the Bulk SMS page, click Schedule. The Schedule page appears.
  2. Under the Single tab, click to select the start date.
  3. Under Time, click to select the time when you wish the SMS schedule to start.
  4. Under Time Zone the default time zone is displayed.
  5. You can configure your Timezone from Profile > My Settings > Language and Timezones. Get in touch with your System Administrator to change your timezone, if required.
  6. If you wish to configure a recurring schedule, click Recurring. The schedule parameters appear.
  7. Click to enter the start date.
  8. Select the End Date check-box to configure the date when you want the campaign to end.
  9. Under Time, click to configure the start time for the campaign.
  10. Under Frequency, select the schedule frequency. The available options are:
      • Daily – Select the number of days after which you want the campaign to run.
      • Weekly – Select the day of the week in which you want the schedule to run. You can also select the All Days check-box to run the campaign on all days of the week.
      • Monthly – Select the month and the day of the month when you want the campaign to repeat. You can also select the All Months check-box to run the campaign on the selected day of every month.
      • Yearly – Select the number of years after which you want the campaign to repeat. When you select the yearly frequency, you also need to specify the day and the month in the year when you want the campaign to recur. You can also select the All Months check-box to run the campaign every month. For example, if Repeat every = 5 years; Day = 2nd; Every Month check-box = Selected then the campaign is scheduled to run after every 5 years on the second day of every month.
  11. Under Time Zone the default time zone is displayed.
  12. Click Done to set the schedule.


Delete a message

  1. Login to Salesforce and on the Salesforce Home page, click
  2. Search for ‘SMS History’ 
SMS History
  1. The following SMS History page appears:
SMS History view
  1. Select the record number to delete the messages 
  2. Click on the delete button as shown below
Delete option for sms
  1. Click on the delete button as shown below, to delete the messages of the selected record
Delete SMS Confirmation