A webhooks gives you the ability to communicate with a 3rd-party application by sending an instant web notification every time an event occurs.
Follow these steps to create a webhook:
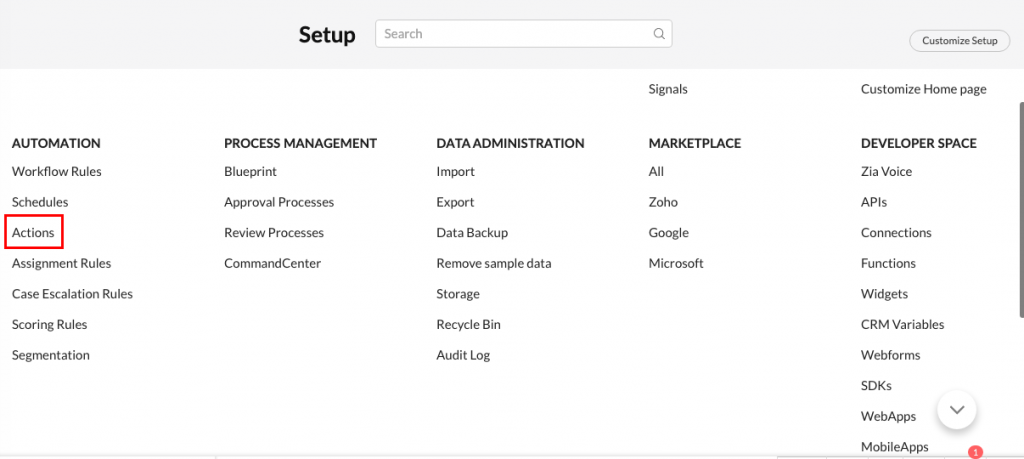
In Zoho CRM, go to Setup and click on the ‘Actions’ sub-section in the Automation section
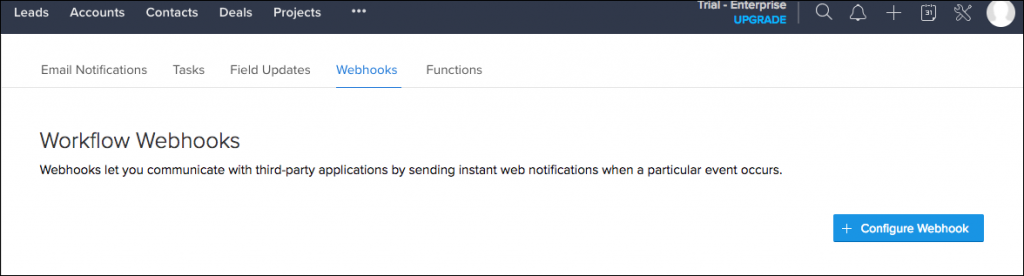
Go to Webhooks and click on the Configure Webhook button
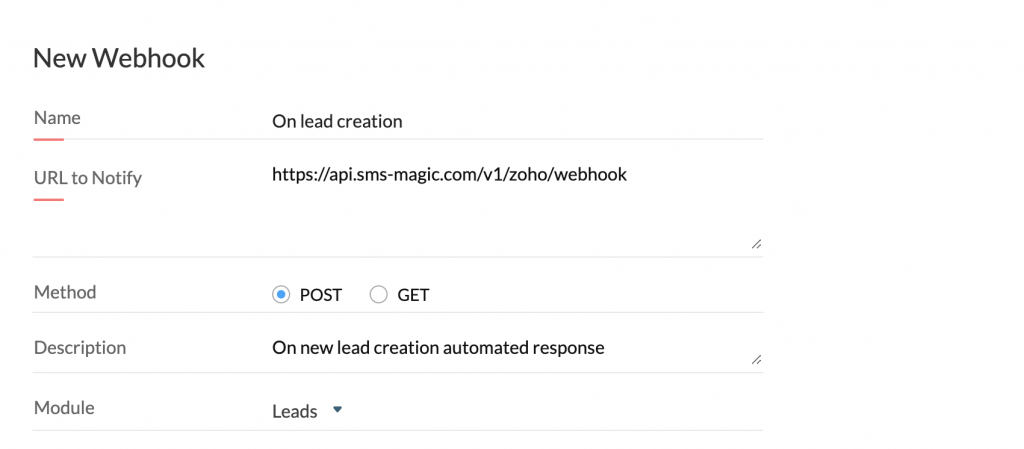
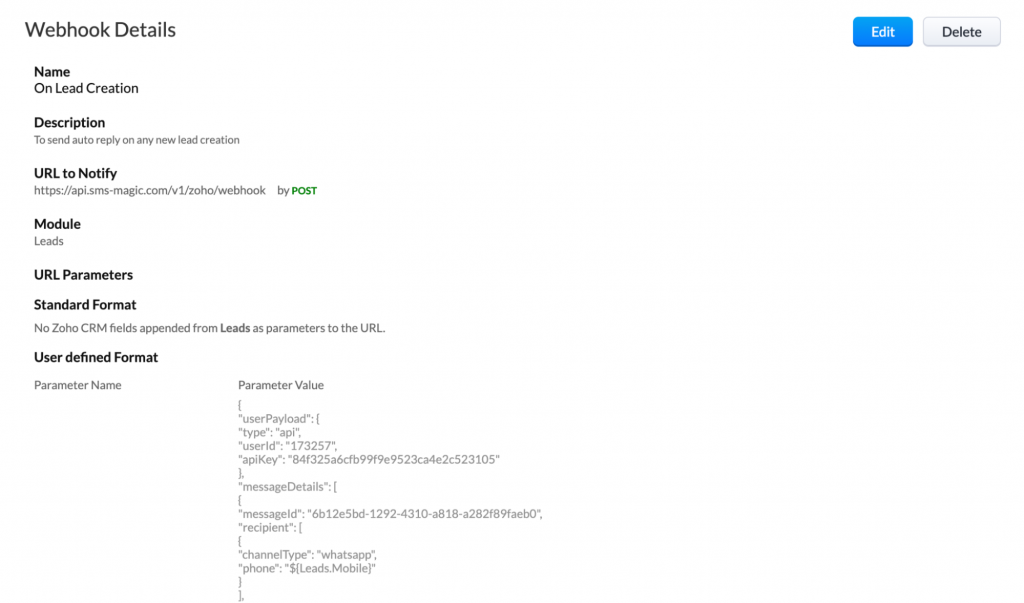
Complete the New Webhook form:
Name: Type a name for the webhook
URL to Notify:
Here is the URL you can use based on your data center- US > https://api.sms-magic.com/v1/zoho/webhook
EU > https://eu.api.sms-magic.com/v1/zoho/webhook
AUS > https://aus-api.sms-magic.com/v1/zoho/webhook
Method: Select POST
Description: Briefly state the purpose of the webhook
Module: Select the module for which you want to Automate and ensure it matches with the module chosen in the JSON Payload.
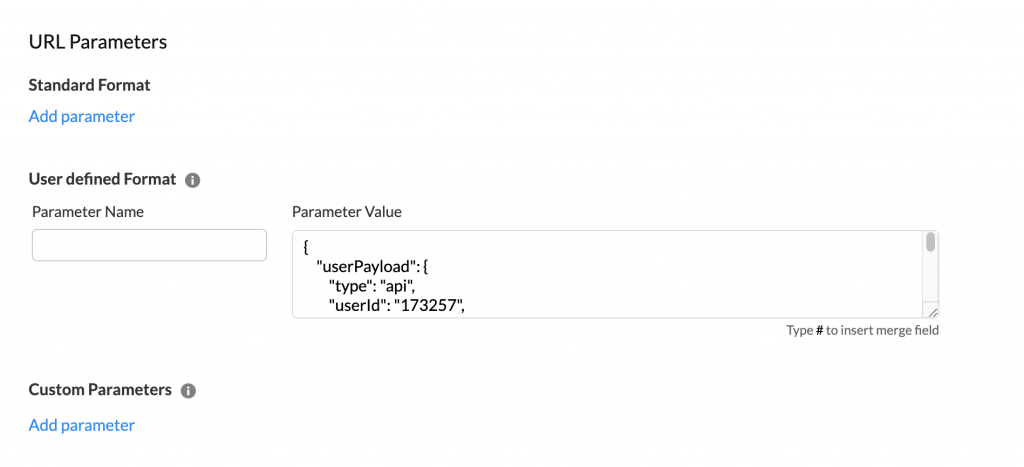
URL Parameters: Click on the Add Parameter under User Defined Format. Enter the Parameter Name = text. For the Description, copy and paste the JSON payload configuration that you saved in the Generate JSON step above.
Click on the Save button and your webhook is now ready to be used in a Workflow rule.
Overview
|
You can send Bulk Campaigns to records of any module. You can send SMS, MMS, or Registered WhatsApp template messages via these Campaigns. The sections below explain how to set this up.
Note: You need to have Campaign feature enabled in SMS-Magic Web Portal to send Bulk Campaigns. Please contact sales@screen-magic.com, in case you do not have access to the feature.
Preparing your recipient list
To send Bulk Campaign to the records of any module of your Zoho CRM, you need to have the recipient list in the CSV file and upload it while running a campaign. The uploaded CSV gets saved on SMS-Magic Web Portal so that you can use this in the future again. You can delete the saved lists by navigating to Campaign -> Contact Lists.
Follow these steps to export records from Zoho CRM:
Login to your Zoho CRM account.
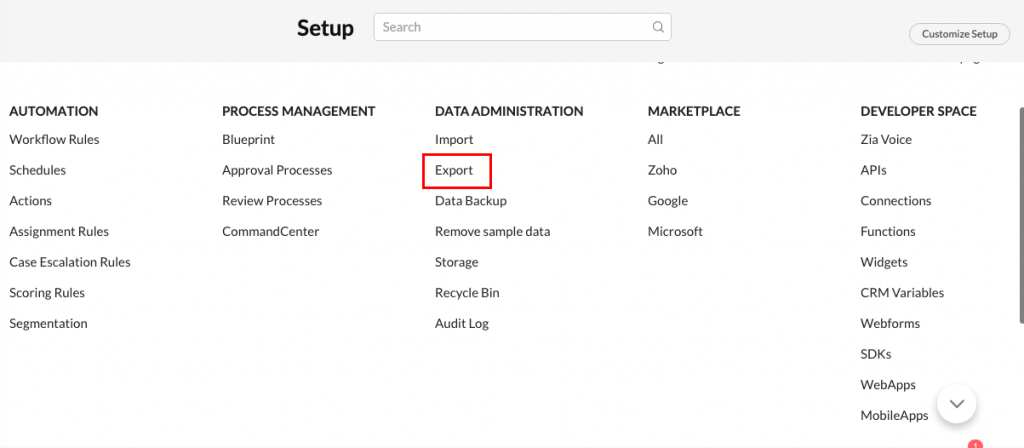
Go to Setup > Data Administration > Export
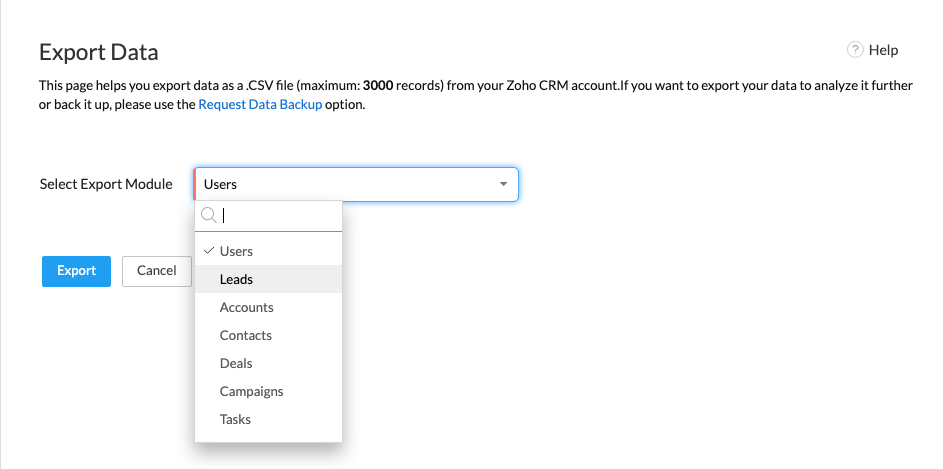
Choose the Module from which you need to export records in CSV format
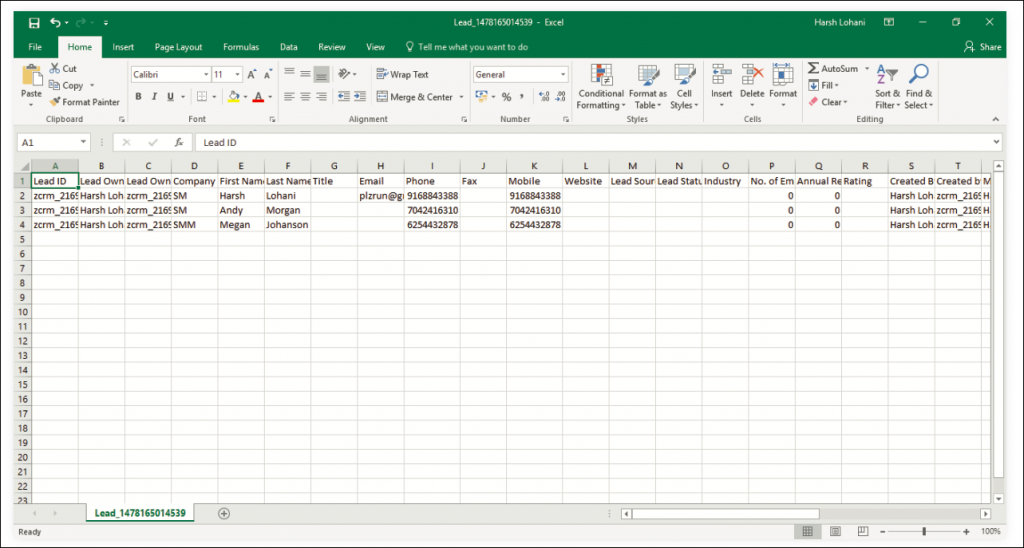
Your CSV has the list of records and is ready to be used for sending out SMS/MMS campaigns. You can examine the CSV file and remove any recipients that you don’t want to receive SMS messages.
Notes: It is not mandatory to export a CSV from Zoho CRM. You can create a CSV file and insert the records to which you want to send SMS messages. The CSV created should have the column names/field names.
Running an Bulk campaign
Now that you have the recipients for your campaign, you are all set to run an Bulk campaign. Follow these steps:
Go to Campaign > Message Campaign and click on the Create Campaign button
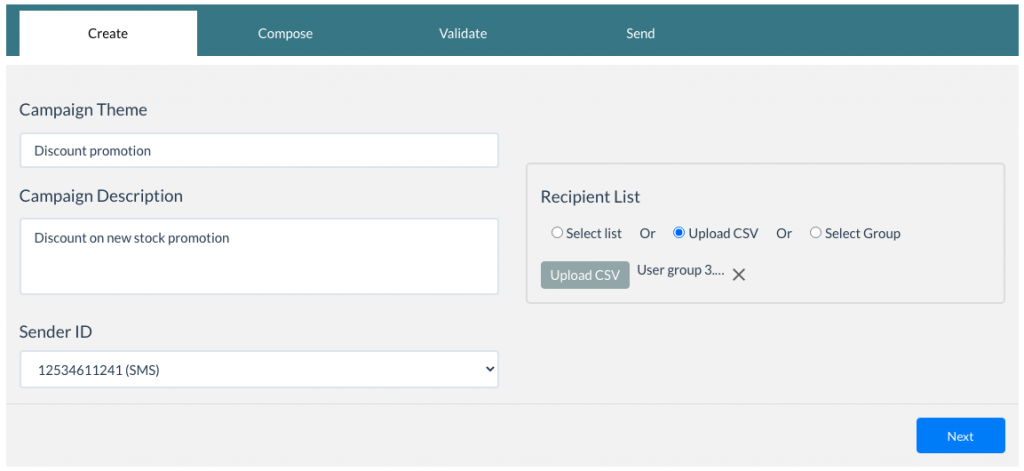
In the Create Campaign section:
Enter both the Campaign Theme/Name and Sender ID, and also choose Recipients for your campaign
Optionally, add a detailed description to your campaign
In the Recipient List, either select the saved list you created earlier, or upload the exported CSV file
If you select an SMS Sender ID, you can send SMS/MMS messages. If you select a WhatsApp Sender ID, you can send pre-created Registered WhatsApp template messages.
Note: As per WhatsApp Business Terms of Service, sending unwanted, non-personal, or bulk messages is a violation of their Terms of Service. Hence we recommend you to avoid sending such messages over WhatsApp.
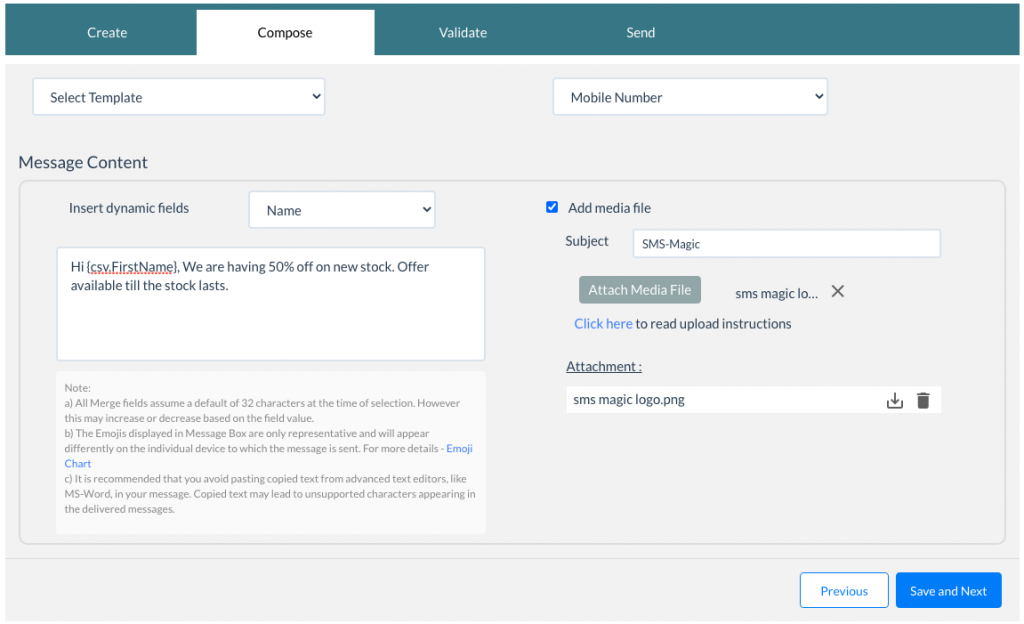
In the Compose section, select a template that you created in the SMS-Magic portal. SMS-Magic currently supports only static templates, which can be used while running a campaign.
Using Insert Dynamic Fields you can choose to insert dynamic fields into your SMS message. The fields displayed in the drop-down will be the columns present in the CSV file.
Note: Replace the parameters in your Registered WhatsApp templates carefully with your CSV dynamic fields.
Since you can have multiple fields for storing phone numbers of your recipients, SMS-Magic provides you the ability to choose the column of your CSV which has the phone number of your recipients—using the Select Phone Field drop-down list.
If MMS is enabled for your organization, you can check the Add media file box and attach a media file to your message, then enter the Subject of the MMS and choose to either upload a media file from your system or enter the web address (Enter URL) of the media file.
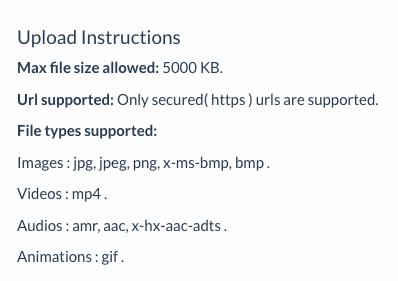
The MMS size, supported file format, and supported file type depends on your network carrier. You can check the details by clicking the link to view the Upload Instructions.
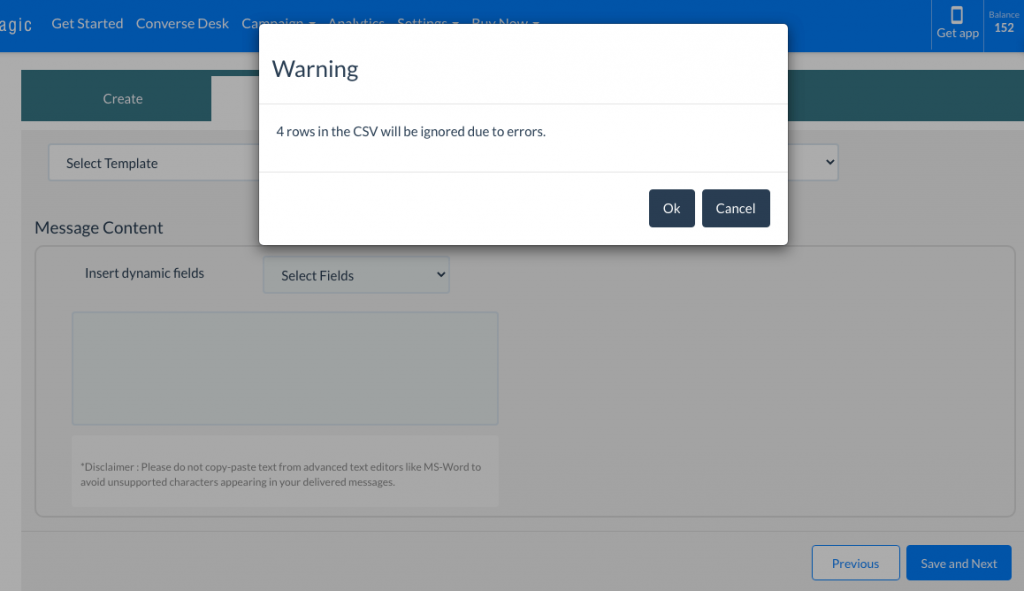
Note: If the rows in your uploaded/selected CSV have errors, you will be shown a warning dialog mentioning the number of rows ignored by us while processing your CSV file.
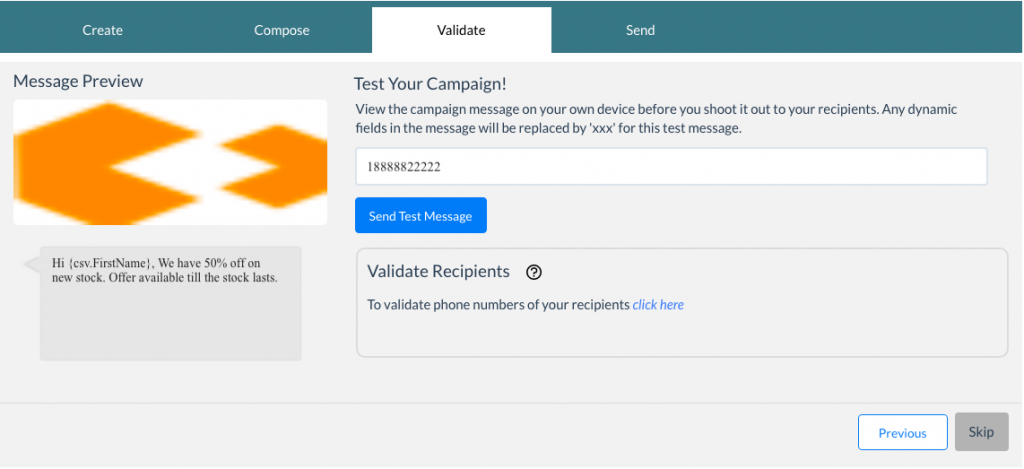
In the Validate section, you can:
See the Message Preview
Send a sample message to yourself before shooting the campaign
Validate the recipient phone number
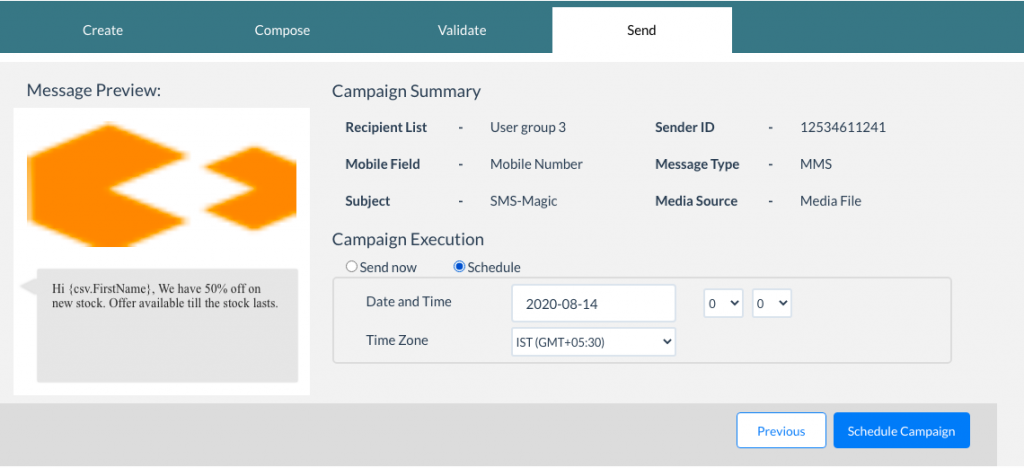
In the Send section, you can:
See the summary of the campaign
Click on the Shoot Campaign button, or schedule campaign now
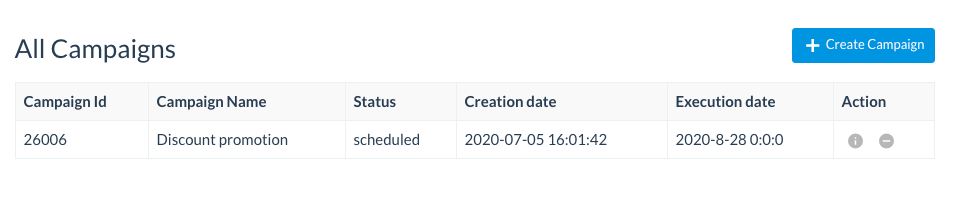
Once the campaign has been sent, the campaign list view page will appear—on which you can see the list of all campaigns
In the Action column, click the small info icon to see the details of a campaign.
You can check the details of the messages that are sent out from campaigns by going to the SMS History Module on your Zoho CRM or by navigating to Campaign > Message History in the SMS-Magic portal.
Notes: The messages sent using campaigns will not be associated with the records of your Module on your Zoho CRM.
Overview
|
Auto SMS functionality support is provided for Zoho events such as request creation, request assignment, and request closure. SMS notifications can be sent to support representatives and any Contact.
Registration with SMS-Magic
After completing the registration form, click on the Register button to register with SMS-Magic. You’ll receive an email containing all your account details–including account ID, user name, and password.
Click this button to go to the registration form page:
If you encounter any difficulty, don’t hesitate to contact us through email at sales@sms-magic.com
Configure SMS notifications
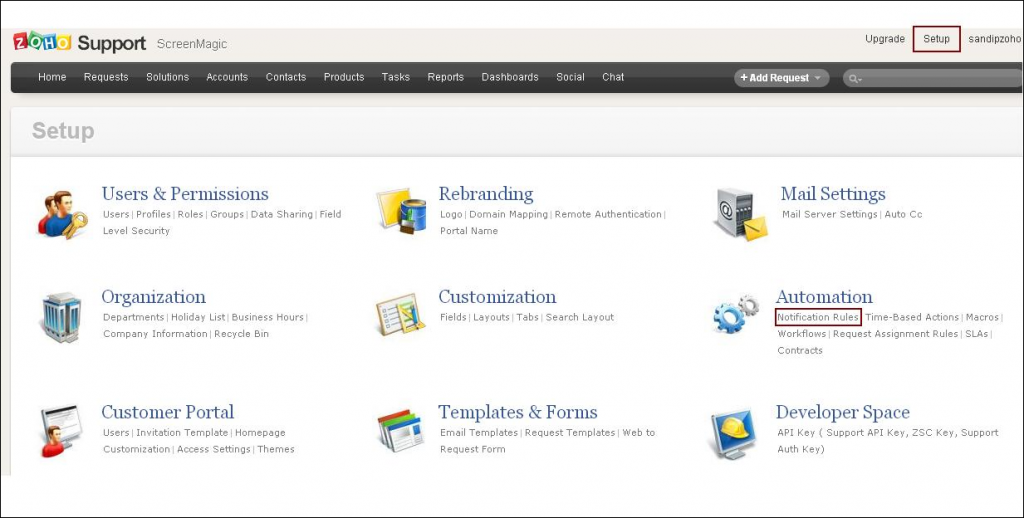
To configure SMS notifications, navigate to Setup > Automation > Notification Rules.
On the Notifications Rules page, set the notification preferences according to your needs. Here, you can also set the SMS template.
Overview
|
SMS-Magic on Zoho Recruit helps you quickly send text messages to Candidates, Contacts, and Interviewers. You can send SMS messages either as a Single or Bulk campaign from Zoho Recruit.
Registration with SMS-Magic
You will need to first choose an appropriate plan from the pricing page. You can either opt for a 15-day trial or purchase immediately. You’ll need to sign up by providing the correct information about you and your company.
Click this button to go to the registration form page:
If you encounter any difficulty, don’t hesitate to contact us through email at sales@sms-magic.com
Configure SMS settings in Zoho Recruit
Configure the SMS add-on to send SMS messages to Candidates, Contacts, or Interviewers (in the Contact list).
Notes:
Only the admin can purchase credits from an SMS Vendor and configure the SMS settings in Zoho Recruit
Only the admin can create SMS templates for candidates, client contacts, and Interviewers
Only the admin can send bulk SMS messages to candidates and client contacts
Both the admin and recruiter can send SMS messages to interviewer, candidates, and client contacts–as either single or bulk
Only the admin can give SMS add-on access to recruiters
Follow these steps to configure SMS settings:
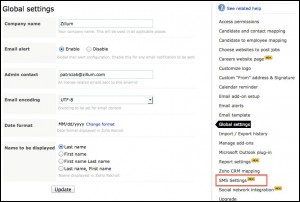
Click on the Settings tab
Click on the SMS Settings in the right pane
Configure SMS Settings as follows:
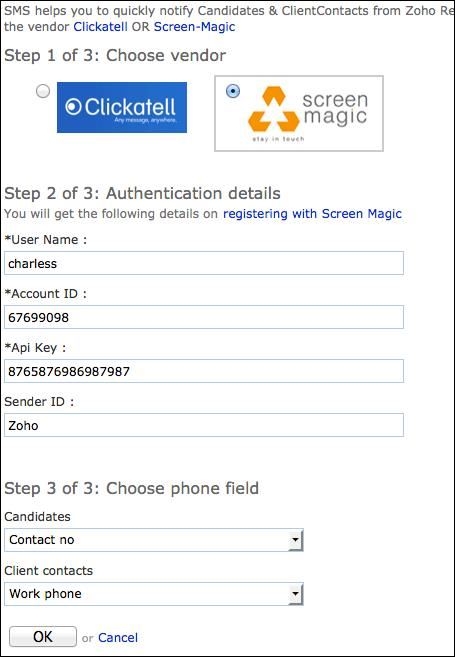
Set the Vendor to Screen Magic
If you have already registered with SMS-Magic, enter the authentication details. If not, then it is first necessary that you register to obtain the authentication details.
Choose the phone fields for both Candidates and Client contacts module and click on the OK button.
Purchase credits for sending SMS messages from SMS-Magic
Overview
|
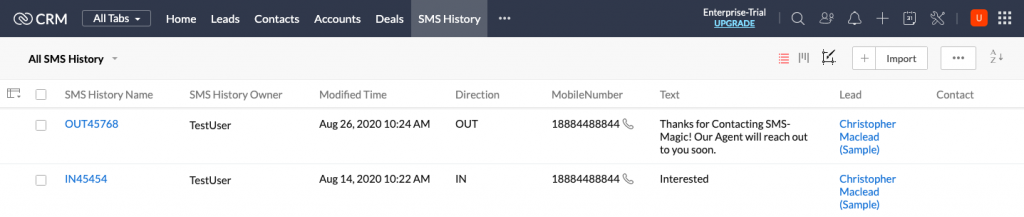
A clean tabular representation for all your messages. Track your incoming and outgoing messages in the SMS History module of SMS-Magic Interact Extension with ease.
In SMS History Module,
Incoming/Outgoing messages can be identified by the entry in the ‘Direction’ column.
If the entry is IN, this message is an incoming message. The SMS History Name for an incoming message will also have IN prefixed before the SMS History Name.
If the entry is OUT, this message is an outgoing message. The SMS History Name for an outgoing message will also have OUT prefixed before the SMS History Name.
SMS/MMS/WhatsApp messages can be identified by the entry in the ‘Type’ column
If the entry is SMS, the message sent/received is an SMS
If the entry is MMS, the message sent/received is an MMS
If the entry is WhatsApp, the message sent/received is a WhatsApp message.
Media attachments can be seen in the Attachments section of the SMS History record. Click on the SMS History record with type MMS/WhatsApp, scroll down to Attachments section, to view the attached media file.
Track the Sent Status and Delivery Status of your Outgoing messages
Module Lookup on SMS History
Incoming and Outgoing messages in SMS History get associated with a relevant Lead/Contact record for which the mobile number of the recipient matches.
Notes: If multiple Lead or Contact records have the same Mobile Number, there can be discrepancies in the association of Lead/Contact.
To associate SMS History records with a relevant Custom Module record, you can configure Custom Module Lookup on SMS History. Follow the steps below to configure Lookup for your required Custom Modules –
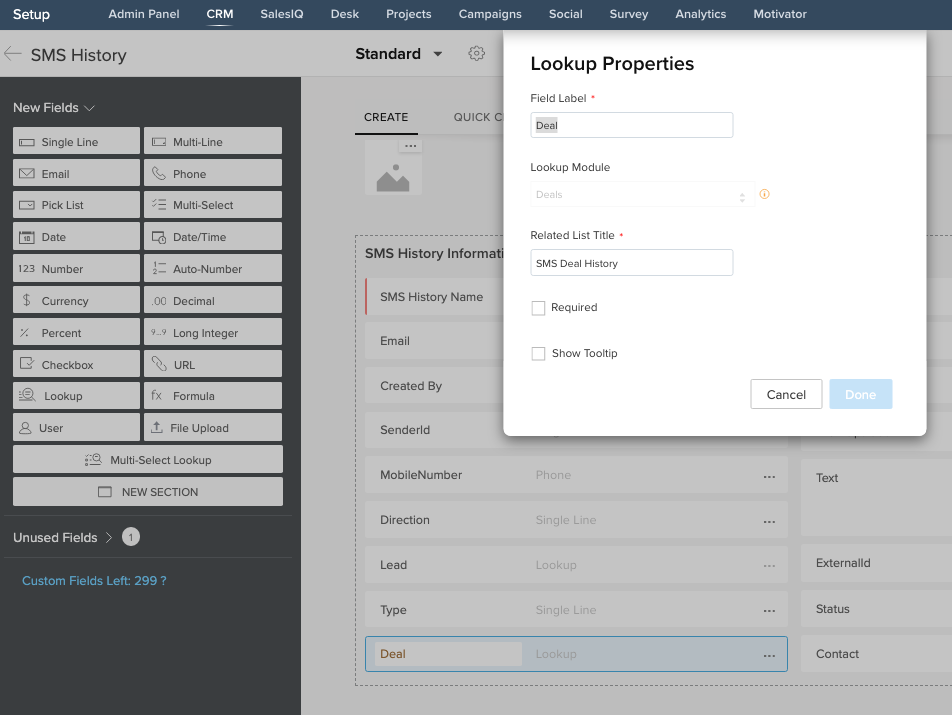
Create Lookup Field in SMS History Module layout
Create a Lookup field in SMS History for the custom module you wish to associate relevant SMS History records with. For the Deals module, we will create a lookup field – “Deal” in the standard layout of the SMS History module.
Click on Setup > Customization > Modules and Fields
Click on SMS History
On Layouts tab, click on Standard
Drag and Drop LookUp from the Left Panel to the SMS History Information Layout
Enter Field Label as ‘Deal’
Select Lookup Module as ‘Deals’ from dropdown
Enter ‘SMS Deal History’ as the Related List Title
Click on the Done button
Notes: Make sure the API name for the lookup field is the same as lookup field name. To check the API Name of the lookup field, Click on Setup > Developer Space > APIs > API Names tab > SMS History.
Create Workflow that will perform the Lookup for the Custom Module.
Follow the below steps to create a Workflow Automation –
Click on Setup > Automation > Workflow Rules
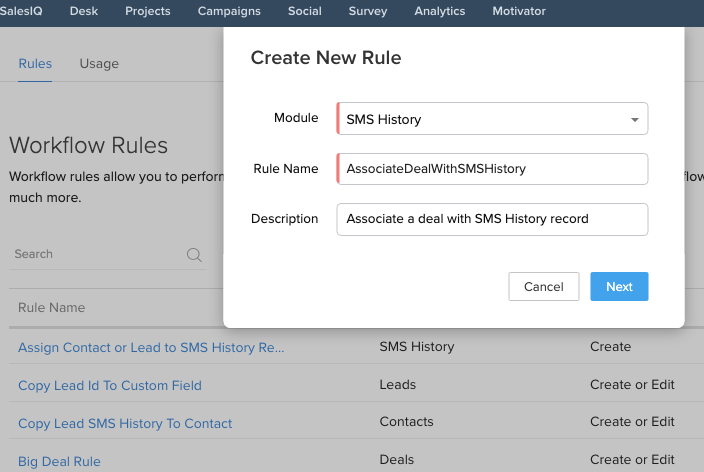
Click on + Create Rule
Select the Module SMS History.
Enter a Rule Name and Description for the Custom Module for which you are creating the Lookup Workflow
Click on the Next button
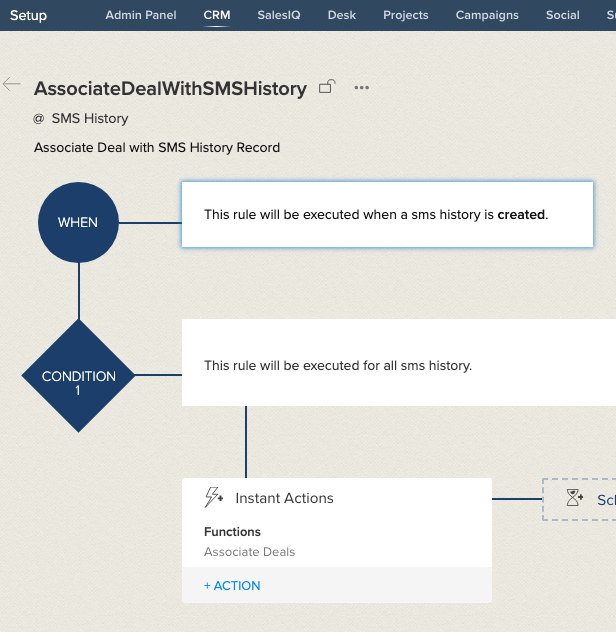
Create a Workflow rule as shown in screenshot below –
WHEN – On a Record Action > Select Create
CONDITION – All SMS History
ACTION – Function > Write your own
Continue Creating a function with the steps below –
Enter Function Name – AssociateDeals i.e Associate<Custom_Module_Name>
Enter Display Name – Associate Deals i.e Associate <Custom_Module_Name>
Enter a Description(optional)
Click on the Next button
Copy and paste the below code in the Text Area
MODULE_TO_BE_UPDATED = “smsmagic4__SMS_History”; LOOKUP_MODULE = “Deals”; LOOKUP_FIELD = “Deal”; PHONE_FIELD = “Mobile”; phone_list = {mobile_number,mobile_number.subString(1),mobile_number.subString(2),mobile_number.subString(3), mobile_number.subString(4)}; record_id = “”; is_record_found = False; for each mobile in phone_list { response = zoho.crm.searchRecords(LOOKUP_MODULE,”(“+PHONE_FIELD+”:equals:”+mobile + “)”); for each deal in response { record_id = deal.get(“id”); info “Found deal with id: ” + record_id; is_record_found = True; break; } if(is_record_found) { break; } }
if(is_record_found) { info “Updating module: ” + MODULE_TO_BE_UPDATED + ” record with id: ” + target_id; info “Updating lookup field: ” + LOOKUP_FIELD + ” with id: ” + record_id; params = Map(); params.put(LOOKUP_FIELD,record_id.toLong()); response= zoho.crm.updateRecord(MODULE_TO_BE_UPDATED,target_id.toLong(),params); if(“Error”.equalsIgnoreCase(response.get(“status”))) { info “Failed to update record: ” + response.get(“message”); } else { info “Hurray! record updated successfully.”; } }
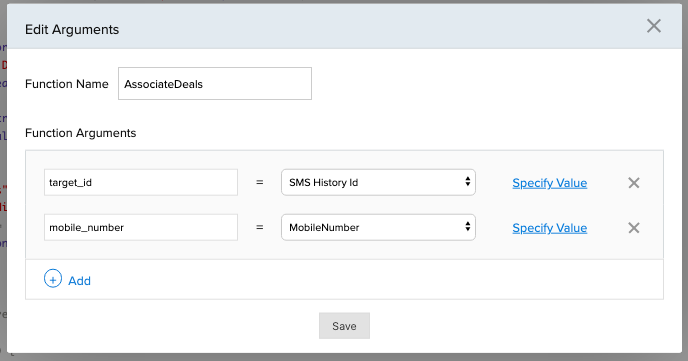
Click on Edit Arguments above the text area
Add the Function Arguments as seen in screenshot below –
Click on the Save button
Click on the Save button on the Function Editor
Click on the Save button to save the Workflow. The Workflow will be active by default.
For the Outgoing and Incoming messages, from/to this custom module, the Lookup workflow will associate a relevant Module record to the SMS History record.
Notes:
Mobile number is SMS History record should exactly match with mobile field value in Custom Module (e.g., Deal).
Although this code takes care of country code, yet Mobile numbers in custom modules should not be formatted.
Overview
|
You can either send a message to a single record from your Leads or Contacts, or you can select multiple records of Leads or Contacts and send a text message to all those recipients at once. Using this method, you can send messages to a maximum of 100 records.
You can select up to 100 recipients to send the SMS on Zoho. Also, to send messages to more than 100 recipients, you can use Custom List Views in your module, and send to maximum of 50K recipients for Enterprise edition Zoho CRM.
If you have configured the Send SMS button on custom modules, you can follow the same steps to send single or more messages.
Follow these steps:
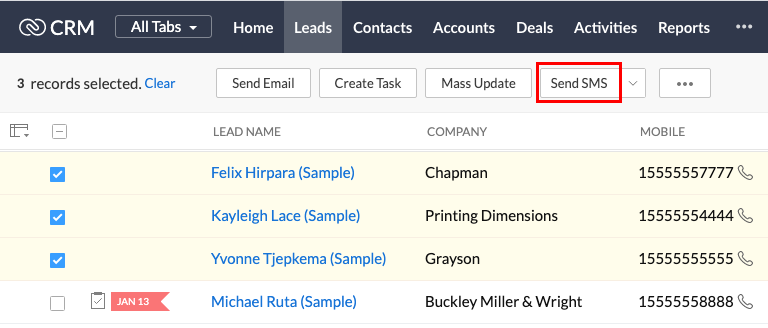
Go to the Module from which you want to send messages
Select one or more records
Click on the Send SMS button. The SMS-Magic Portal Send SMS page appears. You will be directly logged in to SMS-Magic via Single Sign On.
Note:
Notes:
If you are unable to view the Send SMS button you need to configure it for your login view. Refer to the topic on Send SMS button for more details on configuring the button.
Login to SMS-Magic Portal once, to enable Single Sign On for the subsequent access to Portal.
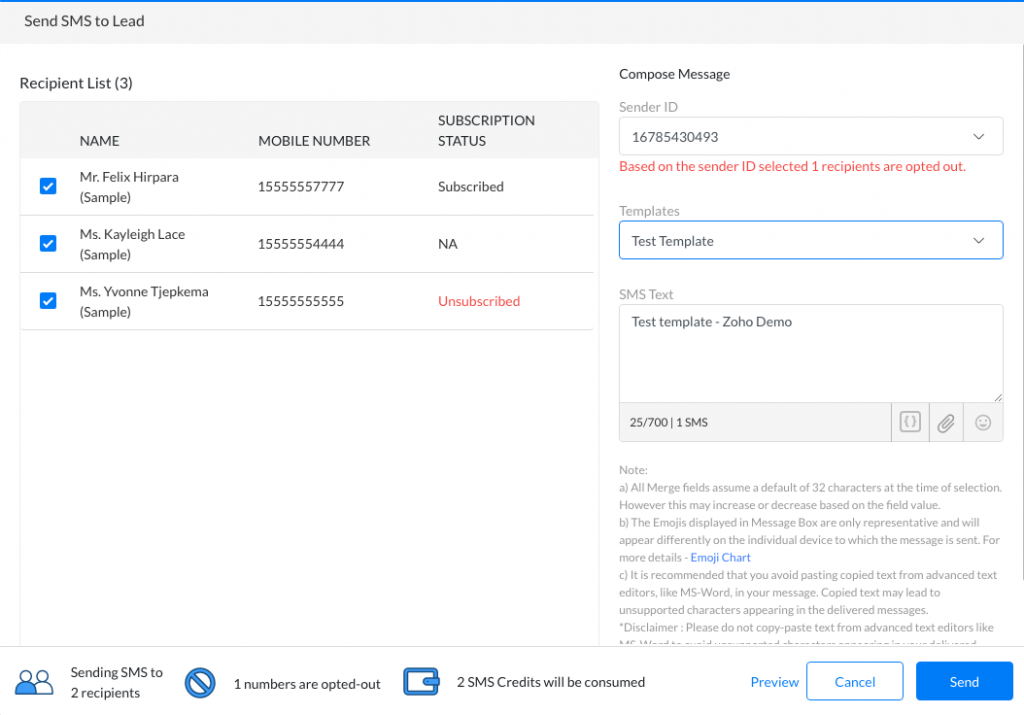
You can review the recipient list and select/de-select the required number of recipients to whom you want to send the message
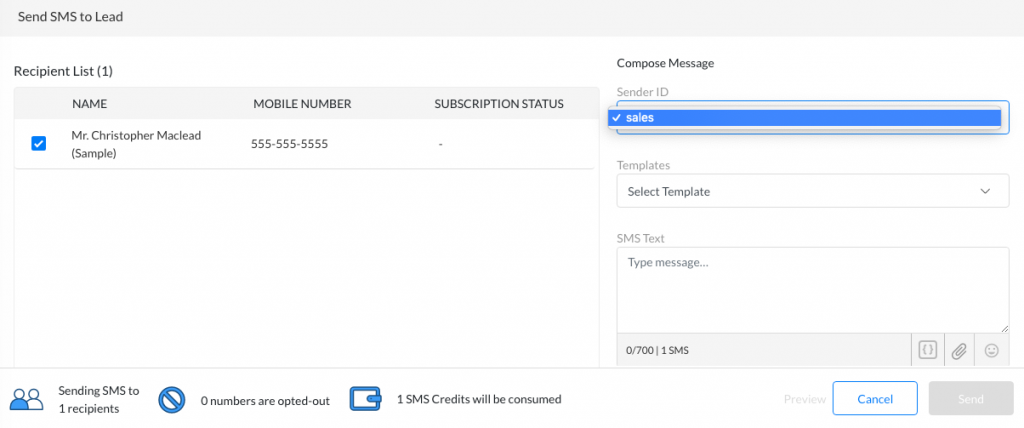
On the right, select the desired Sender ID. If you select an SMS Sender ID, the Templates dropdown will include your pre-created SMS/MMS templates. If you select a WhatsApp Sender ID, the Templates dropdown will include your pre-created Registered WhatsApp Templates.
If you are sending an SMS/MMS and did not select a template, type the message in the text area provided. You can add merge fields, emoticons, and supported media files.
If you want to send WhatsApp messages, you can only choose a Registered WhatsApp template.
Note: As per WhatsApp Business Terms of Service, sending unwanted, non-personal, or bulk messages is a violation of their Terms of Service. Hence we recommend you to avoid sending such messages over WhatsApp.
Review the number of SMS credits that will be consumed on the bottom of the screen.
For 20 recipients or less, you will be able to quickly send the message by clicking on the Send button.
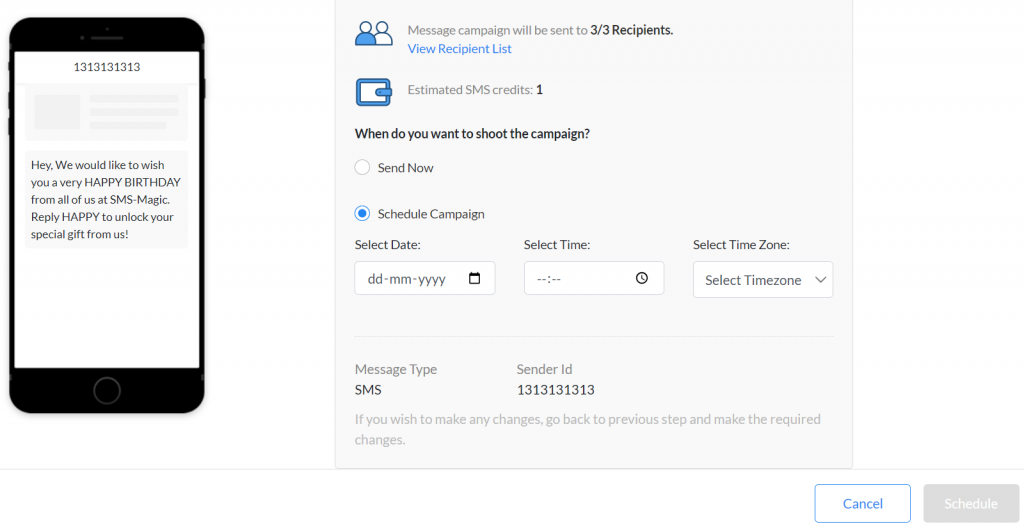
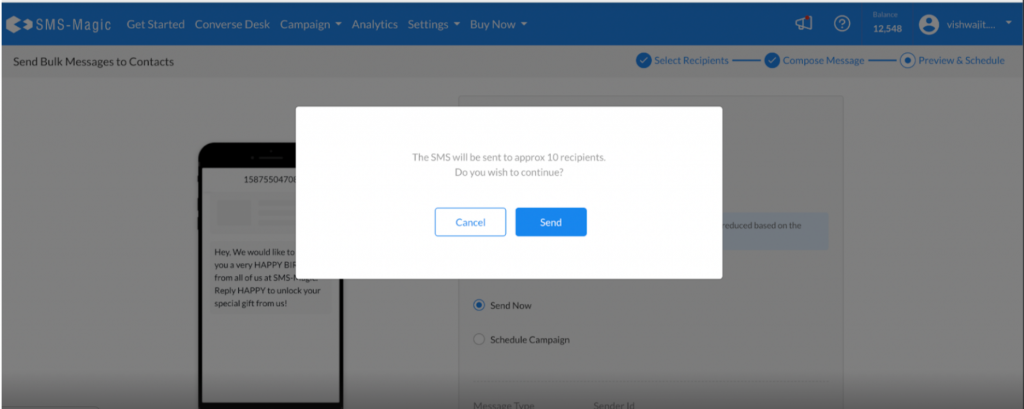
For more than 20 recipients, click on the Next button. The message preview appears displaying a preview of the message text, the number of recipients, to whom the SMS is being sent, and the corresponding number of credits being deducted.
Here, you can see the number of recipients selected, estimated SMS credits that will be consumed, message type, and Sender ID.
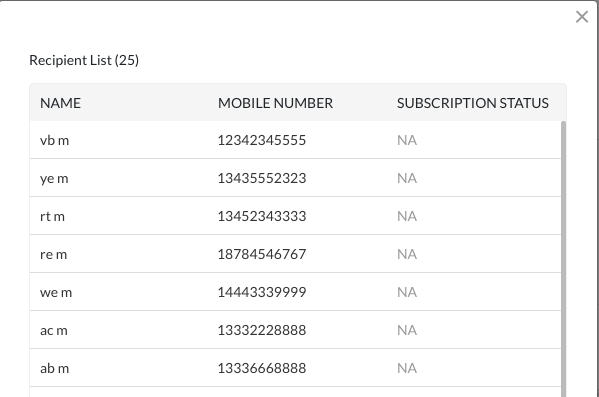
Click on the View Recipient List button. The recipient preview list appears. This is only a view list and details cannot be edited.
Close the preview list
On the Preview & Send page, click Send. The confirmation message appears.
Click Send to send the message immediately
You can also schedule the campaign for a later date and time. If you want to schedule it for later, select the date, time, and time zone.
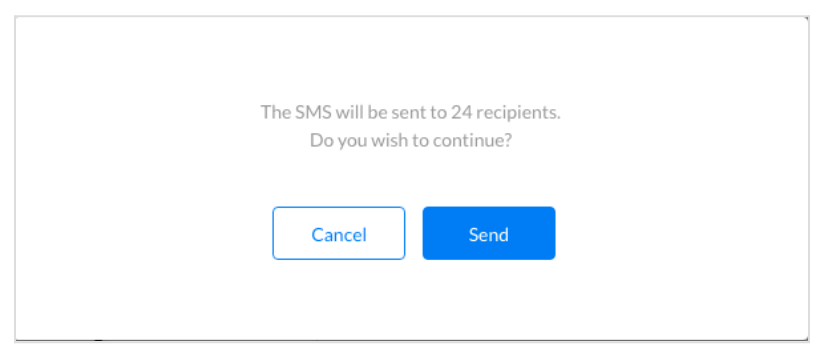
Click Schedule to schedule your message campaign, and the following message will appear:
Click Send to continue
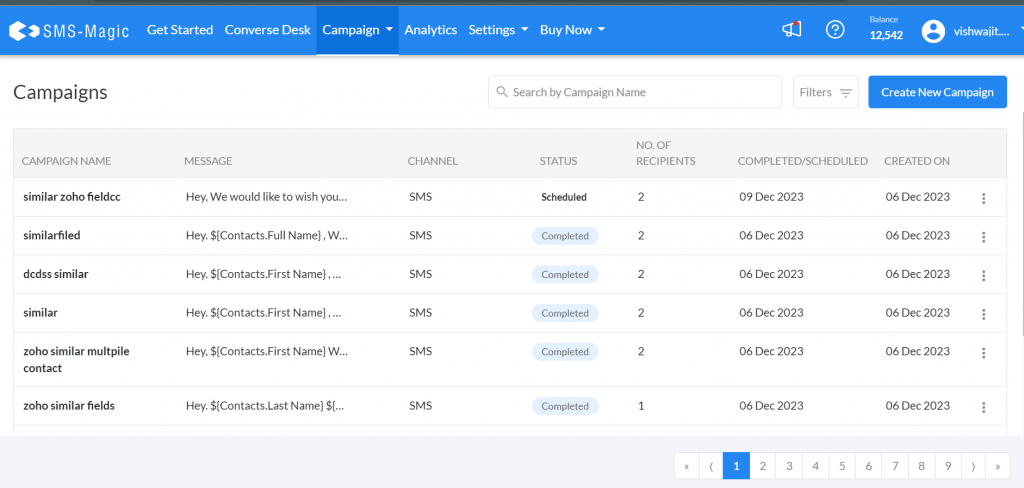
The user will be redirected to the Campaigns page:
The above screenshot shows a list of scheduled campaigns and completed campaigns with details such as campaign name, message, channel on which the campaign will be run, number of recipients, and campaign scheduled date
If you have insufficient credits an error appears to inform you of the need to top up your credits.
Click on the Buy Now button to buy additional credits and resend the message.
Sender ID
|
Sender ID is the name or mobile number which appears on the mobile phone of a recipient when they receive an SMS message. SMS-Magic provides you the option to configure the Sender ID for your organization.
Follow these steps to create a Sender ID:
Admin User can view all the incoming numbers and Sender IDs by navigating to SMS-Services > My Sender IDs on the SMS-Magic Portal.
Notes: You will be required to provision incoming number or Sender IDs by contacting us at care@sms-magic.com.
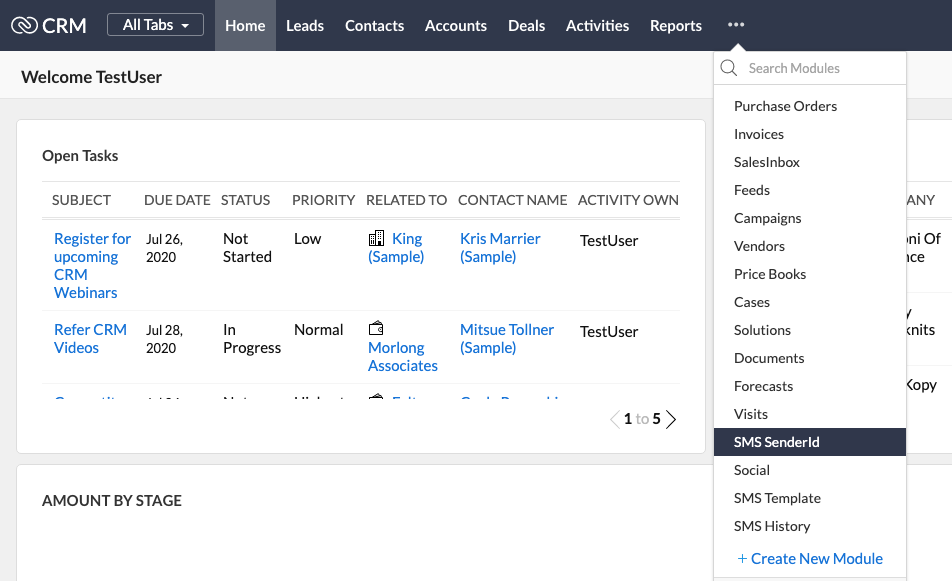
From the top menu in Zoho CRM, go to the SMS SenderID module
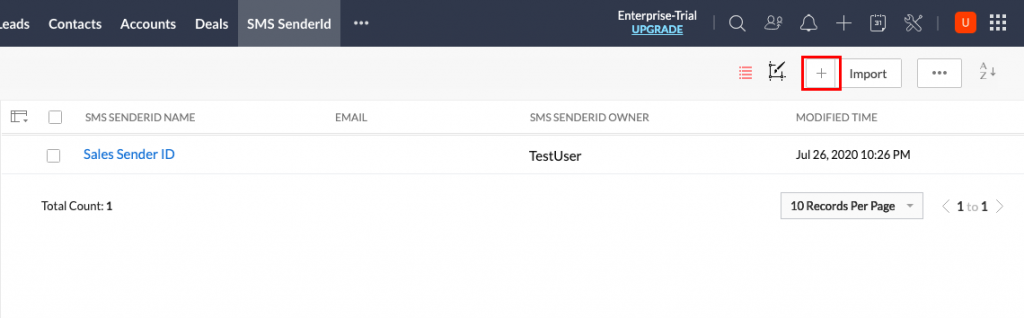
Click on the Create Sender ID button or + icon to create a new Sender ID.
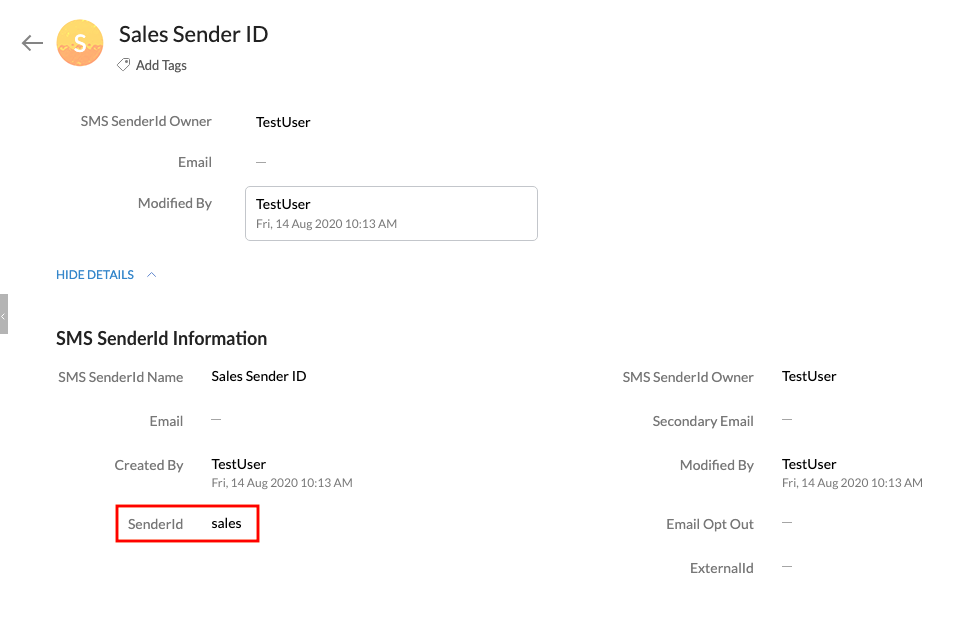
Enter the SMS Sender ID Name for your reference and the Sender ID you want to use.
Notes: By default, a Sender ID is assigned to the current user and will be visible to the owner of the Sender ID. You can share the Sender ID record by setting sharing rules for a particular group or profile. See Data Sharing Rules to learn more about sharing records.
Your Sender ID is now ready for use. Simply choose this Sender ID when composing a message.
You should be able to view the Sender ID when sending an SMS message to Leads/Contacts or any other custom modules
Notes: There are some restrictions on Sender IDs in different countries. See Introduction > SMS Best Practices for using SMS messages to learn more.
Message Template
|
SMS-Magic allows you to create SMS, MMS, and WhatsApp templates that can be used while sending Bulk, Single, or Automated message.
In templates, you can use variables that represent the object—such as name or address. These variables are also called merge fields or dynamic fields. While sending SMS messages, these variables would be auto-populated to their values. This provides you with a personalized touch when you connect with your Leads and Contacts in Zoho. You can personalize messages for custom modules in Zoho CRM.
Follow these steps to create an Message template:
Open one of the below URLs based on the data center where you created your SMS-Magic account during Sign Up.
Login using Zoho CRM. Select the relevant Zoho Data Center from the dropdown
Go to Campaign > Message Templates from the top Navigation Bar
Click on the Create New button. You get 4 sections on this page
Basic Information
Used for Channels
Compose Message
Channel Specific Info
Overview
|
About SMS-Magic
SMS-Magic is a proven, global messaging platform with over 2,500 clients across 59 carriers. SMS-Magic enables Zoho CRM users to engage buyers and win and retain more new customer revenue while creating strong customer relationships that drive sustainable, competitive advantage. SMS-Magic is a popular messaging application on Zoho Marketplace.
Overview
The SMS-Magic Extension for Zoho CRM enables you to converse with prospects and customers easily. It gives you the ability to send and receive SMS messages from Zoho CRM. You can also automate messages using Webhooks, create SMS Templates with Dynamic fields, Manage Sender IDs, and view Delivery Reports for your messages.
With this User Guide, you can get the maximum from your SMS-Magic extension for Zoho CRM. You’ll find detailed steps and images to help you learn each feature.
For information on how to Install and Configure SMS-Magic on Zoho, read our Installation Guide. You can also contact sales@sms-magic.com for more details and assistance.