
Conversations
Here is the step-by-step video for setting up Conversations in Converse Settings
In the Conversations section, you can define the conversation settings for users and user profiles in the organization. You can configure the following in Conversations:
Converse Desk Layouts – Under the Converse Desk Layouts tab, you can help users configure the following:
- Conversation Filters and Global Filters for specific users and profiles.
- The color theme for the Converse Desk.
- Conversation Topic Layout.
Message Settings – Under the Message Settings tab you can define the following:
- The color theme for displaying Automated messages.
- Information to be displayed under every Incoming and Outgoing message bubble.
- Information to be displayed under the information lookup fields.
General Settings – Under the General Settings tab, you can disable or enable user privileges for the following features:
- Send Canned Responses
- Define Character Limit for Messages
- Internal Note
- CRM Actions
- Related Conversation Setting
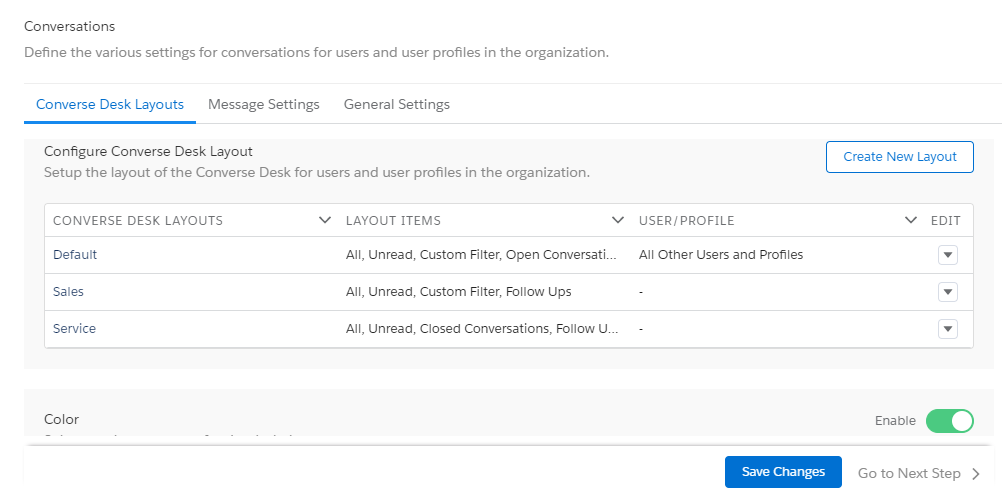
Configure Converse Desk Layout
Under the Converse Desk Layouts tab, you can create multiple layouts for the Converse Desk. For each layout you can:
- Select the filters under the static Conversation Filters.
- Select the filters under the dynamic Global Filters.
- Assign the users and user profiles to the layout.
The static Conversation Filters are pre-defined. The All and Unread filters are the default filters and cannot be removed from the selection list of filters.
The dynamic Global Filters are dependent on what message objects are selected under Message Configuration.
To Create a New Layout:
1. Login to Salesforce and access SMS-Magic Converse.
2. In the Converse Settings tab, click Conversations. The Conversation page appears.
3. Under Configure Converse Desk Layout section, click Create New Layout. The Create New Layout popup window appears.
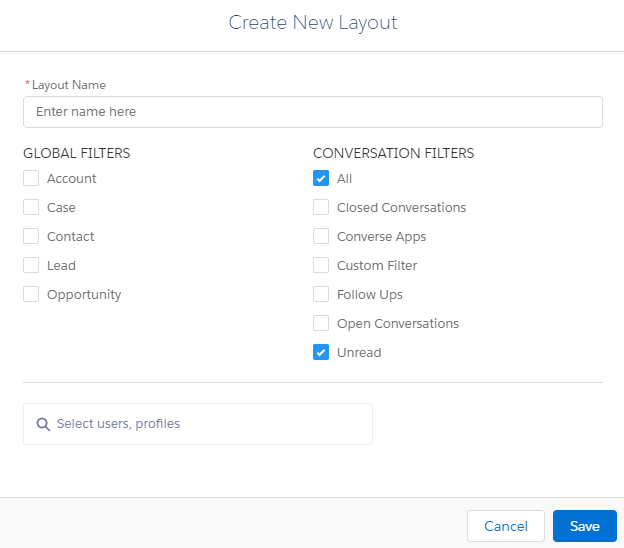
4. Type the name of the Layout.
5. Under Global Filters, select the objects for which you want to view the messages.
6. Under Conversation Filters, select the relevant filters to view messages.
7. Select the user or profile names for whom the layout will be available in the Select Users, profile field.
8. Click Save. The new layout is found in the Configure Converse Desk Layout list.
9. Click Save Changes at the bottom of the Converse Desk Layouts tab page.
To Select the Desk Theme:
1. the Converse Desk Layouts section, slide the toggle button to enable the Color feature. The Color section appears as shown.
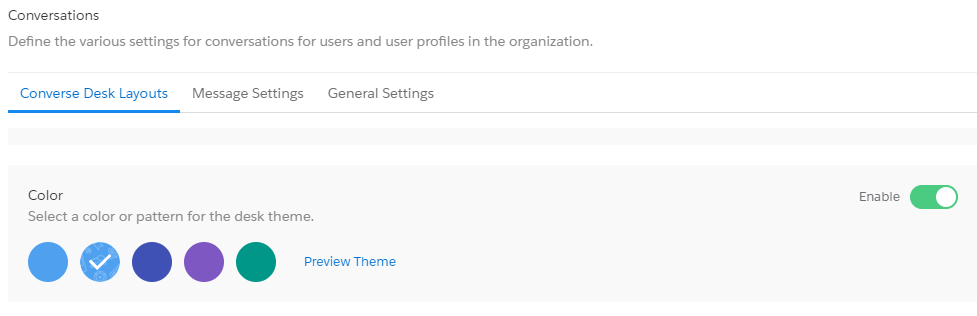
2. Select a color or pattern for the desk theme.
3. Click Preview Theme. A separate popup window displays a preview of the Converse Desk.
4. Click Save Changes at the bottom of the Converse Desk Layouts tab page.
To Customize the Conversation Topic View:
1. In the Converse Desk Layouts section, go to Conversation Topic.
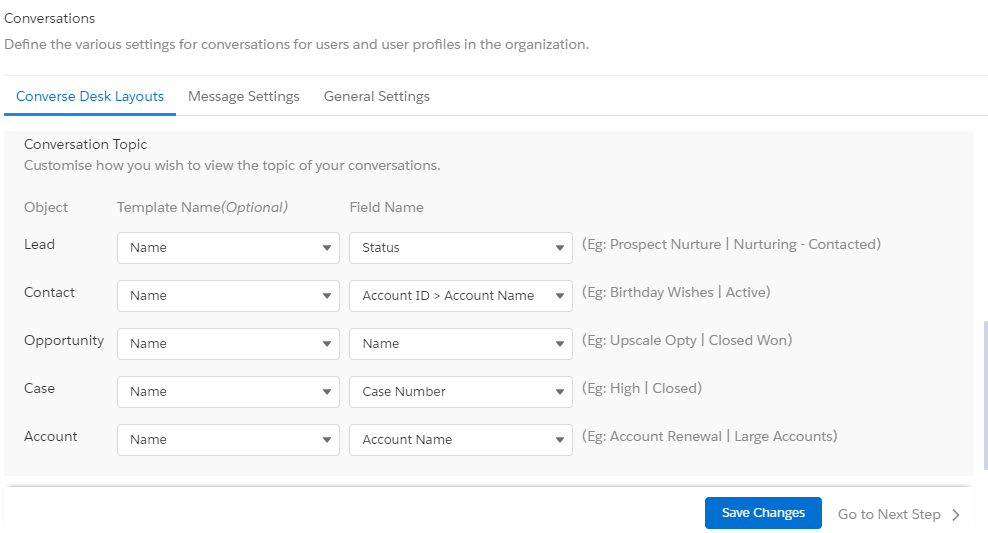
2. Select the relevant template from the Template Name list.
3. Select the relevant name for the field from the Field Name list.
4. Click Save Changes at the bottom of the Converse Desk Layouts tab page.
Configure Message Settings
In the Message Settings tab, you can configure the following:
- The color theme for displaying automated messages
- The information that appears below every Incoming and Outgoing message bubble
- The information that appears below the information lookup fields
To Configure Color for the Automated Message:
1. In the Message Settings tab, browse Display Automated Message.
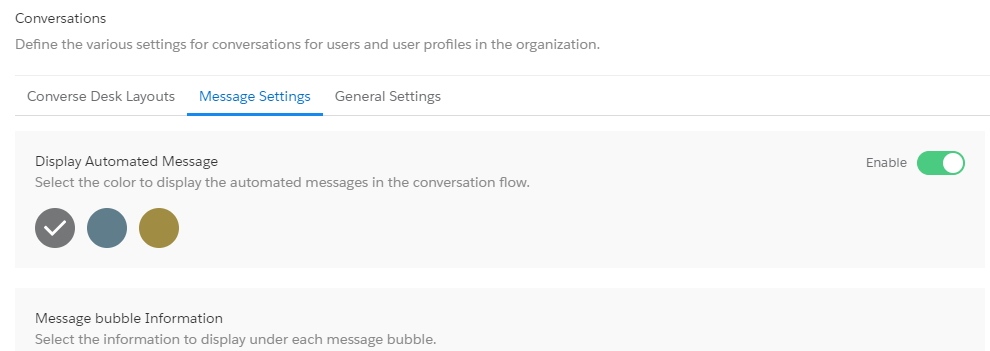
2. In Display Automated Message, slide the toggle button to enable the feature.
3. Select a color.
4. Click Save Changes at the bottom of the Message Settings tab page.
To Define Message Bubble Information:
1. In the Message Settings tab, browse Message Bubble Information.
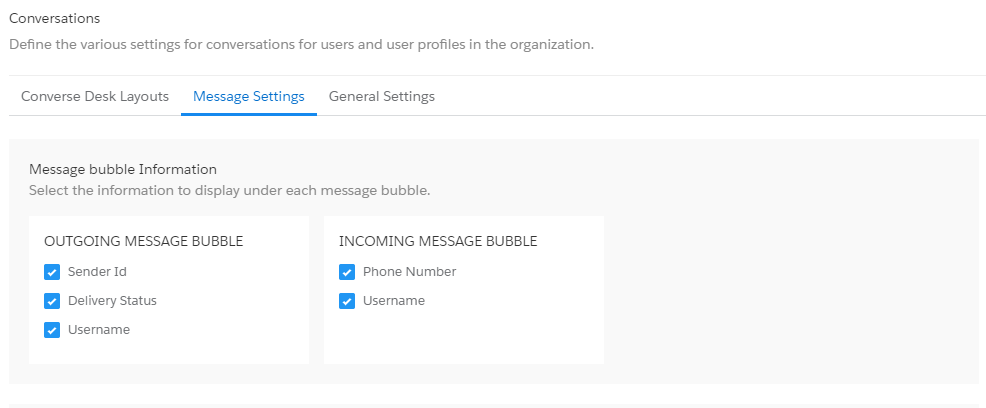
2. In Message Bubble Information select the relevant checkboxes to define the information to be displayed under each message bubble.
3. Click Save Changes at the bottom of the Message Settings tab page.
To Define Lookup Field Information:
1. In the Message Settings tab, browse Lookup Fields Display and Configuration.
2. In Lookup Fields Display and Configuration, slide the toggle button to enable the feature. The information to be displayed under Lookup fields appear.
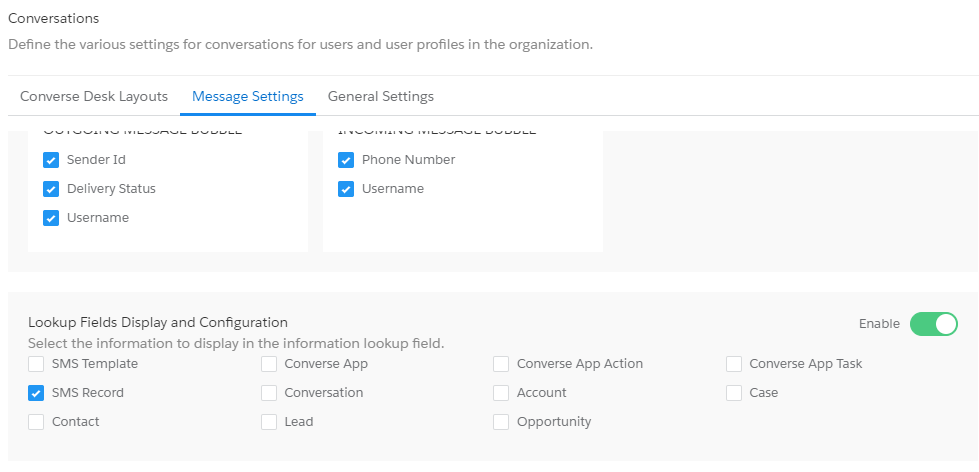
3. Select the appropriate information to be displayed in the information lookup field.
4. Click Save Changes at the bottom of the Message Settings tab page.
Configure General Settings
In the General Settings tab, you can disable or enable user privileges for the following features:
- Send Canned Responses
- Define Character Limit for Messages
- Internal Note
- Configure CRM Actions
- Configure Related Conversation
To Enable Usage of Canned Responses:
1. In the General Settings tab, browse Reply Using Canned Responses (Templates Only).
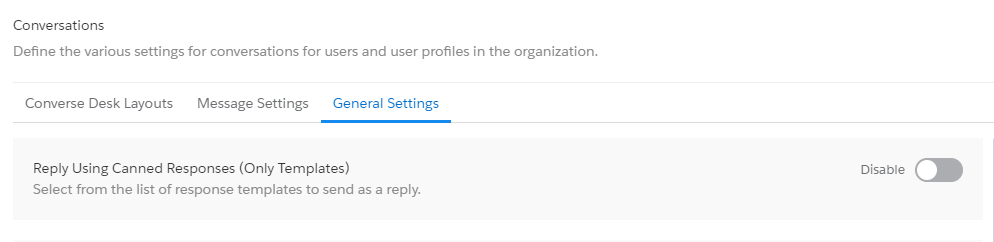
2. In Reply Using Canned Responses (Templates Only), slide the toggle button to enable the feature.
3. Click Create New. The Reply Using Canned Responses (Create New) popup window appears.
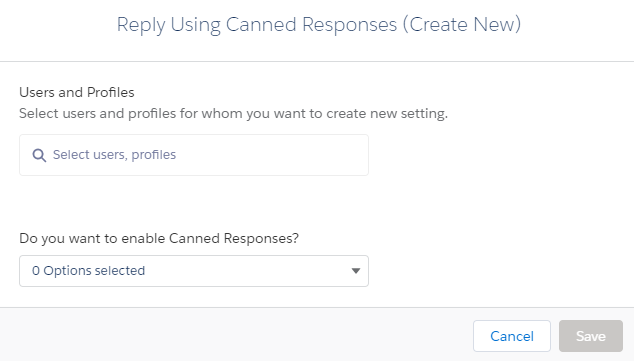
4. In Users and Profiles, type any three letters of the User name or profile and select the relevant name from the list that appears.
5. In Do you want to enable Canned Responses? Select Yes if you want to enable this feature for the selected user or No if you want to disable this feature for the selected user profile.
6. Click Save.
To Define the Message Character Limit:
1. In the General Settings tab, browse the Character Limit of a Message.
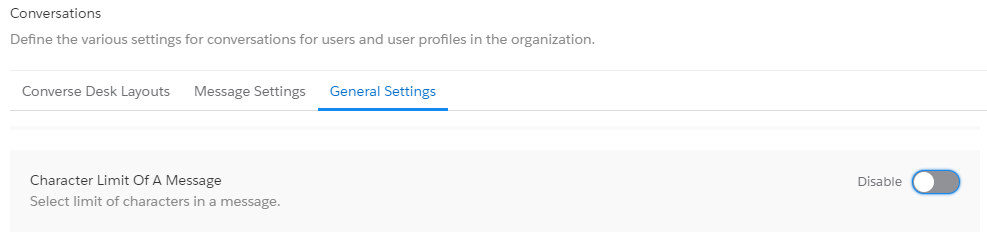
2. In the Character Limit of a Message section, slide the toggle button to enable the feature.
3. Click Create New. The Character Limit of a Message (Create New) popup window appears.
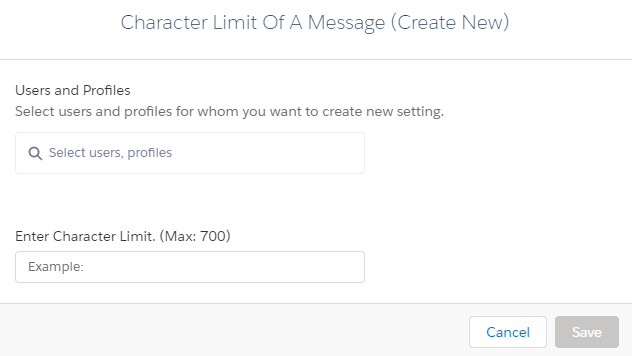
4. In Users and Profiles, type any three letters of the User name or profile and select the relevant name from the list that appears.
5. In Enter Character Limit type the maximum number of characters each message sent by the selected user profiles can contain.
6. Click Save.
If you want to edit or delete the character limit, then in Action, click the Down icon and then click Edit or Delete to make the required changes.
To Enable Internal Note:
1. In the General Settings tab, browse Internal Note.
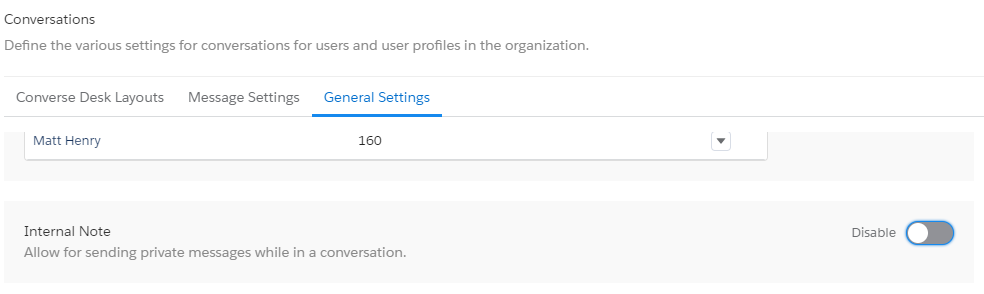
2. In the Internal Note section, slide the toggle button to enable the feature.
3. Click Create New. The Internal Note (Create New) popup window appears.
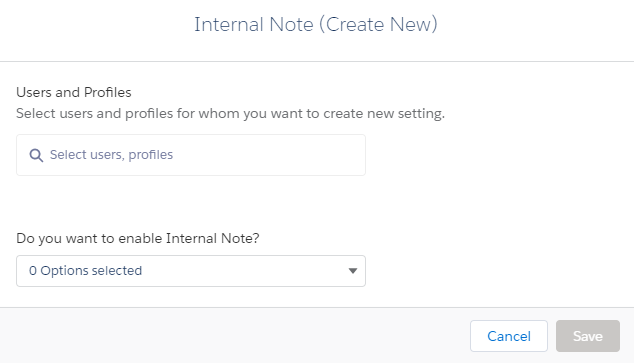
4. In Users and Profiles, type any three letters of the User name or profile and select the relevant name from the list that appears.
5. In Do you want to enable Internal Note? Select Yes if you want to enable this feature for the selected user profile or No if you want to disable this feature for the selected user profile.
6. Click Save.
If you want to edit or delete the internal note, then in Action, click the Down icon and then click Edit or Delete to make the required changes.
To Configure CRM Actions:
1. In the General Settings tab, browse Configure CRM Action.
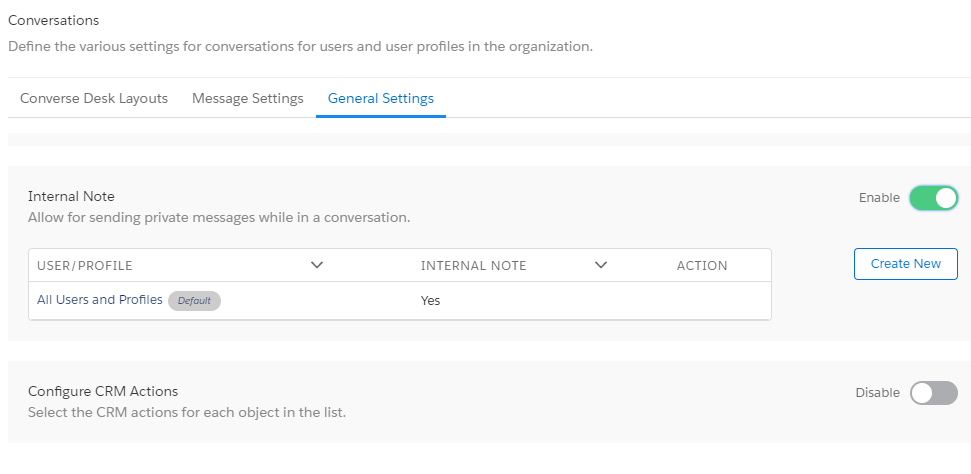
2. In Configure CRM Action section, slide the toggle button to enable the feature. The feature is disabled by default. If you enable it once, then it will remain enabled for subsequent logins. In the disabled state, none of the fields shown in the screen above will be visible.
3. Identify the object for which you want to add CRM actions.
4. In Action, click the Down icon and then, click Edit.
5. In the Configure CRM Actions for <Object Name> popup window, select or clear the relevant CRM actions checkbox for the object.
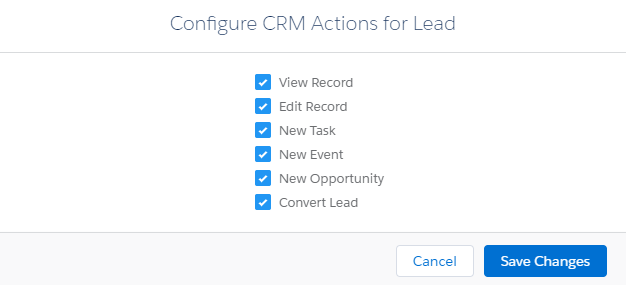
6. Click Save Changes. The General Settings tab page appears displaying the CRM action configurations for the selected Object.
Outgoing/ Incoming Messages to have a lookup related objects:

Related Objects Settings for Conversations:
Click on ‘Create New’ the following Page will appear:

- Choose the appropriate option from the ‘Select Configured (Child) Object’.
- Choose the appropriate option from the ‘Select Related (Parent) Object’.
- Choose the appropriate option from the ‘Select Field for Generating Lookup’.
- Click on the ‘Save’ button the New Related Object Setting for Conversation will be created
- Click on the ‘Cancel’ button to make changes to the New Related Object Setting for Conversation
Create New Related Object Setting for Message
- Click on ‘Create New’ the following Page will appear:
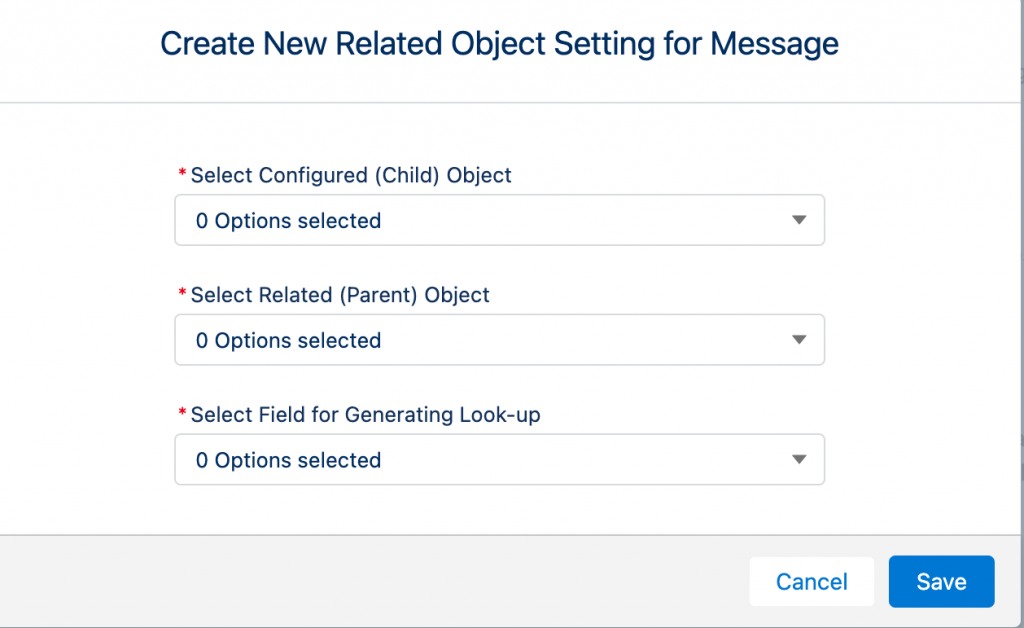
- Choose the appropriate option from the ‘Select Configured (Child) Object’.
- Choose the appropriate option from the ‘Select Related (Parent) Object’.
- Choose the appropriate option from the ‘Select Field for Generating Lookup’.
- Click on the ‘Save’ button the New Related Object Setting for Message will be created
- Click on the ‘Cancel’ button to make changes to the New Related Object Setting for the Message
Multi-Media Settings
Users exchange documents and files with a record (e.g. insurance application docs on contact object) by attaching them with respective records. SMS-Magic Converse application has been using SMS-Magic storage to store the media files. Many times, the documents were lost in the conversations, as they did not get attached to the record.
Also, irrespective of what is configured at the account level, in terms of file size support, from Salesforce, we have been supporting only 2.5 MB as the max size. This was considered to be a known limitation of the SMS-Magic Salesforce application.
Hence in order to enable sharing of higher size media files and to consider the data privacy issue, we brought in the media file exchange via Salesforce storage. So now, by enabling Salesforce storage, you need not worry about the media files being lost, you can send higher size media files, and also associate files with a record.
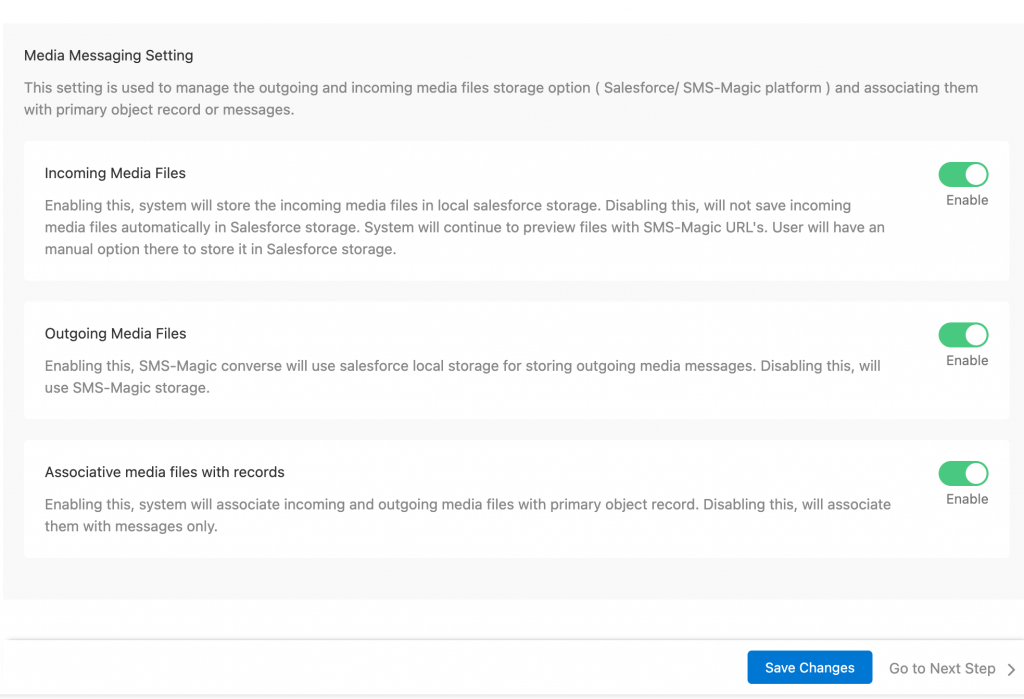
- Incoming Media Messages: If this option is enabled, moving forward when an incoming message is received, it will be received and sent to the Salesforce storage. Once the messages are stored in the Salesforce Storage they will be auto-deleted from the SMS-Magic Platform. By enabling this option, the system will store all incoming media files in local Salesforce storage. The system will continue to store the outgoing media files in SMS-Magic storage.
2. Outgoing Media Messages: If this option is enabled, the messages which used to be stored in SMS-Magic platform, will now be stored in the local storage of Salesforce. By enabling this option, SMS-Magic converse will use Salesforce local storage to store all outgoing media files. However, the system will continue to store the incoming media files in SMS-Magic storage.
3. Association Media Files with Records: If this option is enabled, the system will associate all incoming and outgoing media files with the primary object record. For this, either of the two options namely, ‘Incoming Media Files’ and ‘Outgoing Media Files’ should be enabled.

As you can see here in the conversation window, you will find the option ‘Save this file to Salesforce Storage’. The following page will appear before saving the file:


Once you click on the ‘Save as File’ button, the file gets saved and the following page will appear:

The media files will be saved in Salesforce storage.
To Associate Media Files With Records
Now by enabling Salesforce storage, it is simple for users to associate media files with records. Follow the steps below:

Here, there is a particular contact that has been selected to associate media files with records

Choose the appropriate Sender ID from the drop-down list

Once the appropriate Sender ID is selected from the drop-down list you can see that this Sender ID is SMS enabled
Enter the message text in the ‘Message Text’ field

Choose the appropriate file that you want to upload


Here, you can see that the file is getting attached. Once the file is attached, click on the ‘Send’ button and the following message will appear:


Here, under ‘SMS History’ you can see that the new MMS has been associated. As the Associate Media Files with Records was enabled under General settings it gave us the option to attach the File.
To Disable Outgoing Media Files
Disabling Outgoing Media Files will help store files on Amazon Server

Disable the Outgoing Media Files to store files on Amazon Server and click on ‘Save Changes’

Choose the appropriate file and click on ‘Save’ to upload the selected file

Here you can see that the file is getting uploaded.
- Enter the message text in the ‘Message Text’ field
- Click on the ‘Send’ button and the following message will appear:

Here, you can see that under SMS History the new SMS is associated with the contact. Click on the new ‘SMS’ which is created and the following page will appear:

Here, you can see the S3 MMS URL has been created which means the files will be stored in
S3.
- As per the channel level, media files can be exchanged
- Across all interfaces now all channel-specific will be supported storage along with different file types and file size