
Configure Conversations Settings
In the Conversations section, you can define the conversation settings for users and user profiles in the organization. You can configure the following in Conversations:
Converse Desk Layouts – Under the Converse Desk Layouts tab, you can help users configure the following:
- Conversation Filters and Global Filters for specific users and profiles.
- The color theme for the Converse Desk.
- Conversation Topic Layout.
Message Settings – Under the Message Settings tab you can define the following:
- The color theme for displaying Automated messages.
- Information to be displayed under every Incoming and Outgoing message bubble.
- Information to be displayed under the information lookup fields.
General Settings – Under the General Settings tab, you can disable or enable user privileges for the following features:
- Send Canned Responses
- Define Character Limit for Messages
- Internal Note
- CRM Actions
- Related Conversation Setting
Configure Converse Desk Layout
Under the Converse Desk Layouts tab, you can create multiple layouts for the Converse Desk. For each layout you can:
- Select the filters under the static Conversation Filters.
- Select the filters under the dynamic Global Filters.
- Assign the users and user profiles to the layout.
The static Conversation Filters are pre-defined. The All and Unread filters are the default filters and cannot be removed from the selection list of filters.
The dynamic Global Filters are dependent on what message objects are selected under Message Configuration.
To Create a New Layout:
1. Login to Salesforce and access SMS-Magic Converse.
2. In the Converse Settings tab, click Conversations. The Conversation page appears.

3. Under Configure Converse Desk Layout section, click Create New Layout. The Create New Layout popup window appears.
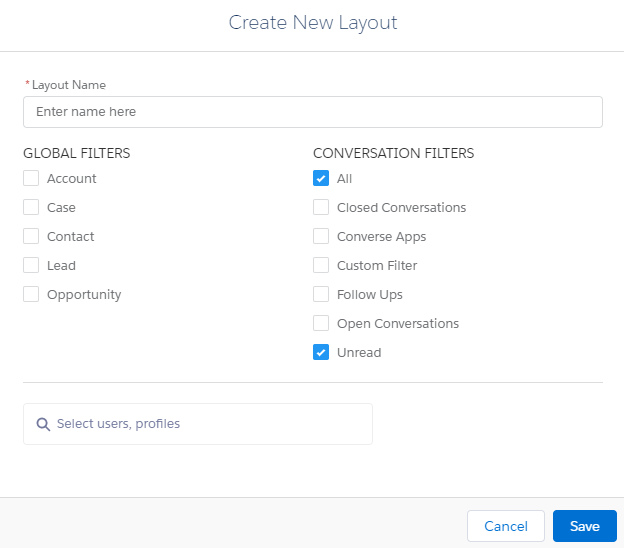
4. Type the name of the Layout.
5. Under Global Filters, select the objects for which you want to view the messages.
6. Under Conversation Filters, select the relevant filters to view messages.
7. Select the user or profile names for whom the layout will be available in the Select Users, profile field.
8. Click Save. The new layout is found in the Configure Converse Desk Layout list.
9. Click Save Changes at the bottom of the Converse Desk Layouts tab page.
To Select the Desk Theme:
1. the Converse Desk Layouts section, slide the toggle button to enable the Color feature. The Color section appears as shown.

2. Select a color or pattern for the desk theme.
3. Click Preview Theme. A separate popup window displays a preview of the Converse Desk.
4. Click Save Changes at the bottom of the Converse Desk Layouts tab page.
To Customize the Conversation Topic View:
1. In the Converse Desk Layouts section, go to Conversation Topic.

2. Select the relevant template from the Template Name list.
3. Select the relevant name for the field from the Field Name list.
4. Click Save Changes at the bottom of the Converse Desk Layouts tab page.
Configure Message Settings
In the Message Settings tab, you can configure the following:
- The color theme for displaying automated messages
- The information that appears below every Incoming and Outgoing message bubble
- The information that appears below the information lookup fields
To Configure Color for the Automated Message:
1. In the Message Settings tab, browse Display Automated Message.

2. In Display Automated Message, slide the toggle button to enable the feature.
3. Select a color.
4. Click Save Changes at the bottom of the Message Settings tab page.
To Define Message Bubble Information:
1. In the Message Settings tab, browse Message Bubble Information.
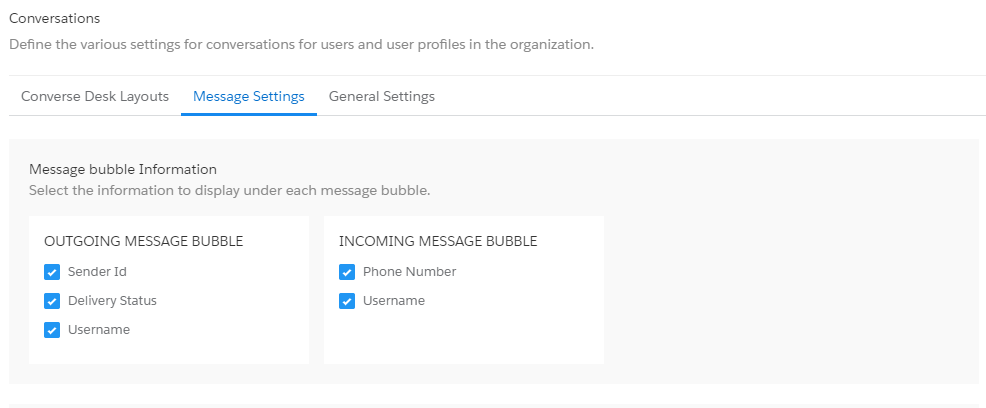
2. In Message Bubble Information select the relevant checkboxes to define the information to be displayed under each message bubble.
3. Click Save Changes at the bottom of the Message Settings tab page.
To Define Lookup Field Information:
1. In the Message Settings tab, browse Lookup Fields Display and Configuration.
2. In Lookup Fields Display and Configuration, slide the toggle button to enable the feature. The information to be displayed under Lookup fields appear.

3. Select the appropriate information to be displayed in the information lookup field.
4. Click Save Changes at the bottom of the Message Settings tab page.
Configure General Settings
In the General Settings tab, you can disable or enable user privileges for the following features:
- Send Canned Responses
- Define Character Limit for Messages
- Internal Note
- Configure CRM Actions
- Configure Related Conversation
To Enable Usage of Canned Responses:
1. In the General Settings tab, browse Reply Using Canned Responses (Templates Only).

2. In Reply Using Canned Responses (Templates Only), slide the toggle button to enable the feature.
3. Click Create New. The Reply Using Canned Responses (Create New) popup window appears.

4. In Users and Profiles, type any three letters of the User name or profile and select the relevant name from the list that appears.
5. In Do you want to enable Canned Responses? Select Yes if you want to enable this feature for the selected user or No if you want to disable this feature for the selected user profile.
6. Click Save.
To Define the Message Character Limit:
1. In the General Settings tab, browse Character Limit of a Message.

2. In Character Limit of a Message section, slide the toggle button to enable the feature.
3. Click Create New. The Character Limit of a Message (Create New) popup window appears.

4. In Users and Profiles, type any three letters of the User name or profile and select the relevant name from the list that appears.
5. In Enter Character Limit type the maximum number of characters each message sent by the selected user profiles can contain.
6. Click Save.
If you want to edit or delete the character limit, then in Action, click the Down icon and then click Edit or Delete to make the required changes.
To Enable Internal Note:
1. In the General Settings tab, browse Internal Note.

2. In the Internal Note section, slide the toggle button to enable the feature.
3. Click Create New. The Internal Note (Create New) popup window appears.

4. In Users and Profiles, type any three letters of the User name or profile and select the relevant name from the list that appears.
5. In Do you want to enable Internal Note? Select Yes if you want to enable this feature for the selected user profile or No if you want to disable this feature for the selected user profile.
6. Click Save.
If you want to edit or delete the internal note, then in Action, click the Down icon and then click Edit or Delete to make the required changes.
To Configure CRM Actions:
1. In the General Settings tab, browse Configure CRM Action.

2. In Configure CRM Action section, slide the toggle button to enable the feature.
3. Identify the object for which you want to add CRM actions.
4. In Action, click the Down icon and then, click Edit.
5. In the Configure CRM Actions for <Object Name> popup window, select or clear the relevant CRM actions checkbox for the object.

6. Click Save Changes. The General Settings tab page appears displaying the CRM action configurations for the selected Object.