1

No Change in Status for Bulk Campaigns

Issue Scenario

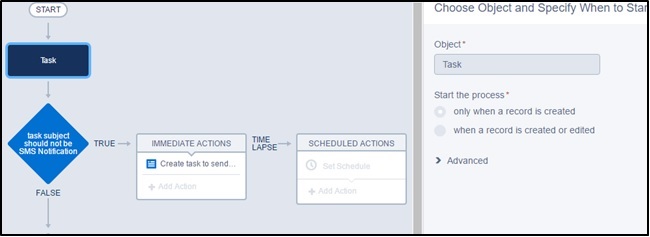
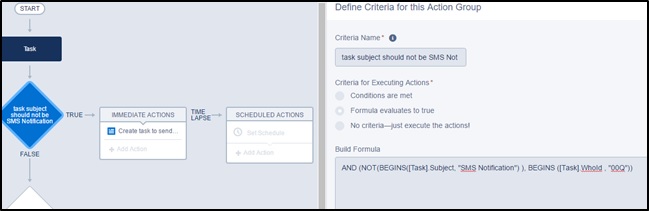
A user tries to execute a bulk Campaign in Converse App by filtering the list view on the basis of the campaign name. However, the campaign status remains unchanged and continues to display “Running”.


Possible Causes

To investigate the reasons behind this issue, you can follow the given procedure:

1.Under Setup, click Apex Jobs.

2.View Batch Jobs for this Bulk Campaign. The following error message appears:
“First error: Semi join sub-selects are only allowed at the top level WHERE expressions and not in nested WHERE expressions.”

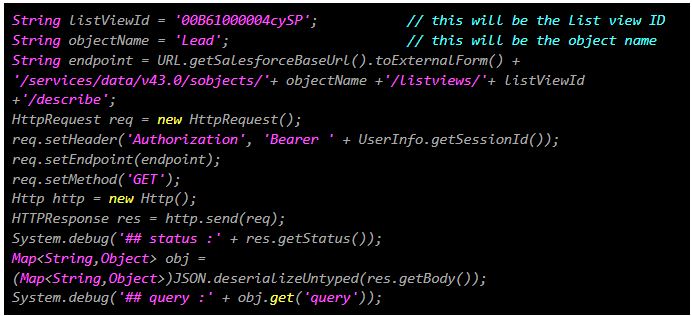
As the list view, filters records on the basis of the Campaign name, it creates a subquery in the WHERE clause. The subquery can be shown as below:

SMS-Magic Converse does not support a subquery in the WHERE clause which leads to this error and results in not processing the messages. Consequently, the bulk campaign status remains unchanged.

To locate the query you can run the following code in the Anonymous window of the Developer Console:


Solution

To send messages to a list which has been filtered using campaign names, customers can use the Run SMS Campaign functionality directly from the Campaign object.


Unable to Install Package Owing to Insufficient Privileges

Issue Scenario

A user tries to install our package on his org and gets the error – “Unable to install due to insufficient privileges”.


Possible Causes

Salesforce has a restriction on the access level  a user should have before trying to install an app exchange package.


Solution

We recommend that a system admin user performs the installation.

Refer the Salesforce help document in the URL mentioned below that provides details on the access level that is required to install an app – https://help.salesforce.com/articleView?id=distribution_installing_packages.htm&type=5


Installation Failed: Error Message

Issue Scenario

User tries to install our package on his org and gets an “Installation failed” error.


Possible Causes

There can be multiple reasons for this issue. For example,

1.The user does not have appropriate access level for installing an app.

2.The Un-managed custom object tab already exists and the package upgrade cannot create another tab

3.Trying to install the application on the Professional Edition or an earlier version of Salesforce.


Solution

The possible solutions to resolve this issue is provided below:

1.Refer the Salesforce help document ( URL mentioned below) for details on the access level that is required to install an app – https://help.salesforce.com/articleView?id=distribution_installing_packages.htm&type=5

2.If you had created a tab for Message_Object_Config__c object in an older version and then tried to upgrade the customer to a latest version (1.50+), then you will get this error. In order to resolve it, do the following:

a. Under Setup, click Tabs and then click Delete next to the object name. The Salesforce tab is successfully removed.

b.Re-install the package .

3.Refer the URL mentioned below:
https://docs.google.com/document/d/1VTHYWV_UFmXRsUSwoD4ktxE4QBOO0R1MpWbFv_jTs2M/edit?usp=sharing

For all 1.50 and later versions you will need a streaming API access. Consult the Dev team if the issue remains unresolved.


Installation Failed Owing to IP Restriction

Issue Scenario

User tries to Install package and gets an IP restriction error.


Possible Causes

IPs may have been blacklisted.


Solution

IP whitelisting will resolve the issue. The following table provides a list of whitelisted IPs for the US and EU servers.

US Server EU Server
34.197.38.71 34.250.41.120
34.197.69.171 34.253.11.161
52.45.151.171 54.77.136.41
34.234.244.188 54.194.41.236
34.197.238.88 34.255.49.21
34.197.121.156 34.197.121.156


Use SMS Magic Error Logs

Issue Scenario

User needs to know how to use SMS Magic Error Logs.


Solution

•In order to understand an issue you have encountered, check the Error Logs to confirm if a Log was generated.

•In case of Permission issue, you can see the Object name and the field which requires permission.

•In case of validation issues, the error logs will provide you with details for the same.

•It also informs you of system exceptions on which you can find out more details on Google.

•In case of code issues, it provides the line number and the trigger name.

•Check with the CS team, to know if they have encountered a similar issue.

•Reach out to the dev team If no logs are available or you are unable to understand them.


System Error Messages

Issue Scenario

The user receives system Error Messages


Solution

When you receive a system error message, you can look it up on Google to understand its significance and resolve it with a work around. However, If you are unable to resolve it you can reach out to the Dev team.


Setup Debug Logs

Definition

Debug Logs help you identify the possible causes behind a particular issue occurring in the customer’s org.


Prerequisites

You will need a subscriber access to setup Debug logs. As, our objects and functionalities are part of a managed package, detail logs for the same will not be available directly from the customer’s org. Therefore, we will need to set up the logs from the subscriber’s access.

When you view the debug logs page through subscribers access, Salesforce displays the following message
“Debug logs you request will also include debug information for your packages. These logs are not accessible by the customer.”


To setup Debug Logs

1.Under Setup, type “Debug Logs” in the Quick Find search box.

2.Click Debug Logs and then click New.

3.If you want to debug the issue for a user select User in the Traced Entity type field.

4.Select name of the user facing the issue in the Traced Entity Name field.

5.Select the start time and end time , i.e. the time during which you will be reproducing the issue. (Try to be very specific. If you select a long time period, then, it will generate 1000s of logs and will be difficult to trace)

6.Now add a debug log.
For the debug log, make sure that you are selecting appropriate debug levels for debugging. (for example, if you want to check an issue regarding a custom apex class or trigger, then, you can select finer/finest for it.
If you are trying to trace an issue with the workflow, then, select the Workflow as Fine/Finer)

For more details on adding a debug log, visit the attached URL:
https://help.salesforce.com/articleView?id=code_setting_debug_log_levels.htm&type=5

7.Click Save.

8.Reproduce the issue for which you want to generate the log.

9.Once generated, open the logs and search for “Exception” or “Error” to narrow down your area of investigation.

10.If you are unable to understand the logs, create a case for the Dev team and share the logs with them for further investigation.


Send Automated SMS

Issue Scenario

User needs to know how to send Automated SMS.


Solution

1. Create a process builder to send an automated SMS when a new task is created or edited to meet certain criteria. The XML configuration needs to be created on the Object on which you are creating the task. You can refer to the following link for steps to create the XML configuration: http://www.screen-magic.com/configure-sms-automation-using-workflow-rules/

The following procedure assumes that the automated SMS will be sent when the task is created on leads object and the XML configuration is also created on lead.

2.Select “Task” as the object.

3.Under Start the process select Start only when the record is created option.

4.Enter the criteria as per your requirement. In the screenshot shown below, the criteria is defined as “task subject should not be SMS Notification” and the task should be related to Leads object.

5.Save the criteria.

6.Enter the immediate action as Create a record.

7.Under Record Type select Task .

8.Enter the following field values for creating the task record.

Field Description
Description Enter the XML configuration that you have created in order to send out the automated SMS. The configuration needs to be created on the Object on which the task will be related to. In this case, the configuration is created on Leads object.
Priority Set the priority of the task as per your requirement.
Status Enter the status as completed if you would like the task to be added to the Activity History related list. Otherwise, set any other value if you would like the task to be added to Open activities related list.
Subject Enter the subject as SMS Notification
Related To Id It should be the task What ID.
Name Id Set the Name Id as task Who Id.

9.On completion, you can send an Automated SMS on task creation.