1

Overview

Building message automation has been simplified in SMS-Magic Converse. The easy intuitively designed interface ensures that you manage to automate your message with a few simple clicks.

The illustration below helps to explain how SMS-Magic handles message automation.

  • The business users define the automation template for the Salesforce automation tool using Converse Apps. This leaves the Admin free to focus on criteria for triggering messages using flows without worrying about templates, SenderIDs, phone numbers, or compliance-related information (Opt-in/Opt-out).
  • The Action key, generated while creating the automation template, is assigned to the Flows for triggering the automation.
  • Messaging attributes, defined in the Automation Template created using Converse Apps, are sent to the Flows when the defined conditions are met.


Keyword-Based Automation

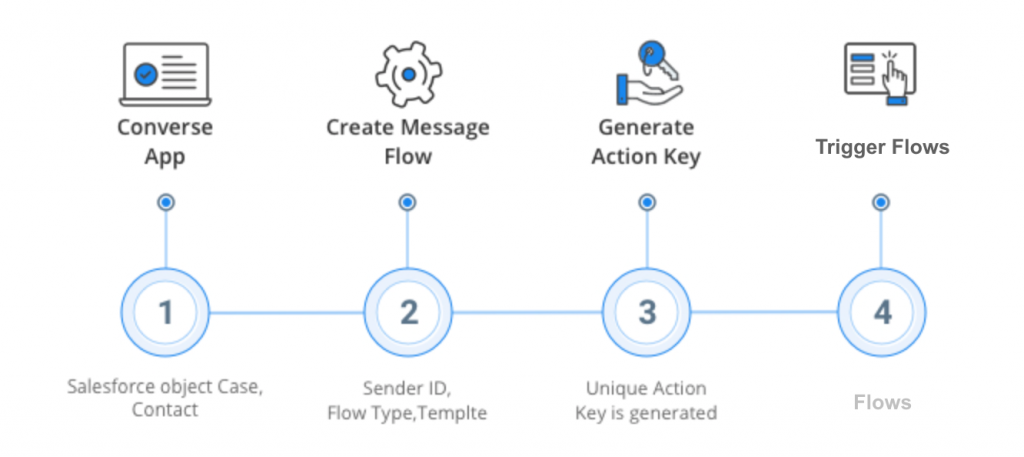
Keyword-based automation is the automatic sending or triggering of text messages to individuals or groups of people based on certain keywords. You can configure keyword-based automation when messages are triggered on a specific date and for a particular event. This is similar to running drip campaigns. Keyword-based automation saves time while ensuring that your customers instantly get the right response and your lists are accurately updated based on the keywords in your received messages. As a business user, you can define the automation template in the Converse App which can be used to make it work with flows.

To create Keyword-based automation, first, you need to create an automation message flow and then trigger an SMS Message based on a Keyword Response using the action key.

In the following example, we will update a Salesforce record based on the keyword response of a customer.

To create an automation message flow, do the following:

1. Go to the App detail page and click Setup.

2. From the list, select Automation.

3. From the Setup Automation Campaign dialog, select the number of steps that are part of the message flow.

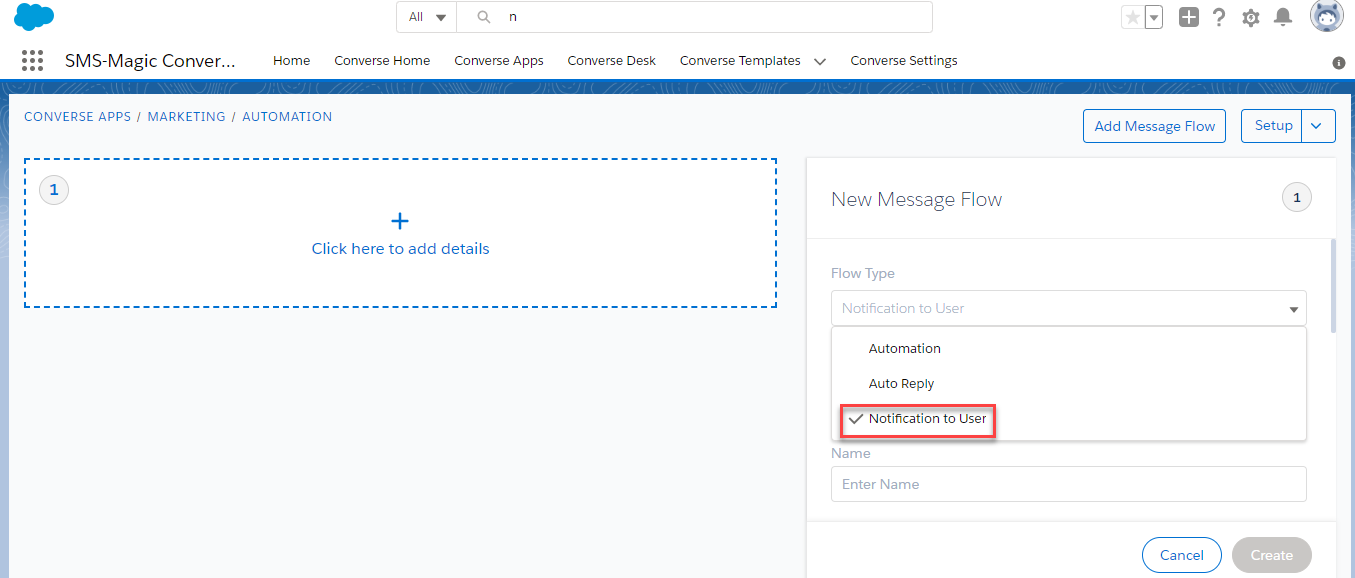
4. On the Message Flow configuration page, select the Automation flow type.


5. Enter the name of the message flow in the Name field.

6. Enter a short description of the message flow in the Description field.

8. Select the sender ID in the Sender ID field.

9. Select the action trigger in the Message Flow Trigger field.

10. Select the template in the Template field. The text of the template is displayed.

11. By default, Do not send to opt-out members is selected. To send the message to opt-out members, clear the checkbox.

12. Click Create.

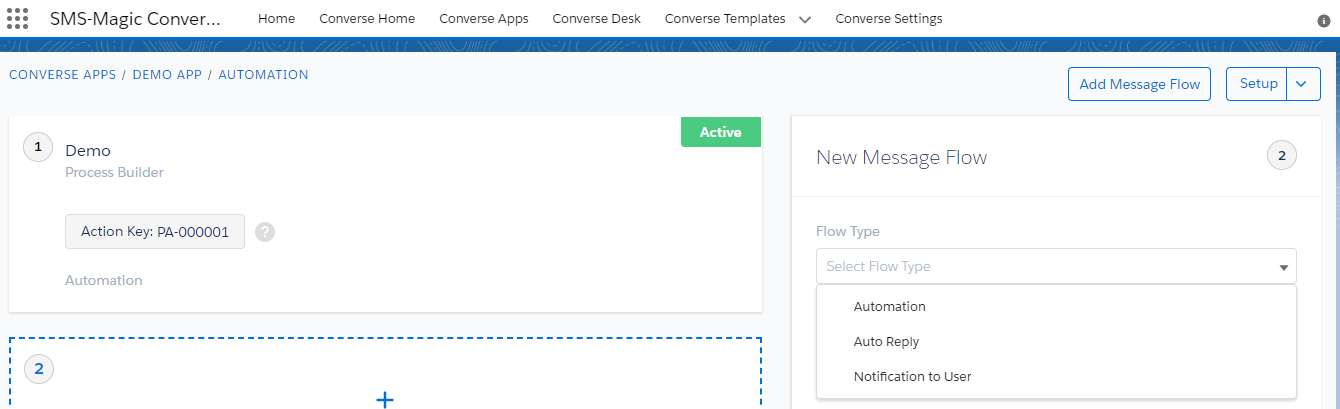
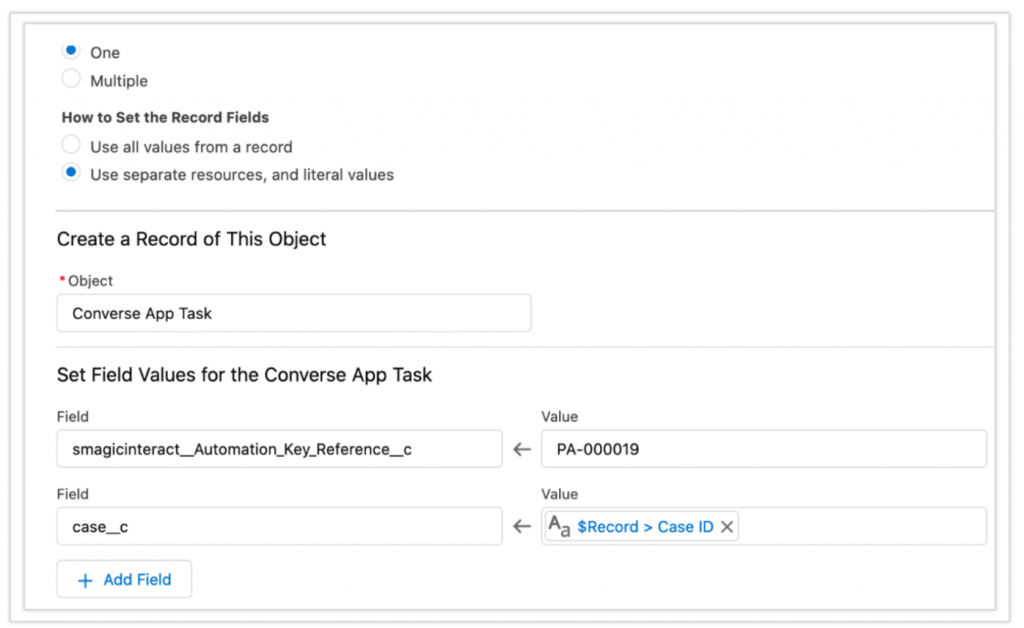
Trigger an Automation Message Flow from Flows using Action Key

Using the Action Key generated for each message in a message flow, you can trigger further messages from Flows. The triggering of the messages is based on certain criteria and conditions.

What is the Action Key?

For each message created in the message flow, a unique Action Key is generated. The action key is necessary to trigger messages from the Flows.

To know more, refer to the document here.


Auto-Reply to Texts

Auto-reply is one of the first automation you need to implement because they reassure customers that they will be taken care of as soon as possible, no matter when they send you a message.

To create Auto-reply, first, you need to create a message flow and then trigger an Auto-reply message using the action key.

To create an auto-reply to text message flow, do the following:

1. Go to the App detail page and click Setup.

2. From the list, select Automation.

3. From the Setup Automation Campaign dialog, select the number of steps that are part of the message flow.

4. On the Message Flow configuration page, select the Auto Reply flow type.


5. Enter the keyword for the message flow in the Keyword field. The keyword is decided by the user.

6. Enter the name of the message flow in the Name field.

7. Enter a short description of the message flow in the Description field.

8. Select the sender ID in the Sender ID field.

9. Select the action trigger in the Message Flow Trigger field.

10. Select the template in the Template field. The text of the template is displayed.

11. Click Create.

Trigger an Auto-Reply Message Flow from Flows using Action Key

Using the Action Key generated for each message in a message flow, you can trigger further messages from Flows. The triggering of the messages is based on certain criteria and conditions. In the following example, we send auto-replies based on the incoming message keyword.

What is the Action Key?

For each message created in the message flow, a unique Action Key is generated. The action key is necessary to trigger messages from the Flows


To Trigger an Auto-Reply SMS Message based on a Keyword Response:

1. From the Salesforce navigation on the top right click Setup.

2. Select Flows by searching it in the Search Setup field.

  • Click on the Flows option as highlighted in the image above. the following page will appear:
  • Click on the New Flow button, and the following page will appear:
  • Here, you will get many flow template options to select from. As per your requirement, select the right type of flow to continue. For instance, select the ‘Record-Triggered Flow’ and click on the Create button.
  • Here, consider an example when a customer wants to trigger an automated message when a record is created, updated, or deleted. Enter Object as Lead, select trigger option as ‘A record is created’, and click on the ‘Done’ button to proceed.
  • Once the object is created, you need to define the elements. Click on the plus sign in the flow as shown above. The following elements will appear:
  • Select the Create Records element to create records. The following page will appear:
  • Select the method in which you want to set the record fields.
  • In the Object field, mention as ‘Converse App Task’. 
  • In the next section, you need to set field values for the converse app task.
  • You can add more fields by clicking on the ‘Add Field’ button. 
  • Add the required criteria in the flow and click on the ‘Save’ button
  • Click on Run to test the flow
  • Click on Activate to activate the message flow


Notification to Users

Message notifications are an important functionality that keeps you updated on all incoming messages. SMS-Magic Converse provides multiple ways in which you can be notified when you receive a new message.

To create a notification to users message flow, do the following:

1. Go to the App detail page and click Setup.

2. From the list select Automation.

3. From the Setup Automation Campaign dialog, select the number of steps that are part of the message flow.

4. On the Message Flow configuration page, select the Notification to Users flow type.


image-2

5. Enter the keyword for the message flow in the Keyword field. The keyword is decided by the user.

6. Enter the name of the message flow in the Name field.

7. Enter a short description of the message flow in the Description field.

8. Select the sender ID in the Sender ID field.

9. Select the action trigger in the Message Flow Trigger field.

10. Select the template in the Template field. The text of the template is displayed.

11. Click Create.


Configure Converse App Task in Marketing Cloud

Overview

The Marketing Cloud Platform is a Customer Relationship Management platform from Salesforce that allows Marketers to establish and manage marketing relationships with their customers.

You can send automated messages through Salesforce Marketing Cloud using Converse App tasks. You can associate templates for sending messages from the Marketing Cloud. Converse App tasks are configured within the Salesforce Marketing Cloud (SFMC) Journey Builder.

Prerequisites

Integrating SMS-Magic with Marketing Cloud requires the following prerequisites:

  • Marketing Cloud is connected to your Sales or Service Cloud
  • SMS-Magic Converse is installed on your Sales or Service Cloud
  • SMS-Magic Converse version is 1.50 or higher

SMS-Magic on Salesforce Configurations 

1. Create a Converse App and select the respective object

2. Create SMS Templates

3. Generate Automation key reference from Converse Apps

– 

Marketing Cloud Configurations

1. Go to Journey builder and Create or Select existing marketing journey

2. Once the journey is defined with the data source you have to drag the Object Activity as shown below:

2. Search for Converse App task in the Object Activity 

3. Create a New record by following a few steps

4. Copy Action Key from Converse App (Created in step 1.3)

5. Add Automation Key reference value 

5. Select Contact or respective object ID

The configuration is complete.

Wherever you have the use case of sending SMS from the Marketing cloud’s Journey builder, you can add Object Activity >> Converse App task >> and configure the action key as per required templates for that Marketing journey. 

Notes: 

  1. Make sure to allocate the SMS-Magic license to the user who is creating the task in Salesforce from the marketing cloud. 
  2. Assign the SMS-Magic Permission set to the user.


Automate SMS Messaging in Marketo

Overview

Marketo is a marketing automation software that is used for Lead Scoring (Qualifying Leads) and Lead Nurturing (send emails and product updates).

Marketo provides the facility to integrate your Salesforce Data with its platform. This will facilitate the synchronization of your Salesforce data with Marketo.

Marketo Integration with SMS-Magic

The Marketo platform can be synced with SMS-Magic Converse enabling users to access the synced lead records from the Marketo lead database and send automated messages. Once integrated you can also search for new or existing leads on the Marketo Platform.

Leads in Marketo terminology are known as People.
We can send only automated messages from Marketo.

Prerequisites

In order to integrate SMS-Magic with Marketo using a Salesforce task you need to fulfill the following prerequisites:

  1. Create an SMS-Magic account for the customer
  2. Provide the SMS-Magic Application Account ID of your Salesforce CRM to sync the data
  3. SMS-Magic version is 1.50 or higher
  4. Converse App is enabled for your Organization in SMS-Magic Converse
  5. Install the package in Production. To install the package, click here.
  6. Install the package in Sandbox. To install the package, click here.

Step 1: Create a Converse App Task 

Create a Converse App Task that configures with Marketo for sending messages. Follow the steps below:

  1. Log in to SMS-Magic Converse
  2. On the top menu bar, click Converse App. The Converse App page appears:
  1. Click Create New App. The Create New App pop-up window appears
  1. In the App Name field, enter the name of the Converse App
  2. In the App Description field, enter a short description of the Converse App
  3. Under Object, select the object which you are using in the Marketing Cloud
  4. Click Create

Step 2: Create a Template

Once you create the Converse App you will need to create the template. This will be used while sending messages from Marketing Cloud:

  1. On the App detail page, click Add Templates. The Templates pop-up window appears:
  1. Under Template Text, type the text for your SMS template
  2. Click Save. The Template is created.

Step 3. Create Message Flow

Once the template is created you need to associate it to a message flow. Marketo uses this message flow to send messages.

  1. On the App detail page, click next to Set Up in the top right corner and select Automation from the drop-down. The Setup Automation Campaign pop-up window appears.
  1. Click the number of messages you want to add to the flow
  2. Click Create. The Add New message flow page appears:
  1. Under Template, select the template that you have created in the previous step.
  2. Under Message Flow Trigger, select Marketo
  3. Click Save. The app detail page appears with the action key generated.
  1. On the App Detail page, change the message flow status to Active.
Note the Action key that is generated as it will be used in subsequent stages.Once the message flow is activated, you will also need to activate the Converse App status.

Step 4: Create a Smart Campaign

A smart campaign is a workflow where you can define your criteria for calling the salesforce task. Follow the given procedure to create a smart Campaign:

  1. Click . The Marketo Home page appears:
  1. Under Marketing Activities, click the folder where you wish to create the Smart Campaign. The list of available folders appears:
  1. Select an existing folder or create a new folder
  2. Click ‘New’ and then click ‘New Smart Campaign’. The New Smart Campaign pop-up window appears.
  1. Select the parent folder within which you want to create the new campaign
  2. Type a name for the Campaign
  3. Type a brief description for the Campaign
  4. Click Create. The new smart campaign appears.

A new smart campaign will always display a default status of “Batch (Never Run)”. This indicates that the message will not be delivered when the task is executed. 

In order to ensure successful execution, we need to change the status to “Triggered (Inactive)”. The following section explains the process to create the salesforce task.

Step 5. Create Smart List

  1. On the top menu bar, click Smart List. The Attributes appear on the right.
  1. Drag an option and place it in the grey area at the center. The pop-up window appears.
  1. Select the attribute from the lead database columns
  2. Click Add Constraint
  3. Select the relevant attribute, for example, New Value. The Attributes appear as shown below.
  1. Enter the values as required.
You do not need to manually save your configurations. Once you move to a new tab the defined configurations are automatically saved.

Step 6. Create a Flow and Schedule Campaign

  1. On the top menu bar, click Flow. The Trigger Palettes appear on the right.
  2. Under Salesforce click Task. The Create Task pop-up window appears.
  1. Enter the Task details as required

Subject = SMS notification

Comments = Action Key copied from Converse Apps Action. Example – PA-000016

  1. Click Schedule. The Triggered Campaign Schedule section appears.
  1. Click Edit. The Edit Qualification Rules pop-up window appears.
  1. Under the Run each person through the campaign flow, do the following:
  • Select only once – If you want to execute messages only when a task occurs once. Subsequent updates in the lead record will not trigger the task.
  • Select once every – If you want to execute messages every time the lead record is changed during the defined duration. For example, the messages will be executed every 7 days when the lead record is updated.
  • Select every time – If you want to execute messages every time the lead record is changed.
  1. Click Save
  2. In the Triggered Campaign Schedule click Activate
  1. View Results

Once configured, all changes in lead records that match the defined criteria should execute the message. You can check the number of times the task has been executed under the Results tab.

Follow the given procedure to check if the salesforce task-results display correctly:

  1. Click . The Marketo home page appears.
  2. Click Database. The Database page appears.
  1. Under System Smart Lists, click All People. The All People page appears:
  1. Click People. The list of leads appears.

Search for a lead record. 


Automate SMS Messaging in Pardot

Overview

Pardot is a marketing automation software from Salesforce that provides email automation and lead management along with lead nurturing and scoring. In addition to these, it also helps users perform a host of other common marketing activities such as creating digital marketing campaigns, social marketing, landing page marketing, Search Engine Optimization, and so on.

Pardot Integration with SMS-Magic

The Pardot platform can be integrated with SMS-Magic. You can create a converse app task and configure it within a Pardot form to receive automated messages against a customer interaction.

Step 1: Create a Converse App Task 

As the first step of the integration process, you need to create a Converse App Task. This will be configured with Pardot for sending messages.

  1. Log in to SMS-Magic Converse
  2. On the top menu bar, click Converse App. The Converse App page appears.
  1. Click Create New App. The Create New App pop-up window appears.
  1. In the App Name field, enter the name of the Converse App
  2. In the App Description field, enter a short description of the Converse App
  3. In the Object field, select the object which you are using in Pardot
  4. Click Create

Step 2: Create a Template

Once you create the Converse App you will need to create the template. This will be used while sending messages from Pardot:

  1. On the App detail page, click Add Templates. The Templates pop-up window appears.
  1. Under Template Text, enter the text for your SMS template
  2. Click Save. The Template is created.

Step 3. Create Message Flow

Once the template is created you need to associate it to a message flow. Marketo uses this message flow to send messages.

  1. On the App detail page, click next to Set Up in the top right corner and select Automation from the drop-down. The Setup Automation Campaign pop-up window appears.
  1. Click the number of messages you want to add to the flow.
  2. Click Create. The Add New message flow page appears; select Pardot.
  1. Under Template, select the template that you have created in the previous step.
  2. Under Message Flow Trigger, select Pardot.
  3. Click Save. The app detail page appears with the action key generated.
  1. On the App Detail page, change the message flow status to Active.

Step 4: Configure Converse App Action Key ID in Pardot

In Pardot you need to configure the action key ID within a specific action for marketing in Engagement Studio. Accordingly, you will also need to create a salesforce task. 

Once your Engagement Studio marketing journey is configured you have to Add the Salesforce Task option to Send Automated SMS to the Leads/Contacts.

  1. Add new Salesforce task action. The Task creation fields appear as below – 
  1. Type a Subject for the task as an SMS notification.
  2. Under the Comments section, paste the action key ID you copied from the previous step.
  3. Click Confirm and Save. The completed form page appears.

Whenever the defined criteria are met, for example, the customer sends a request, you will receive an automated email and text message. 

Also, make sure you assign the Permission set of SMS-Magic to the user who is creating the Salesforce task.