1

Email To Text Overview

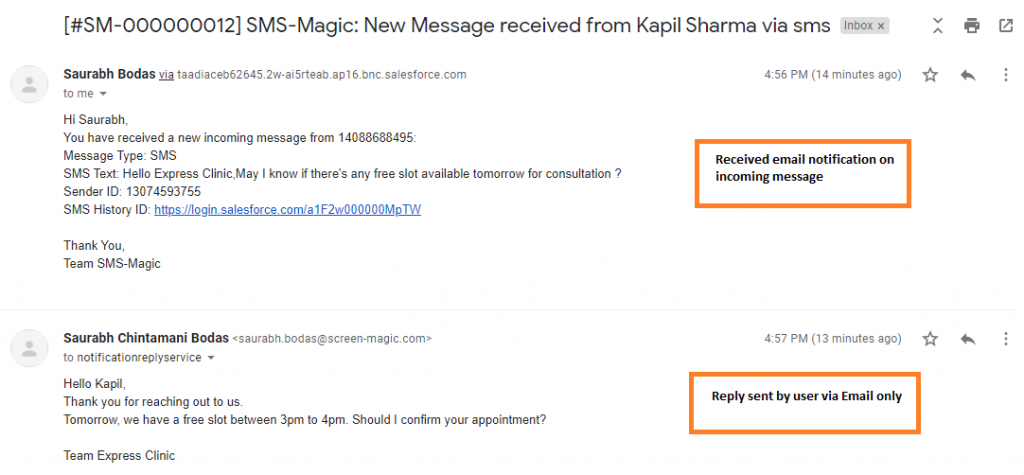
Email to text service is an extension to inbound message notification via email feature. It is provided for customers to easily reply to inbound messages without having to log in to Salesforce.

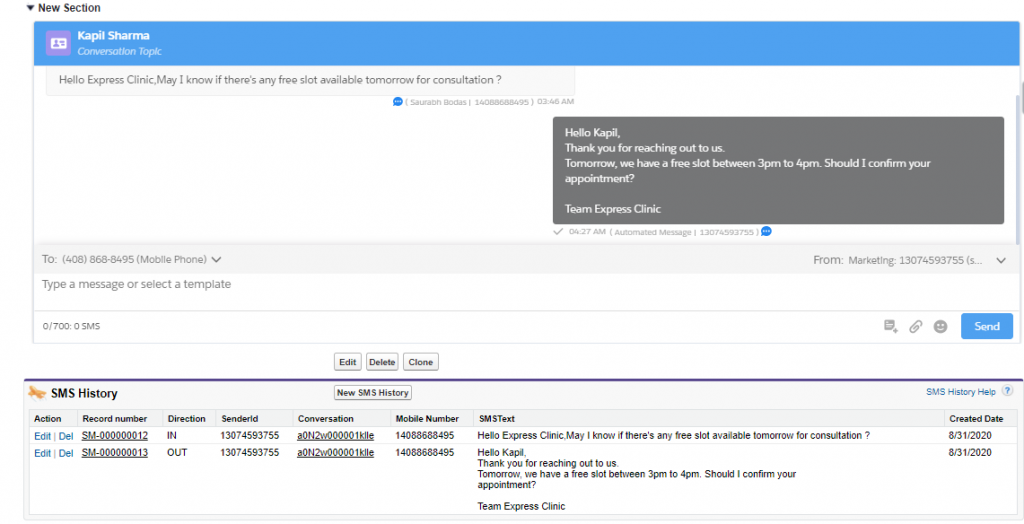
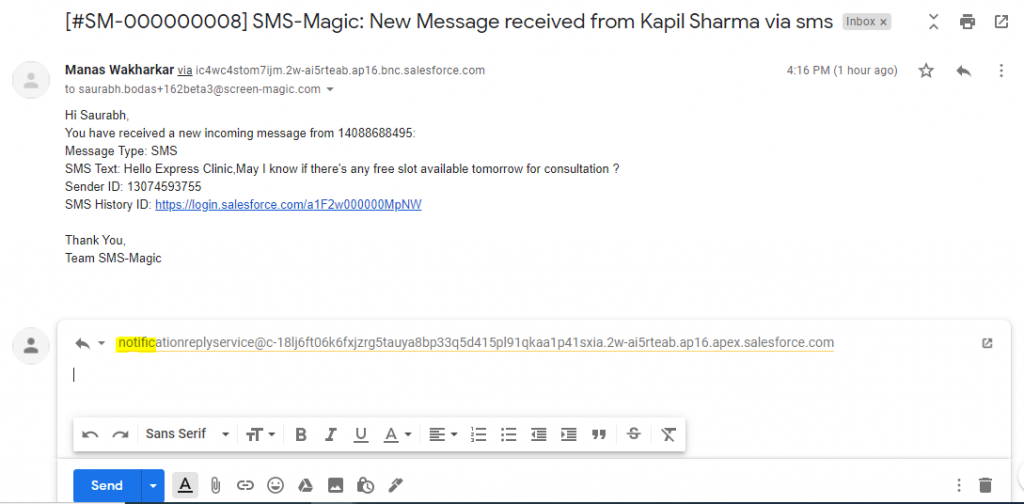
A sales or service rep would get alerted via an email whenever a new incoming message is received from a customer. Until now, they had to go to Salesforce to reply to these inbound messages. With an Email to Text feature, your sales/service rep can reply to inbound messages via an email. These SMSs will get logged under appropriate objects such as a lead, contact as per your org setup. These SMS replies will also get attached to an ongoing conversation. 

It would save significant time for your reps from switching between email & the Salesforce app and also increase their productivity. It would also increase customer satisfaction as they will get quick responses from your reps. 

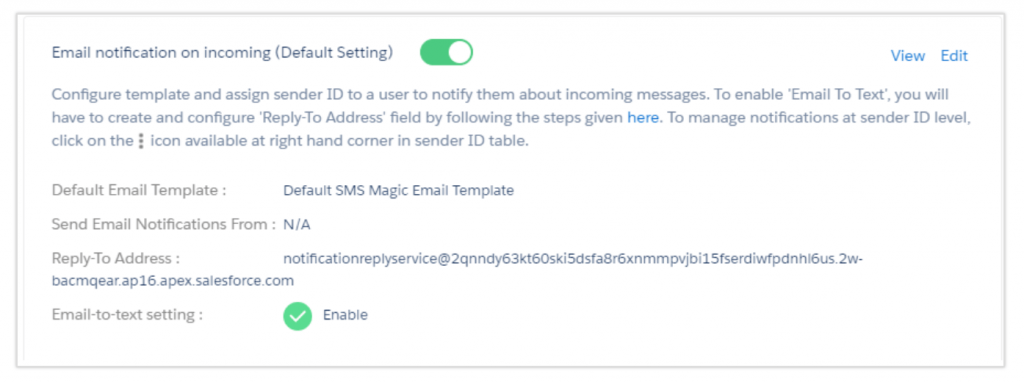
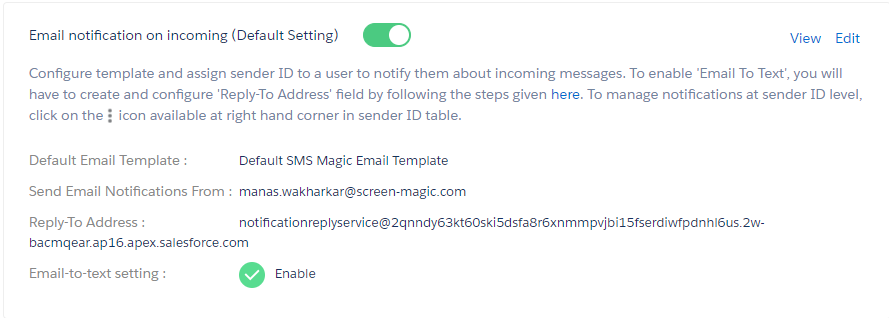
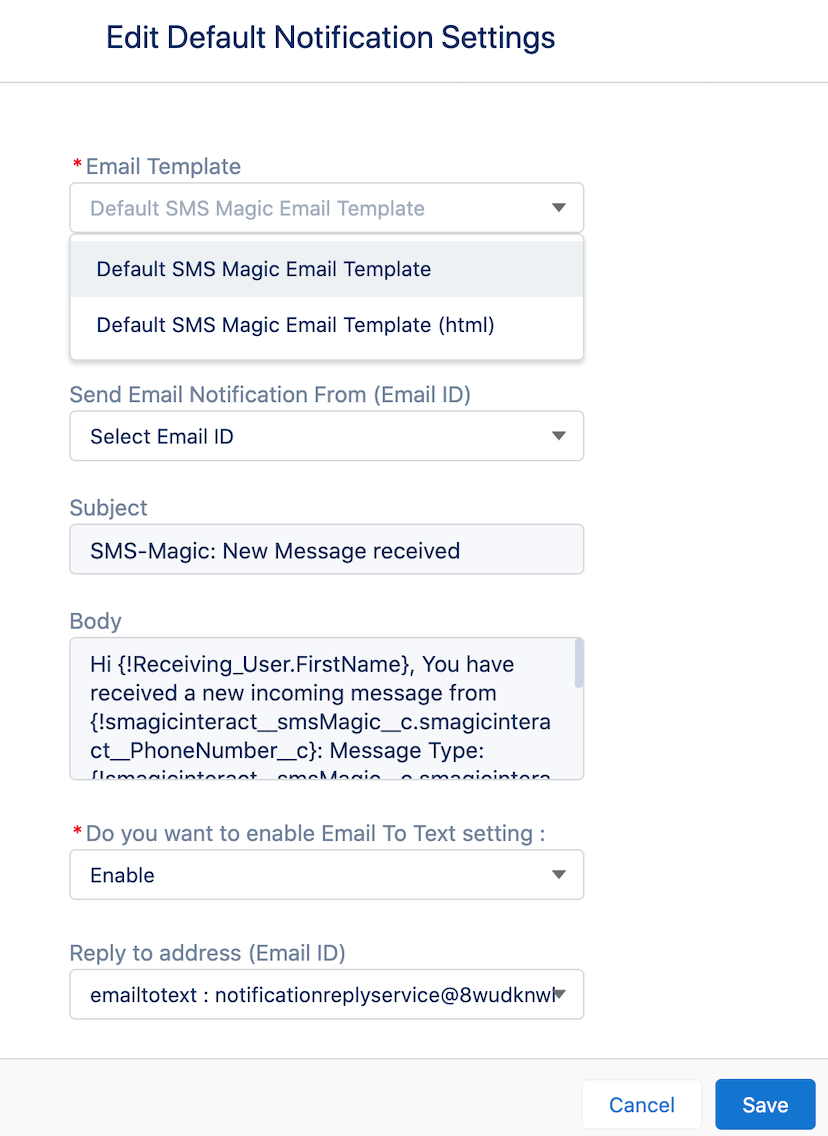
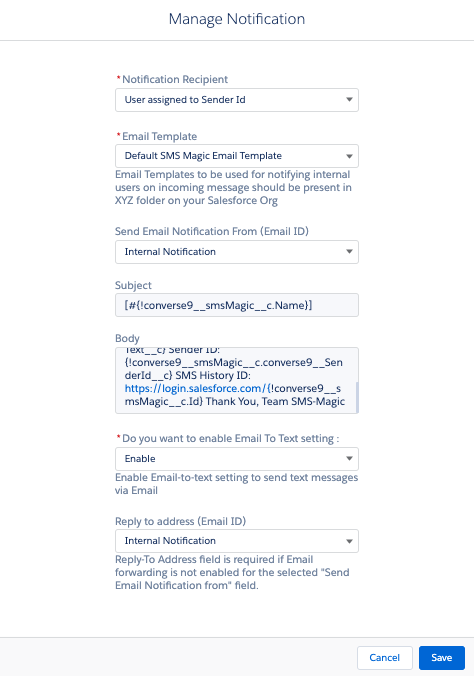
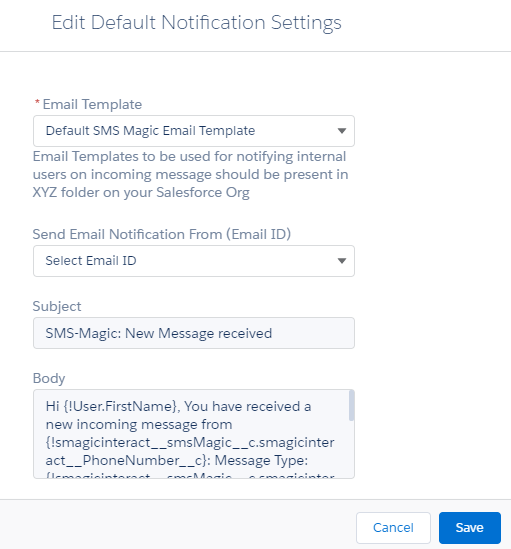
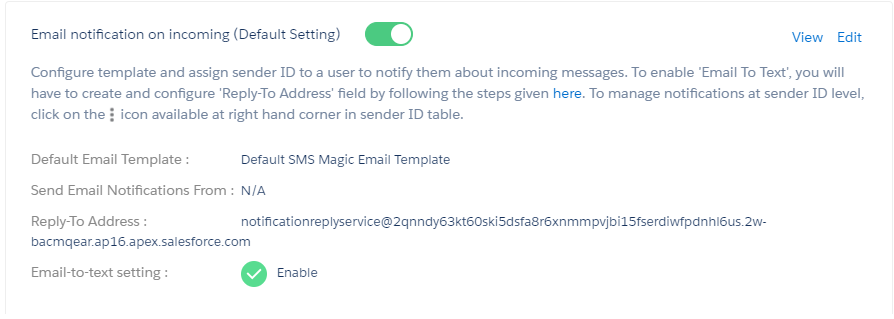
We have given the option to configure this feature globally, or specific to Sender ID. 

Users can reply to the notification received over an email using their email software such as Gmail & Outlook clients. SMS-Magic will further send the same message as a text via the same channel, using the Sender ID on which the notification was received. 

This functionality will work with SMS, WhatsApp as well as the Facebook channel.

Prerequisites

Some of the prerequisites for a manual setup for reply notification are as follows:

  • Gmail or Microsoft Outlook client  
  • The SMS-Magic application should be version 1.62 or higher
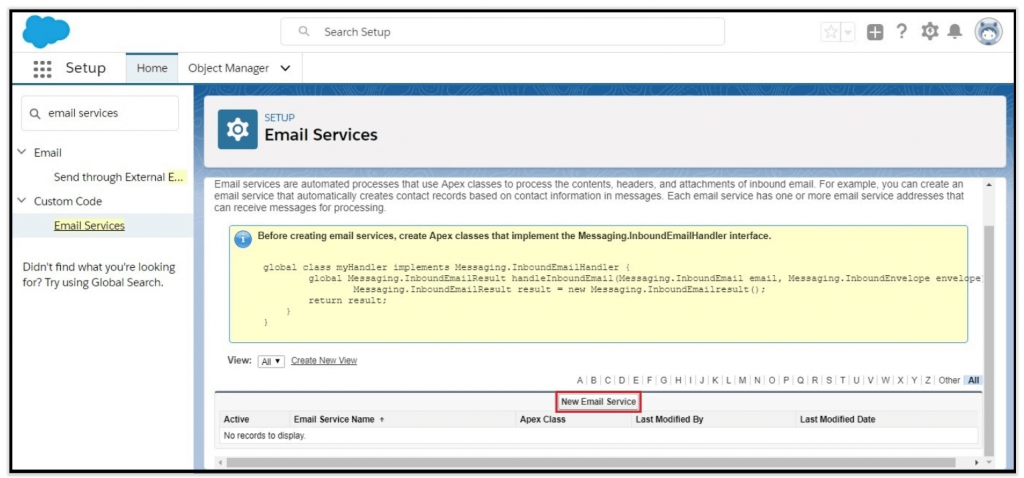
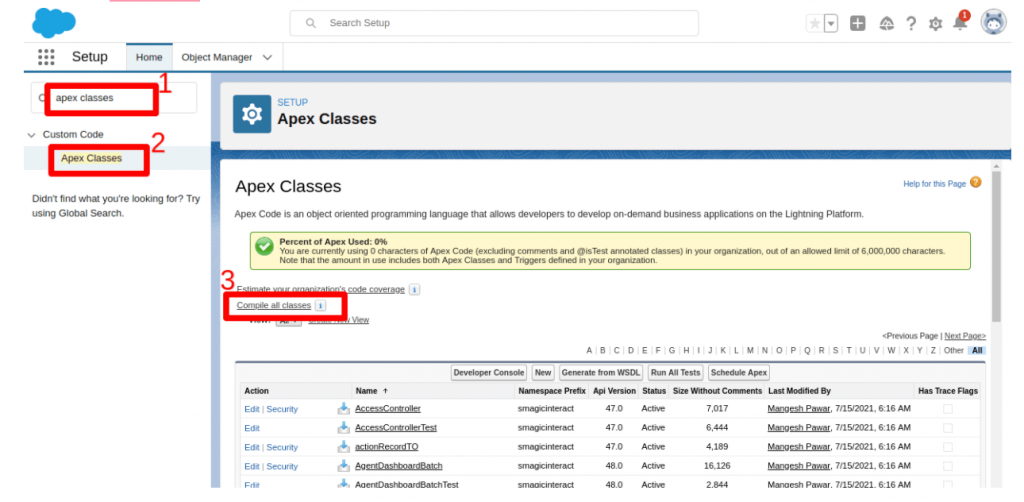
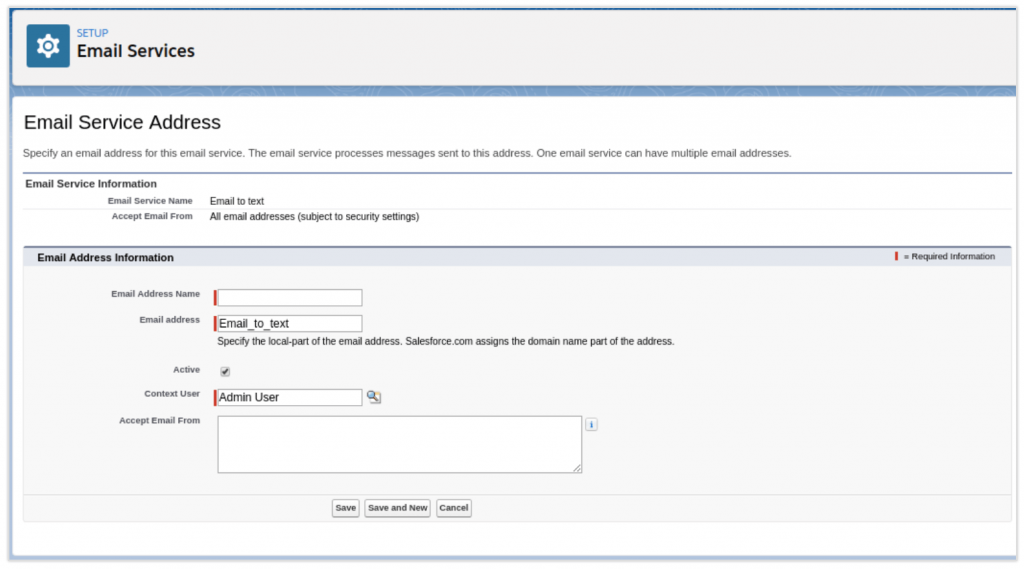
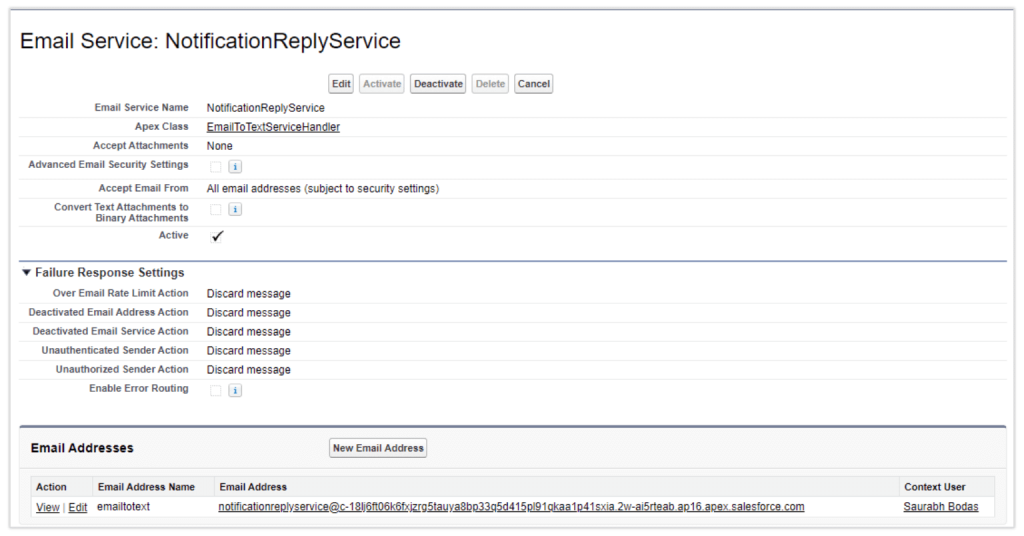
  • The user has permission to configure Apex email services and email service addresses. Admin users will have this permission by default.
  • The user has permission to create Apex classes. Admin users will have this permission by default.

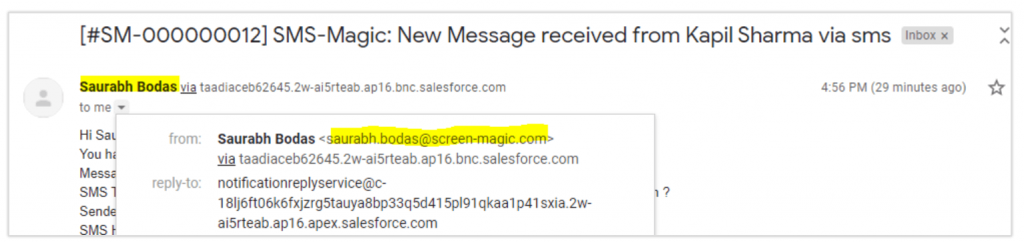
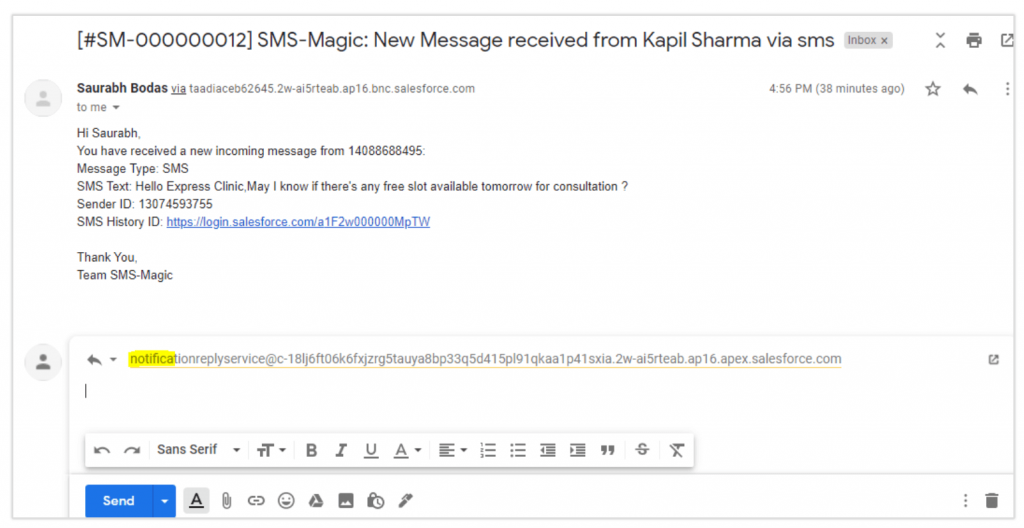
Email to Text sample screenshot

Contact record details page view –


Setup Email Services

You can configure the Email Services to handle the inbound messages. Perform the following steps to manually set up Email Services:

  1. Click on the ‘Settings’ icon on the Salesforce navigation bar and then click on the ‘Setup’ button
  2. Select Email Services in one of the following ways:
    • Use the Search Setup/Quick Find search field, or
    • Select Platform Tools > Custom Code > Email Services
  3. Click on the ‘New Email Service’ button as shown in the image below:
New Email Services
  1. The following window will appear:
Setup new email service
  1. Enter ‘NotificationReplyService’ in the ‘Email Service Name’ field. This is a mandatory field.
  2. Enter ‘EmailToTextServiceHandler’ in the ‘Apex Class’ field. This is a mandatory field.
  3. Do not enter values in the ‘Accept Email From’ text box
  4. Click on the ‘Active’ checkbox to enable the email services
  5. Click on the ‘Save and New Email Address’ button. If the user gets the following error while creating an email service: 

Error: The Apex class selected is not valid. An apex class that implements the Messaging.InboundEmailHandler interface must be selected.

Follow the below additional steps to complete the configuration

  • Go to the ‘Setup’ page in the org
Go to the Setup
  • Search ‘Apex Classes’ in the quick find and open the page
  • Click on the ‘Compile all classes’ link and wait until it finishes compiling
Search Apex Classes
  • Once the compilation is complete, you will get the following message saying, ‘Compilation Complete’:
Complilation Complete Apex Classes
  1. Go to the email service page and now try to save the email service. The following window will appear:
Try to Save the Email Services
  1. Enter the name in the ‘Email Address Name’ field and click on the ‘Save’ button. The following window will appear:
Email Service NotificationReplyService
  1. Once you complete the email notification configuration as mentioned in the following ‘enable notification’ section by selecting the newly created email service address against the ‘Reply-To address’ field, upon receiving an incoming message, the system will send the email notification to the user assigned with Sender ID.
Enable Notificagtion on Email Service

When the ‘Send Email Notification From’ field is not configured, you will see the oAuth user email address as ‘From email ID’ and you will see the above created ‘Reply-To address’ in the ‘Reply-To’ email ID field in the email composer as shown below:

Message Recieved Notificaion
Reply Over Notification Email

Notes: The same email address will start reflecting for the ‘Reply-To Address’ field in the Default Notification settings as well as the Sender ID level notification settings. For more information about Email Services, see Defining Email Services


Setup Organization-wide Email Address (Optional)

Perform the following steps to set up an organization-wide email address: 

  1. Click on the icon on the Salesforce navigation bar and then click on the ‘Setup’ option
  2. Select Organization-Wide Email Address by one of the following ways:
    1. Using the Search Setup/Quick Find search field, or
    2. Selecting Administration > Email > Organization-Wide Addresses
  1. Click on the ‘Add’ button
  1. Enter a display name in the ‘Display Name’ field. For example, reply-support.
  2. Enter the alias email address in the ‘Email Address’ field. For example, reply-support@gmail.com.
  3. Select ‘Allow All Profiles’ to use this From Address
  4. Click on the ‘Save’ button
Notes:

This setup sends a verification code/link to the alias email address. You need to activate the code to verify the alias email address.

  1. Once you complete the email notification configuration as mentioned in the following ‘enable notification’ section by selecting the newly created org wide email address against ‘Send Email Notification From’ field, upon receiving an incoming message, the system will send the email notification to the user assigned with Sender ID.

You will see the org wide email address as an ‘From email ID’ generated and you will see the above created ‘Reply-To address’ in ‘Reply-To’ email ID field in the email composer as shown below.


Create an Email Template (Optional)

We are providing a default template for the package users. If you want to create a separate template you can follow the below steps and create your email template as per your requirements:

  1. Click on the ‘Setup’ option
  2. Search ‘Classic Email Templates’ in the Quick Find field and go to that page
  3. Click on the ‘New Template’ button
  4. Select Text in Step 1 and click on the ‘Next’ button
  5. In the ‘Email Template Information Form’ type in a name for the Email Template and a Unique Template Name
  6. Select SMS-Magic Email Templates in the Folder type and also select the checkbox against field Available for Use
  7. Click on the ‘Save’ button to proceed
Notes:

  1. The same template will start reflecting for the ‘Email Template’ field in the Default Notification settings as well as the Sender ID level notification settings.


Enable Notification

This is the final step of the configuration to enable the ‘Email to Text’ feature. Notifications can be enabled in the following two ways:

  1. Default Notification Settings 
  2. Sender ID Notification Settings

1. Default Notification Settings

In default notification settings, you can configure templates and assign sender ID to a user to notify them about incoming messages. To enable ‘Email To Text’, you will have to create and configure the ‘Reply-To Address’ field by following the steps given here.

  1. Click on the ‘Edit’ button, the following window will appear:
  1. Select the default SMS-Magic email template from the ‘Email Template’ drop-down list

Note: Users need to select the new HTML template in order to see the message history view in the email notification setup section [Default settings as well for Sender ID level overriding]. 

Select Email Template
  1. Select the email ID from the drop-down list in the ‘Select email notification from’ field
  2. Select ‘Enable’ option in the ‘Do you want to enable Email to Text setting’ field
  3. Click on the ‘Save’ button 

The steps to manage notifications at the Sender ID level are explained in the following section.

Notes:

If Manage Notifications is not configured in the Sender ID section the Default Configuration will handle the notifications. Refer to the above screenshot.

2. Sender ID Notification Settings

This section will help you enable notifications at the Sender ID level, which will in turn help you to stay up to date whenever you receive a message.

  1. Go to Converse Settings
  2. Click on Sender ID and Assignment on the left
  3. Choose a Sender ID and click  and click on the ‘Assign to Users’ option. The following window will appear:
  1. Search a user by entering the name or email ID 
  2. Click  and click on the ‘Manage Notifications’ option to enable notification. The following window will appear:
  1. In the Manage Notification pop-up window verify the pre-filled details
  2. Select an Email Template if you wish to use some other template in place of the default template

Note: Users need to select the new HTML template in order to see the message history view in the email notification setup section [Default settings as well for Sender ID level overriding].

Select Email Template
  1. Select an Email ID if you wish to be notified through that
  2. Select ‘Enable’ option from the drop-down list in the ‘Do you want to enable Email To Text setting’ field and a new drop-down appears
  3. Select an Email ID if required or continue with the default notification method
  4. Click on the ‘Save’ button
  5. Enable Notification on incoming using the toggle button

The above function can be managed from the Default Configuration Section when you click on the ‘Edit’ button as shown in the image below.


Email to Text – FAQs