The Converse Template is a library of all the templates created for different purposes across multiple channels such as SMS, WhatsApp, and Facebook Messenger, etc. It helps you to easily manage and organize all templates that are necessary to conduct messaging campaigns.
You can create new templates, edit existing templates, change a template owner, and attach a template to an object. Also, it is easy to add merge fields to the templates in order to personalize each of the outgoing messages.
Create a New Template
|
1. Log in to the SMS-Magic Converse application
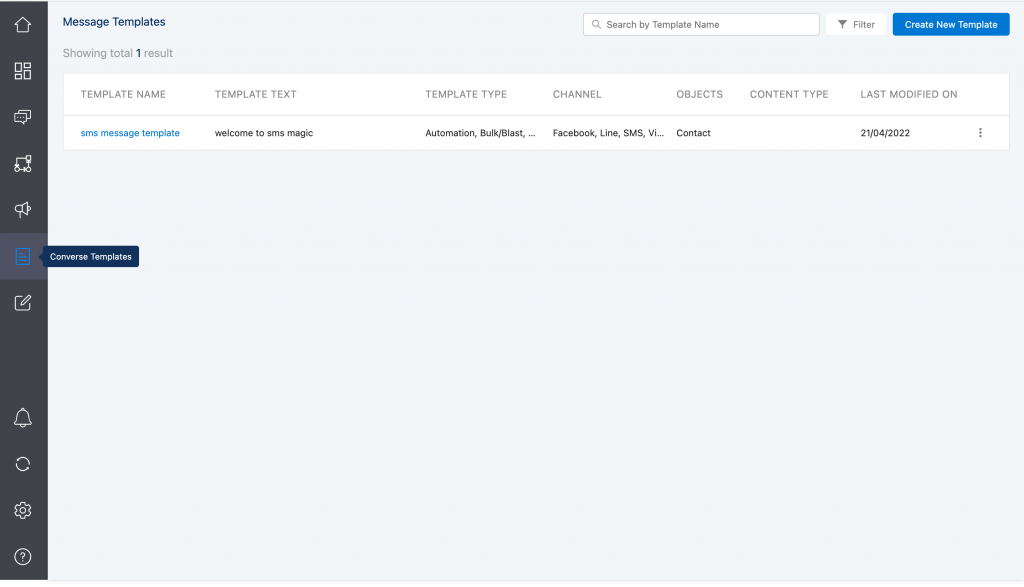
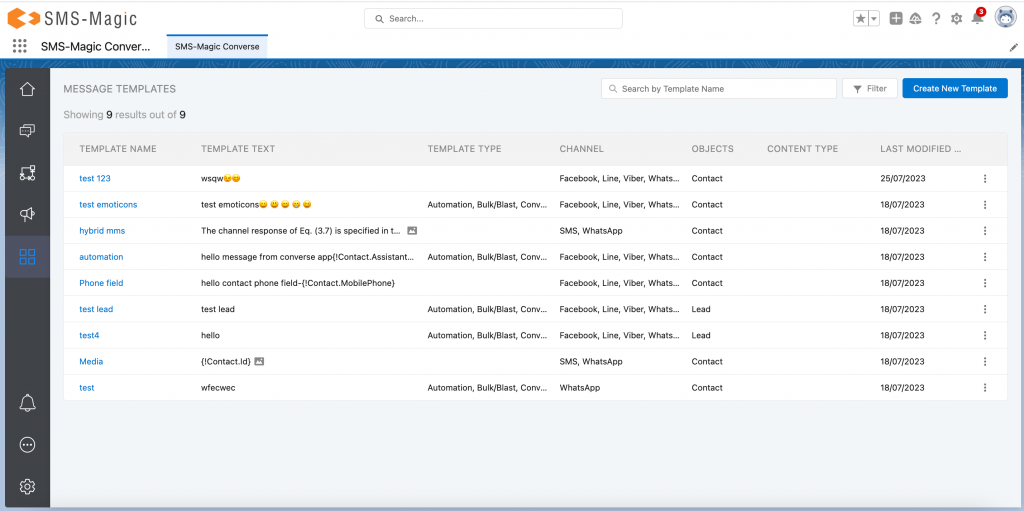
2. Click on the Converse Templates tab. The Converse Templates page appears:
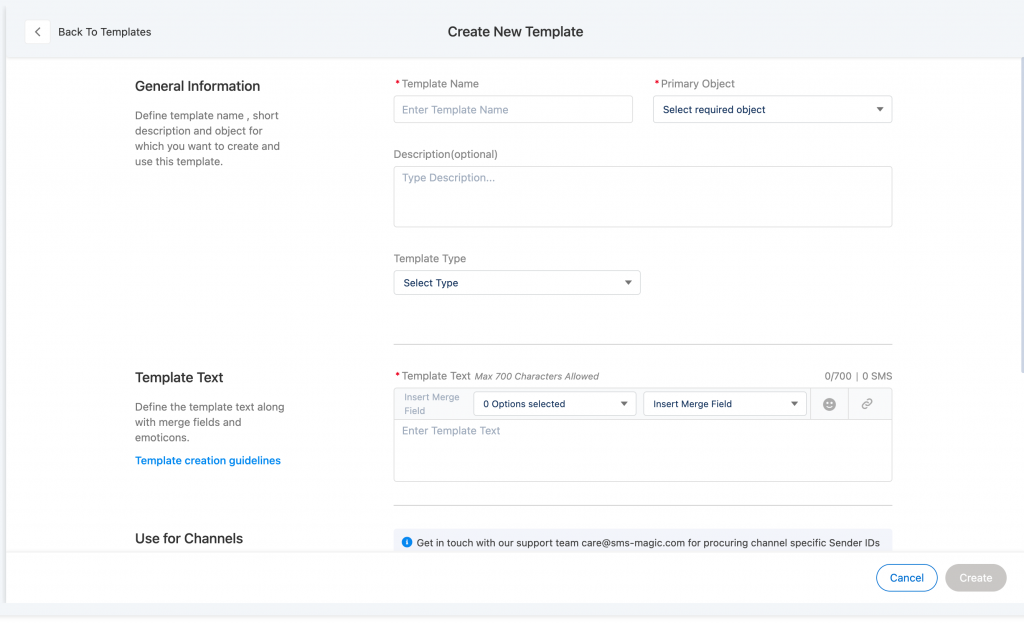
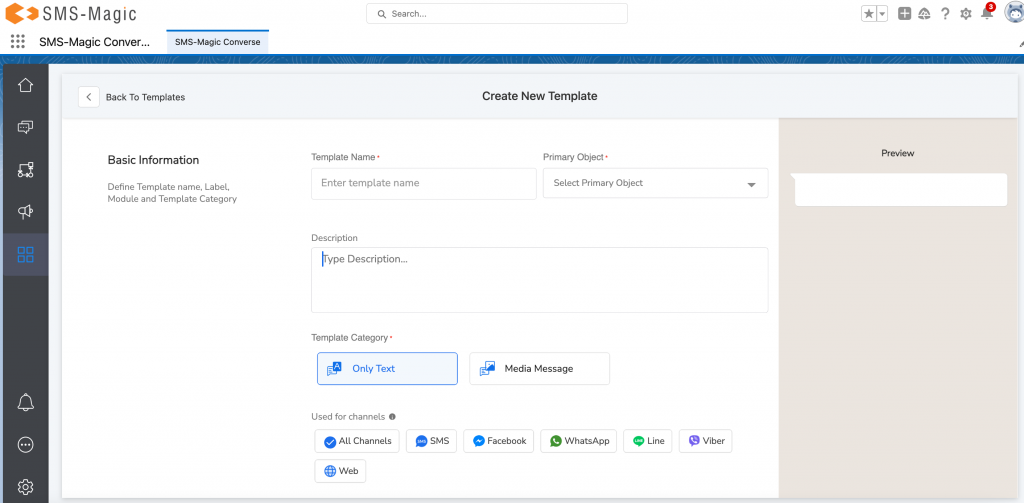
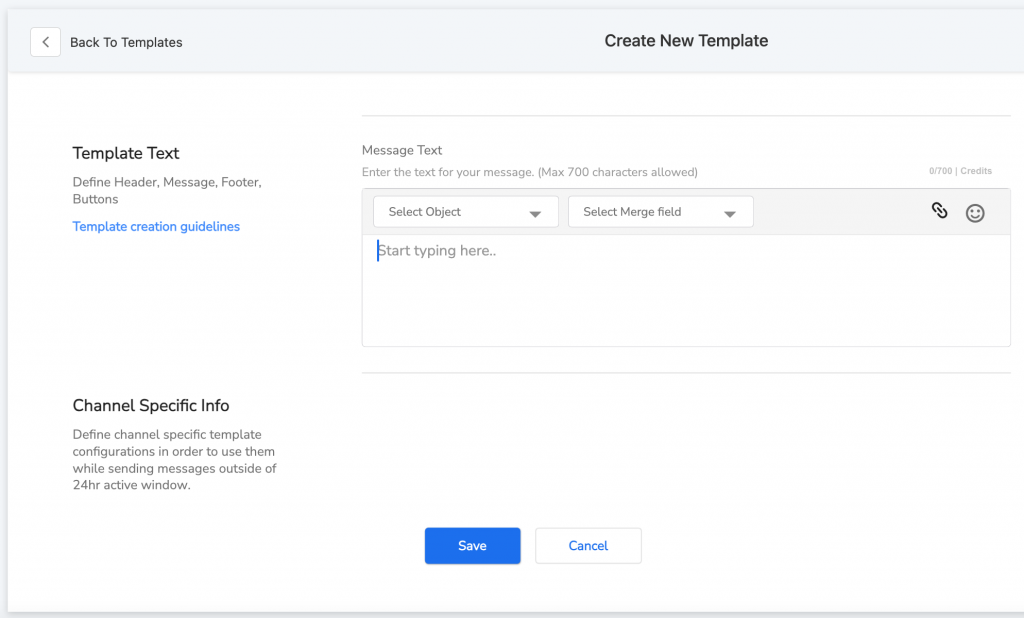
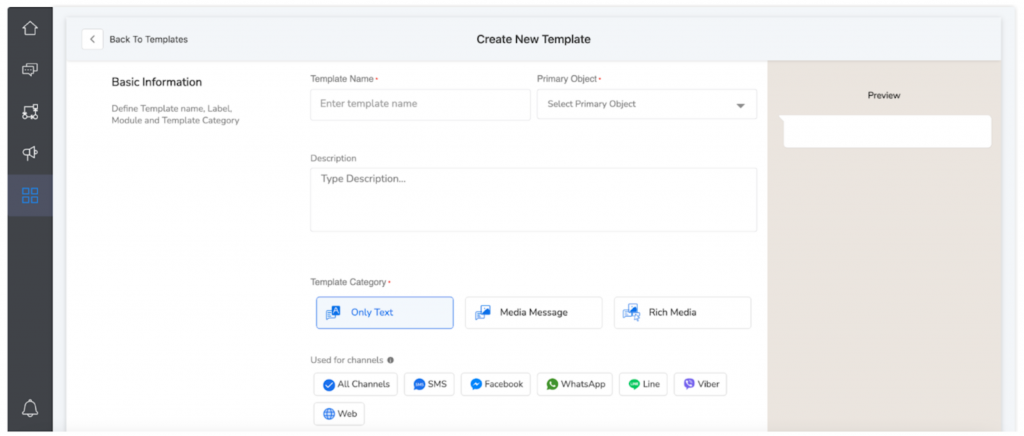
3. Click on the ‘Create New Template’ button. The New Template pop-up window appears. You can enter the basic information.
4. Enter the template text and according to your use case, tag it to single/multiple/all channels. Get in touch with our support team care@sms-magic.com for procuring channel-specific Sender IDs before using templates on channels other than SMS.
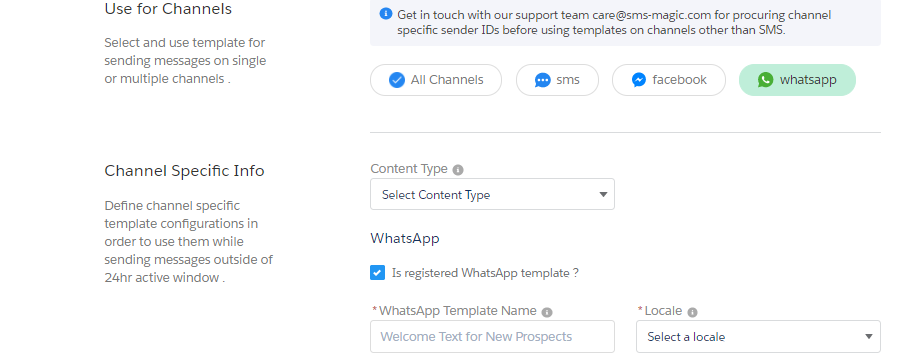
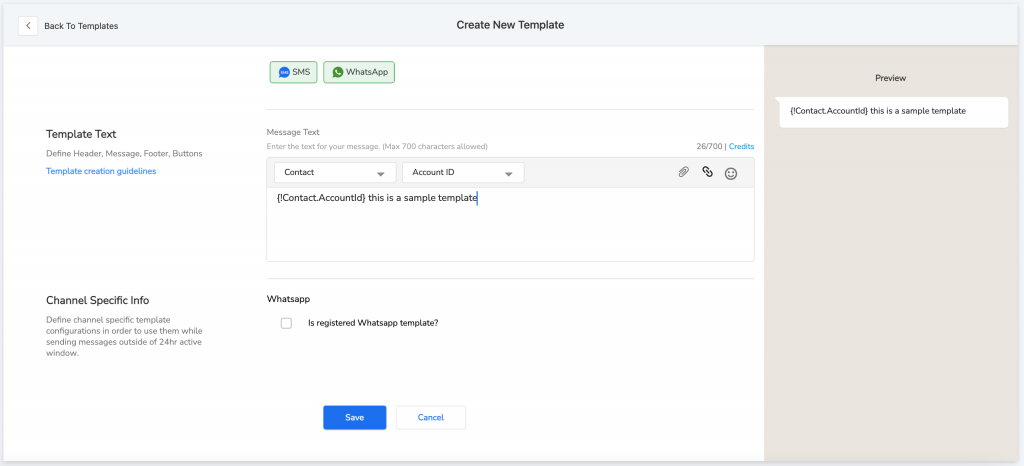
5. Once you tag a template to the WhatsApp channel, you will be asked to fill the channel-specific information along with the basic template information. Channel specific information will be only required while adding WhatsApp approved registered templates.
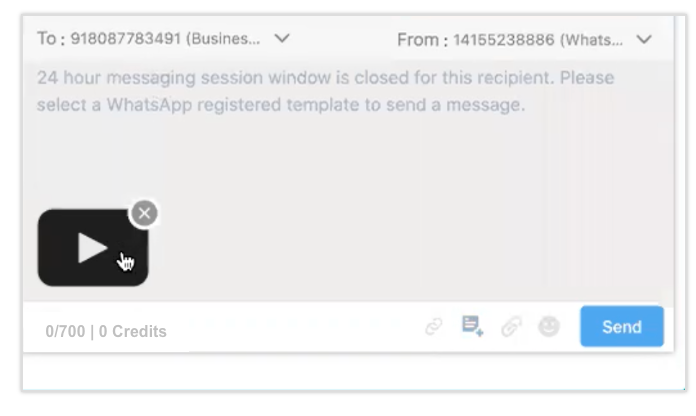
You can add non-registered templates as well just by tagging them with WhatsApp channel where channel-specific information won’t be required and these can be only used for sending WhatsApp session messages i.e. in the recipients 24 hr active window.
Notes:
Once you upgrade/install package version 1.62 and above, we will be tagging your existing templates with all channels so that you need not have to perform an additional step to use them for any messaging channel.
You must select the checkbox ‘Is registered WhatsApp template?’ only while adding WhatsApp registered templates
If required, you can get in touch with the support team at care@screen-magic.com to know the values for channel-specific fields with respect to your registered WhatsApp template
While adding a registered WhatApp template, the template text should match with the registered template text and the parameters in the text should be replaced with merge fields
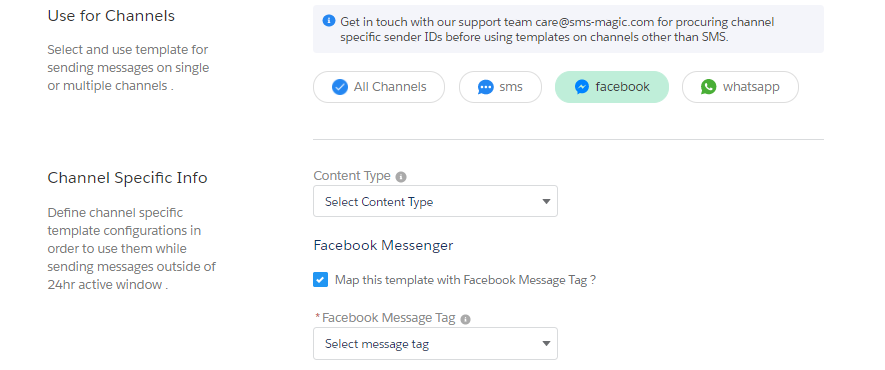
6. Once you tag a template to the Facebook Messenger channel, you will be asked to fill the channel-specific information along with the basic template information. Channel specific information will be only required while mapping template with a use-case specific Message Tag.
You can add templates without mapping them with Message Tag as well, just by tagging them with the Facebook Messenger channel where channel-specific information won’t be required and these can be only used for sending Facebook session messages i.e. in the recipients 24 hr active window.
Notes:
Once you upgrade/install package version 1.62 and above, we will be tagging your existing templates with all channels so that you need not have to perform an additional step to use them for any messaging channel.
You must select the checkbox ‘Map this template with Facebook Message Tag?’ only while mapping template with Message Tag
You can refer to the ‘Understanding Facebook Messaging’ section to know more about supported tags and message contents that are allowed and not-allowed against each tag. Note that the use of these tags outside the approved use cases may result in restrictions on the page’s ability to send messages.
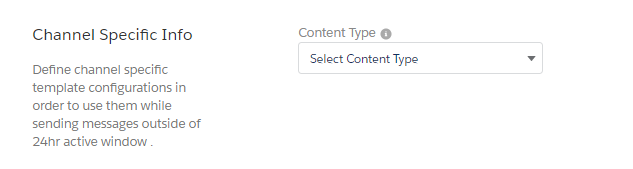
7. You will see an option to tag templates with a content type when you have set up a new compliance configuration for your org with ‘Content-type’ as a parameter. It displays the different content types configured and it is an optional field.
8. Enter relevant details as following:
Field
Description
Template Name
Type an identifier for a Template
Primary Object
In the drop-down list, select the primary object that you want to associate with the template. Create the object in Message Object Configuration (MOC) prior to associating it with the template. Contact your system admin for creating objects.
Description
Type a small summary to describe the template
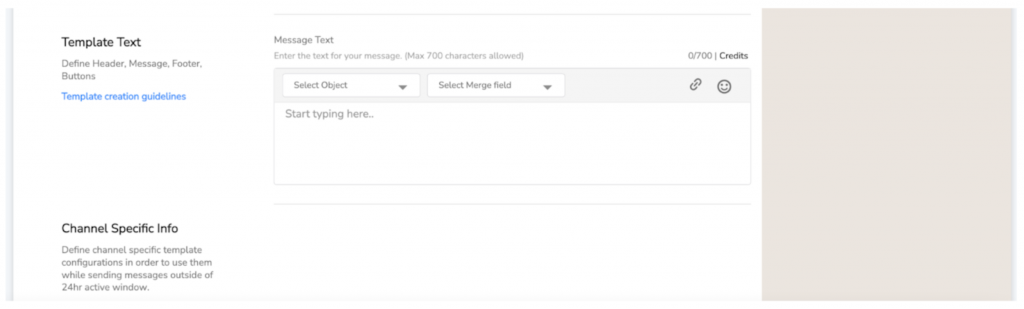
Template Text
Type the default template text. Select the fields that you want to use as merge fields within the template text.
Use for Channels
Select and use templates for sending messages on single or multiple channels. Get in touch with our support team care@sms-magic.com for procuring channel-specific Sender IDs before using templates on channels other than SMS.
Select Content-Type
In the drop-down list, select the content type you want to tag to the template. If you are using the old compliance feature you need not select values in this field.
Is it a registered WhatsApp template?
Select this checkbox while adding Registered WhatsApp Template. This use case-specific approved template can be sent to recipients over WhatsApp outside of the 24 hrs window when you have consent.
WhatsApp Template Name
This name should match with the registered template name
Locale
Select a locale value in which your template is registered with WhatsApp
Map this template with Facebook Message Tag?
Select this checkbox when you want to map the template with Facebook Message Tag. This use-case specific template can be sent to recipients over Facebook outside of the 24 hrs window when you have consent.
Select Message Tag
Select a message tag for the template having a valid use case. The use of tags for invalid use case content may result in restrictions on your page’s ability to send messages.
9. Click on the ‘Create’ button. The new template will be created. These templates will be available for selection based on the Sender ID selection at all messaging interfaces, i.e. if you select Sender ID which is tagged to SMS channel, you will only see templates that are tagged with SMS channel.
Create New Media Message Template (Package Version 1.73 onwards)
|
As a user, now you can create multimedia message templates and use them while sending messages over SMS and WhatsApp channels.
Create Media Media Message Template
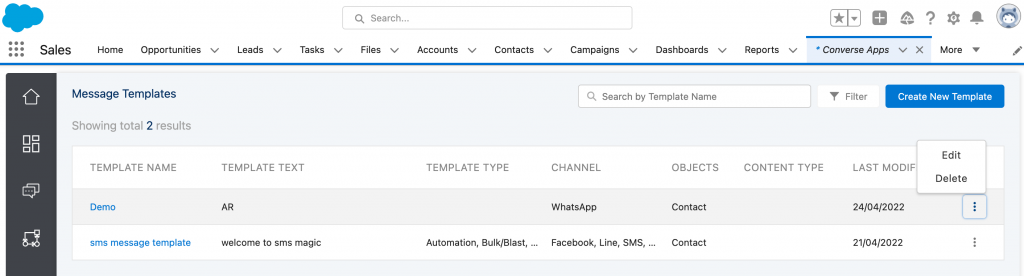
Click on the Converse Templates option to open the Templates home page, as shown below:
The Templates home page displays a list of all templates with details such as template name, template text, template type, channel, objects, content type, and last modified date.
As and when the user scrolls down the page, new templates will appear in the list.
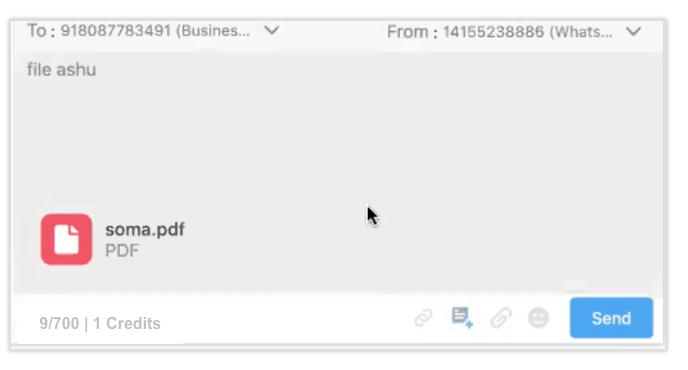
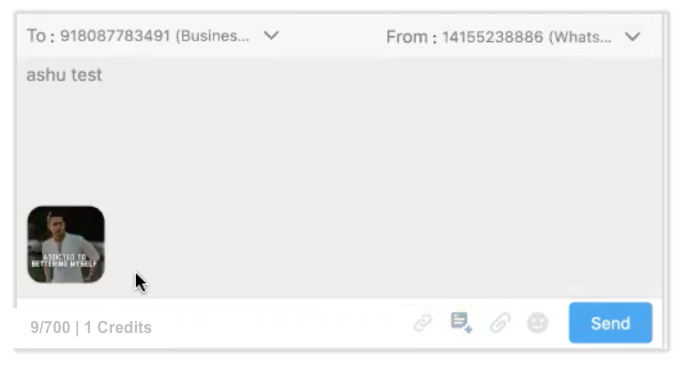
As you can see in the ‘Template Text’ column, all media message templates will be identified with a small icon representing the media type (for example – audio, file, video, or image).
Click on the ‘Create New Template’ button and the following template creation page will appear:
Enter the name of the template in the ‘Template Name’ field
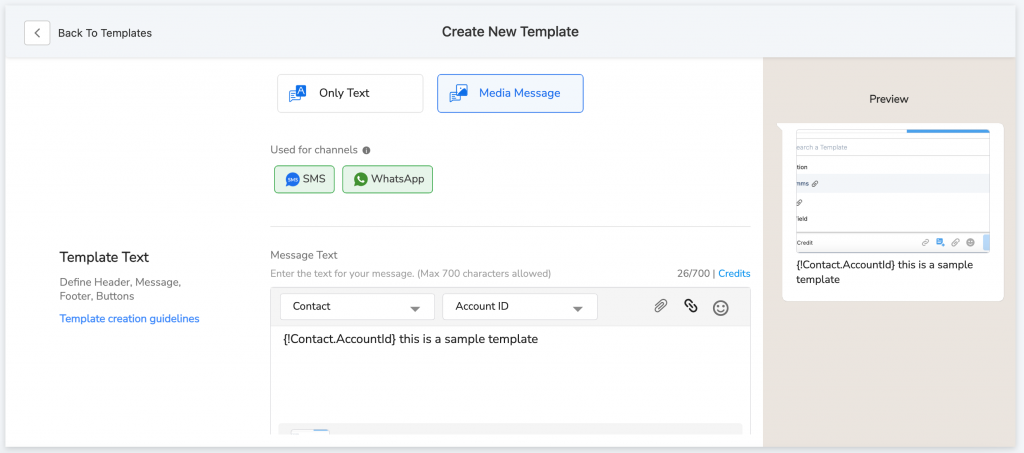
Select the template category as ‘Media message’. For now, media message templates can be sent only via SMS and WhatsApp so only these two channels will be displayed.
Select the primary object and enter the description in respective fields
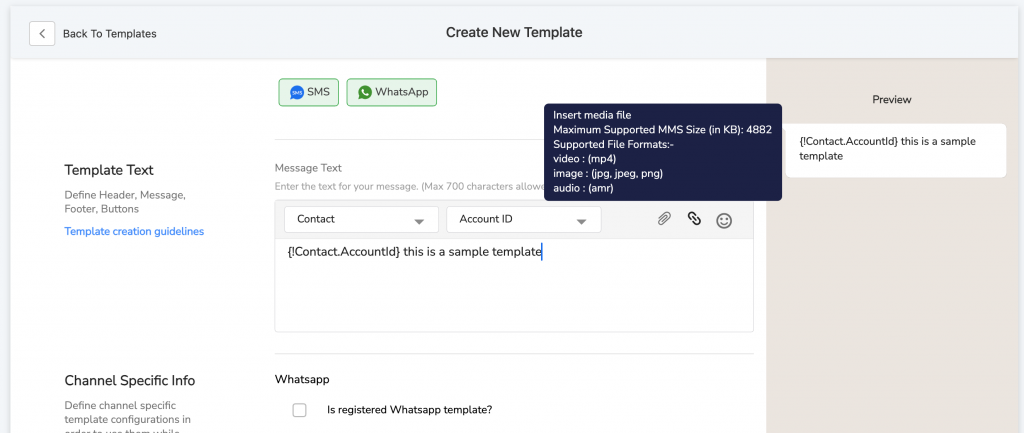
Once you select the channel, SMS or WhatsApp, it will display the supported file types, as shown in the screenshot below:
Similarly, if you choose SMS and WhatsApp both channels, it will display the common media field that can be uploaded
Note: In case you do not have any number which is MMS enabled, you will see a note in the ‘Use for Channels’ section saying, ‘you do not have any MMS-enabled number’
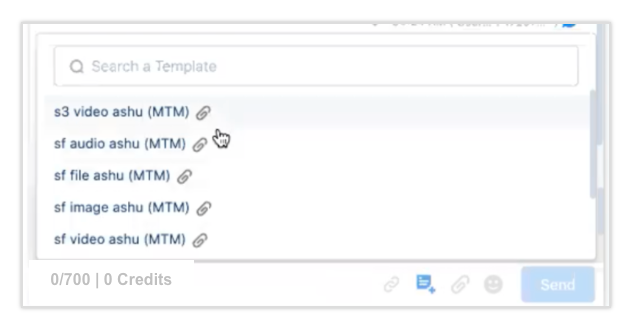
Once you enter the template text, you will be able to see the preview of the template on the screen on the right side, as shown below:
Click on the ‘Save’ button to create your media message template
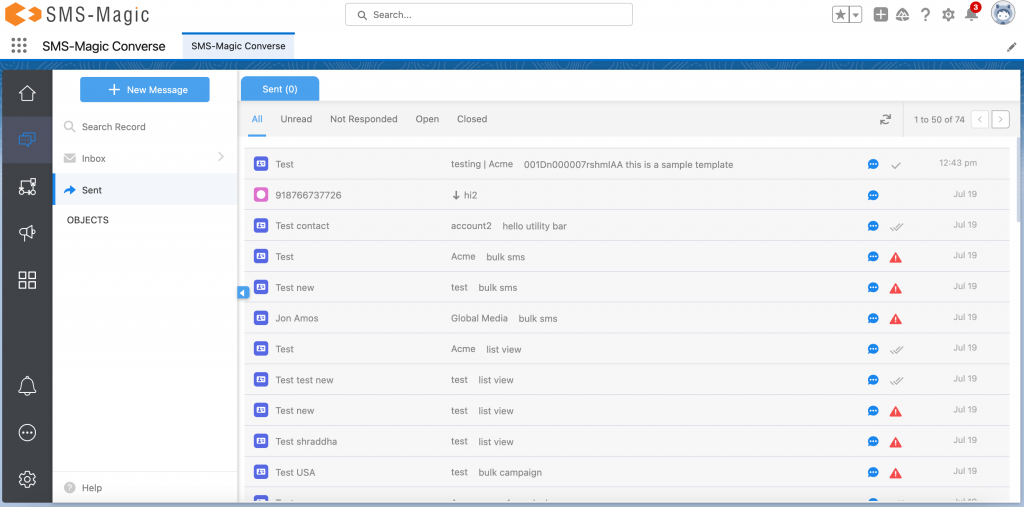
Once the media message template is created, you can go to the Converse Desk, send the message and check the message details in the Sent section.
Select the contact and check the conversations as shown in the image below:
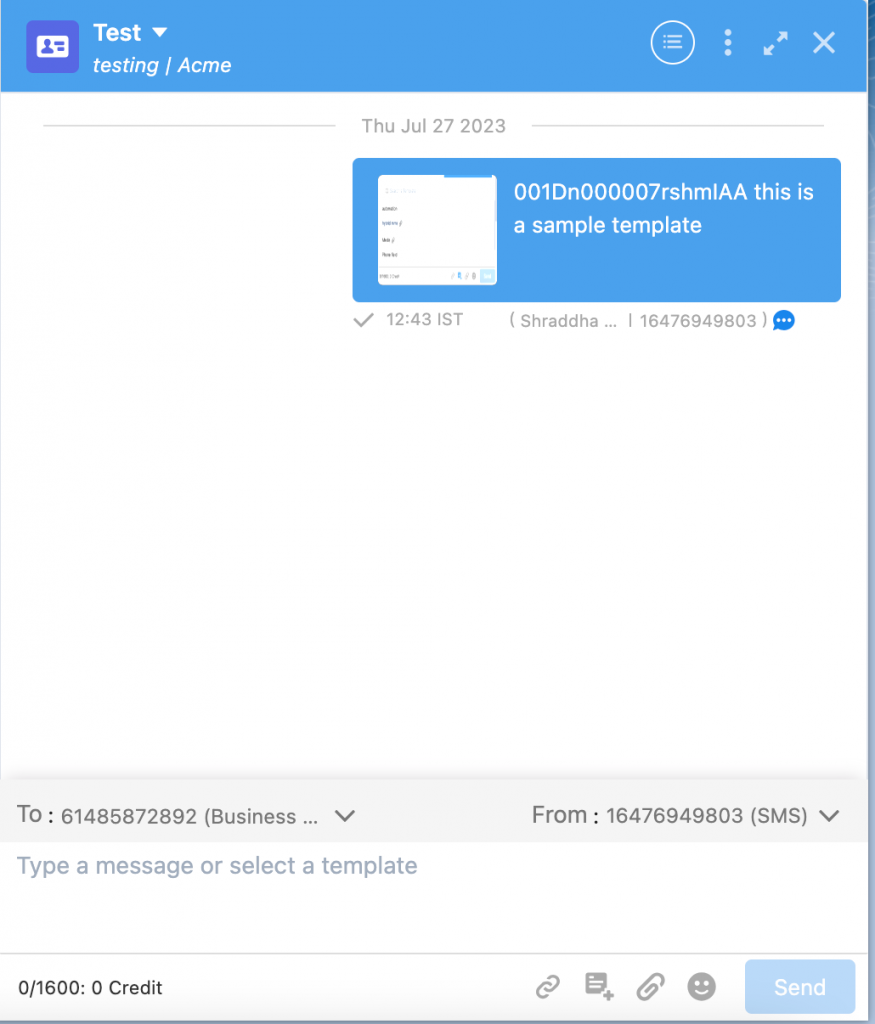
As shown in the above image, on the right, you will be able to see the preview of all the different files that can be shared in the message.
All media message templates are indicated as MTM, as shown in the image above
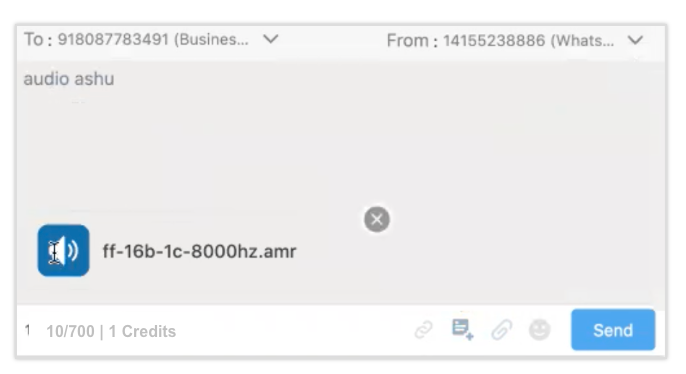
Once you click on any attachment icon, you will be able to see the attachment preview. For instance, if you click on the video attachment icon, you will be able to see the preview of the video. Similarly, you can see the preview of audio, image, and other files sent in the media message templates.
Create New Rich Media Message Template (Package Version 1.73 onwards)
|
As a user, now you can create rich media message templates and use them while sending messages over SMS and WhatsApp channels.
Create a Rich Media Message Template
1.Click on the Converse Templates option to open the Templates home page, as shown below:
The Templates home page displays a list of all templates with details such as template name, template text, template type, channel, objects, content type, and last modified date.
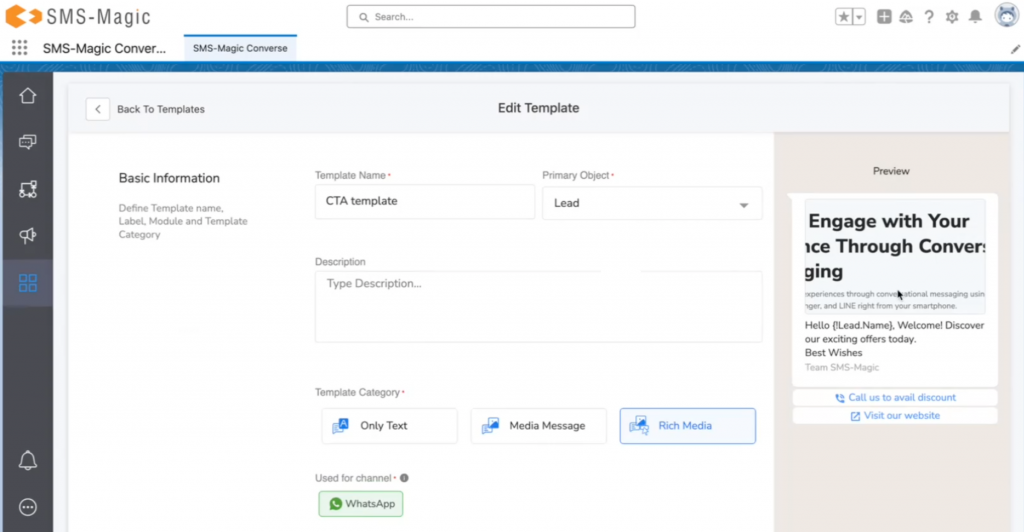
With Rich Media Templates, now you have the button templates in the form of CTA templates and quick reply templates, as highlighted in the image above.
CTA Templates
With the CTA templates, once you click on a button, you get redirected to a website link or a call.
Quick Reply Templates
Under this, you can have maximum up to three options. Once received on the consumer side, they can simply tap on the button and the label of the button will be send as a reply.
As you can see in the image above, in the preview, you have the button templates selected.
As and when the user scrolls down the page, new templates will appear in the list.
Click on the ‘Create New Template’ button and the following template creation page will appear:
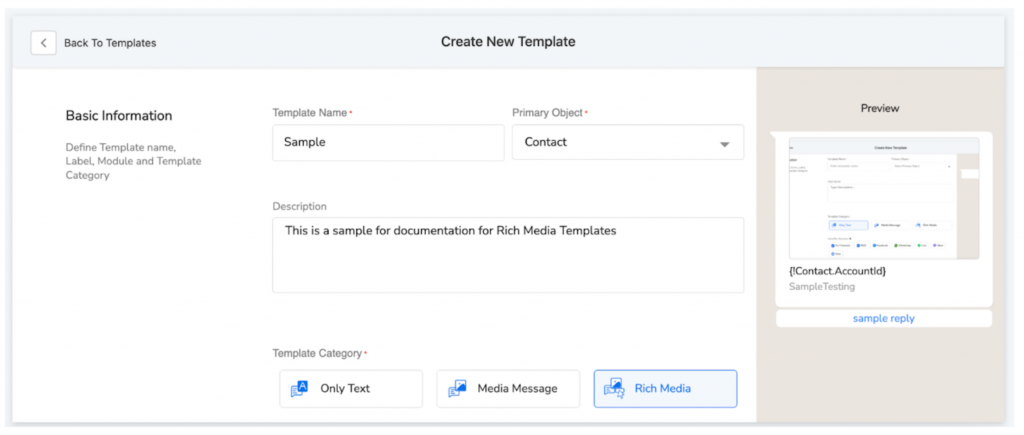
In the Basic Information section, enter the template name in the ‘Template Name’ field and select the primary object from the Primary Object drop-down list
Type the description in the description field
Select the template category as ‘Rich Media’ and select the channels from the list of channels
Note: Rich media message templates allows users to use the WhatsApp functionalities like clickable buttons and call to action buttons
In Insert Merge Field, select the Object type and the Merge Field to personalize your template
Click Create once all details are filled
Once all the details are filled, you can see the preview of your template as shown in the image below:
Edit a Template
|
1. Log in to the SMS-Magic Converse application
2. Click on the Converse Templates tab. The Converse Templates page appears.
3. Select the checkbox next to the template you want to edit. The template will be selected.
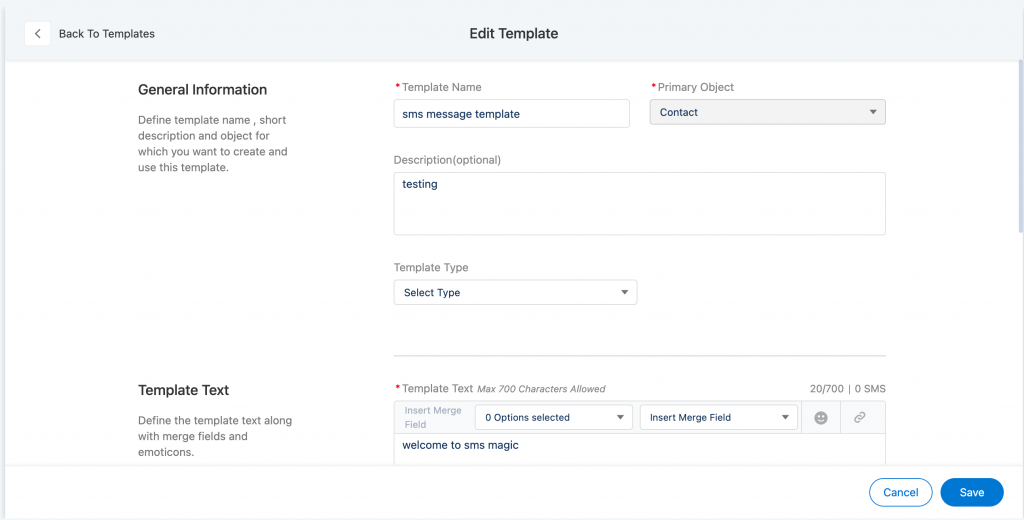
4. Click on ‘Edit’ the following page will appear:
5. Click on ‘Save’ once the template is modified
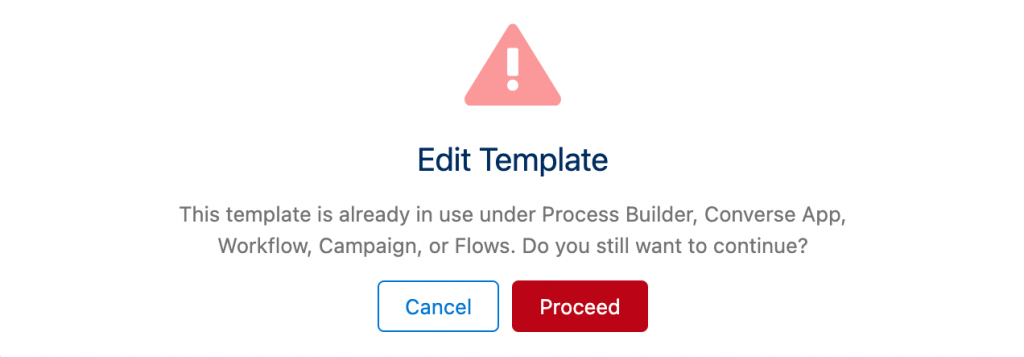
6. Users will be notified with a message if a template is already in use and the following page will appear:
7. Click on ‘Cancel’ if you don’t wish to edit the template
8. Click on ‘Proceed’ if you wish to edit the template
9. Edit the details as required. The following table provides details on individual fields
Field
Description
Template Name
Type an identifier for a Template.
Primary Object
In the drop-down list, select the primary object that you want to associate with the template. Create the object in Message Object Configuration (MOC) prior to associating it with the template. Contact your system admin for creating objects.
Description
Type a small summary to describe the template
Template Text
Type the default template text. Select the fields that you want to use as merge fields within the template text.
Use for Channels
Select and use templates for sending messages on single or multiple channels. Get in touch with our support team care@sms-magic.com for procuring channel-specific sender IDs before using templates on channels other than SMS.
Select Content-Type
In the drop-down list, select the content type you want to tag to the template. If you are using the old compliance feature you need not select values in this field.
Is it a registered WhatsApp template?
Select this checkbox while adding the registered WhatsApp Template. This use-case specific approved template can be sent to recipients over WhatsApp outside of the 24 hrs window when you have consent.
WhatsApp Template Name
This name should match with the registered template name
Locale
Select a locale value in which your template is registered with WhatsApp
Map this template with Facebook Message Tag
Select this checkbox when you want to map the template with Facebook Message Tag. This use case-specific templates can be sent to recipients over facebook outside of the 24 hrs window when you have consent.
Select Message Tag
Select a message tag for the template having a valid use case. The use of tags for invalid use case content may result in restrictions on your page’s ability to send messages.
5. Click on the ‘Save’ button. The template gets modified.
Change the Template Owner
|
Log in to the SMS-Magic Converse application.
Click the Converse Templates tab. The Converse Templates page appears.
Select the check box next to the template which you want to assign to a new owner. The template is selected.
Select multiple check boxes and click Change Owner on the top right-hand corner if you want to change owners of multiple templates.
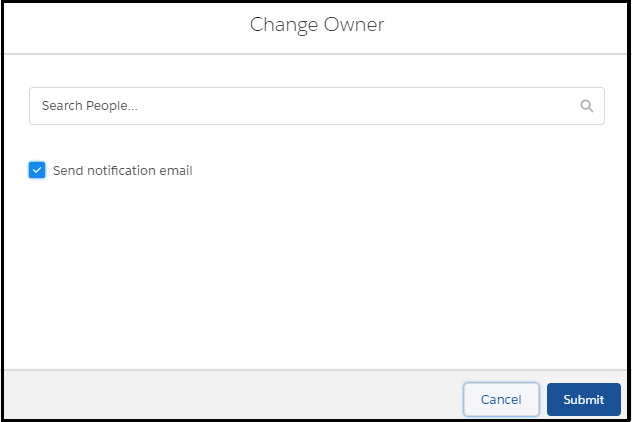
Click and then select Change Owner. The Change Owner pop-up window appears.
Type the first three letters to search for the user you want to move the template to. The search results appear as a drop-down list.
Select a User.
Clear the Send notification email check box if you do not want to send an email notifying the user of being assigned as the template owner.
Click Submit.
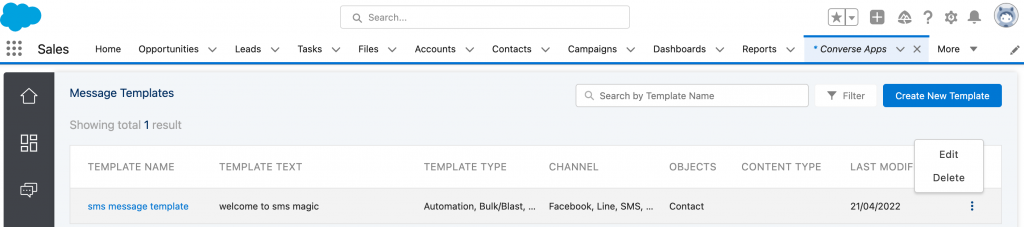
Delete a Template
|
Log in to the SMS-Magic Converse application.
Click the Converse Templates tab. The Converse Templates page appears.
Select the check box next to the template you want to edit. The template is selected.
Click and then select Delete from the drop-down menu that appears. The Delete Template Confirmation page appears.
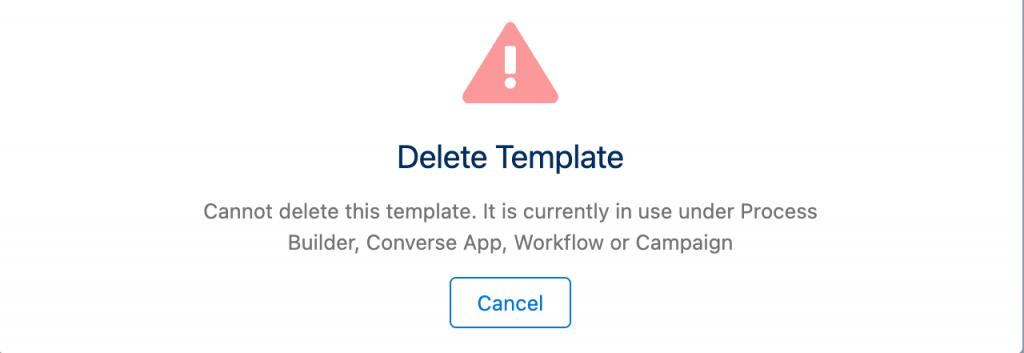
5. Click Delete
6. Users will be notified while deleting a template that is already in use
7. Click on the ‘Delete’ template the following message will appear:
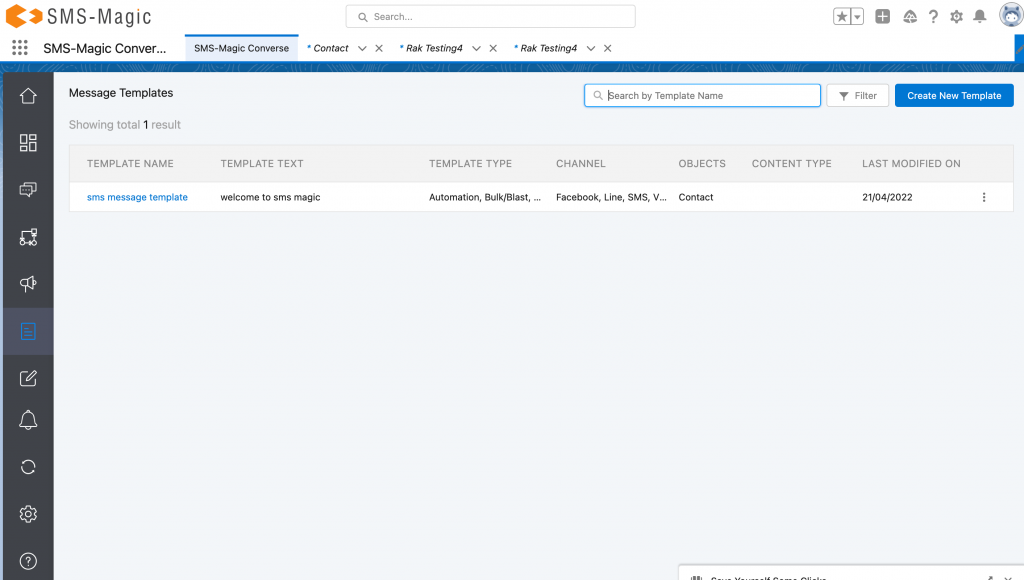
Search Template
|
Here, you can search for any template by typing the template name in the ‘Search’ window.
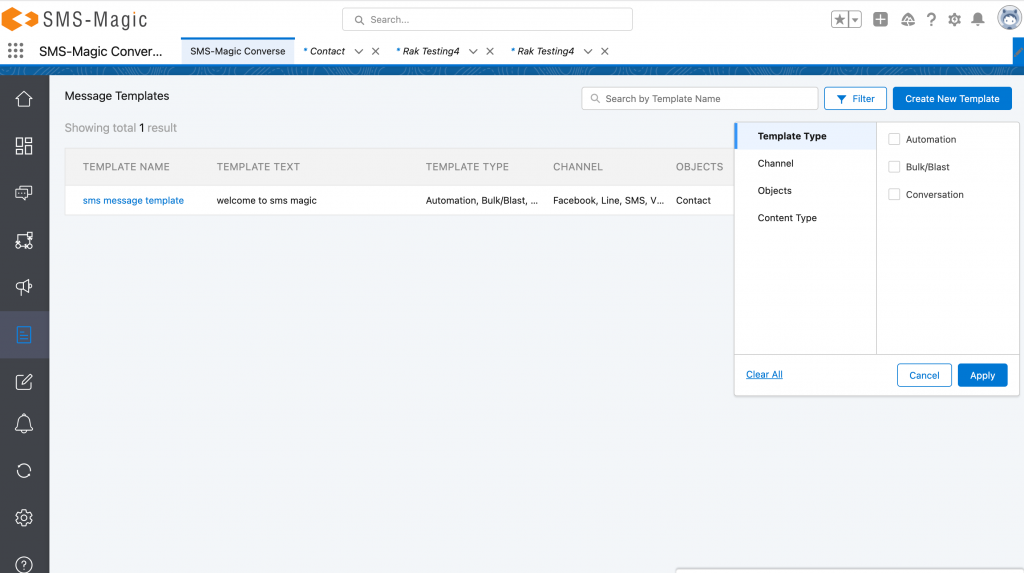
Filter Template
|
Click on ‘Filter’ the following page will appear:
Here, you can filter the Template by choosing the template type and clicking on ‘Apply’.


 and then select Delete from the drop-down menu that appears. The Delete Template Confirmation page appears.