Consent cannot be exchanged, bought, or sold. For instance, you cannot obtain the consent of the recipients by simply buying a phone list from other parties.
Service providers or carriers strive to work closely with their customers to obtain their consent before sending any type of message. Along with the consent taken from the recipients of the messages, you need to take care that the messages comply with all measures of decency, fairness, and the local laws.
Carriers or the telecommunication service providers, need to make sure that businesses willing to contact their customers via any communication channels such as SMS, WhatsApp, and Facebook, etc. adhere to all the strict guidelines that are governed by the local laws.
Once you take consent from your recipients you need to prepare a consent record database. You would require to create a consent record database for contacts in the following scenarios:
When an explicit consent is obtained via the website, email, or mobile handset captured at the object record level
When explicit consent is obtained via contract or paper forms
As per regulatory guidelines, all consents, collected through non-handset sources or created manually need to be maintained and recorded in a database.
Consent can be created in the following ways:
Create Consent through Process Builders
Create Consent Manually
Create Consent Automatically
|
1. Overview
You would need to create a consent record for contacts for the following scenarios:
When explicit consent obtained via the website, email, or mobile handset captured at the object record level.
When explicit consent obtained via contract or paper forms.
Note: You can also import existing consents by creating a CSV with all the fields mentioned in the process builder configuration. Click on the ‘Import’ button to start importing consents.
Consent Obtained via Website, Email, or Mobile Handset
We recommend that you use a process builder and create the consent record automatically when the record is created or edited. Write a process builder as given in the following section on record creation and create a consent record.
Please note, when records are created via non-mobile handset such as web forms, one needs to get the opt-in via a mobile handset. This process of confirming consent via mobile handset by contact created by web forms is called Double Opt-in.
To initiate double opt-in, the admin needs to use the Confirmation Config field and add Compliance Status to Pending to initiate a double opt-in process. One can find Confirmation Config under Converse Settings > Multichannel Compliance > Double Opt-In & Other > View Details.
Consent Obtained via Contract or Paper Forms
If you need to capture the consent on a continuous basis and whenever the records are created or edited, we recommend the same process of configuring the process builder. You must use the comment fields when creating a consent record so that during the audit process you can confirm the source of the consent.
2. Configuring Process Builder
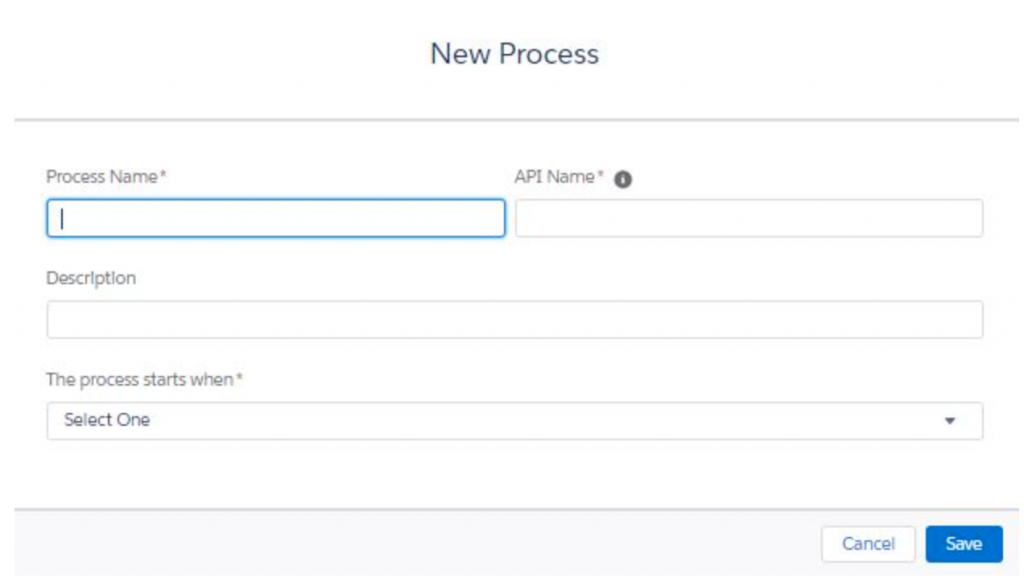
1. Under Setup, click on the ‘Process Builder’ and then click on the ‘New’ button. The New Process pop-up window appears
2. Enter the following information:
The Process Name
The API name
A Description of the process
The Action trigger indicates when the process will begin
3. Click on the ‘Save’ button
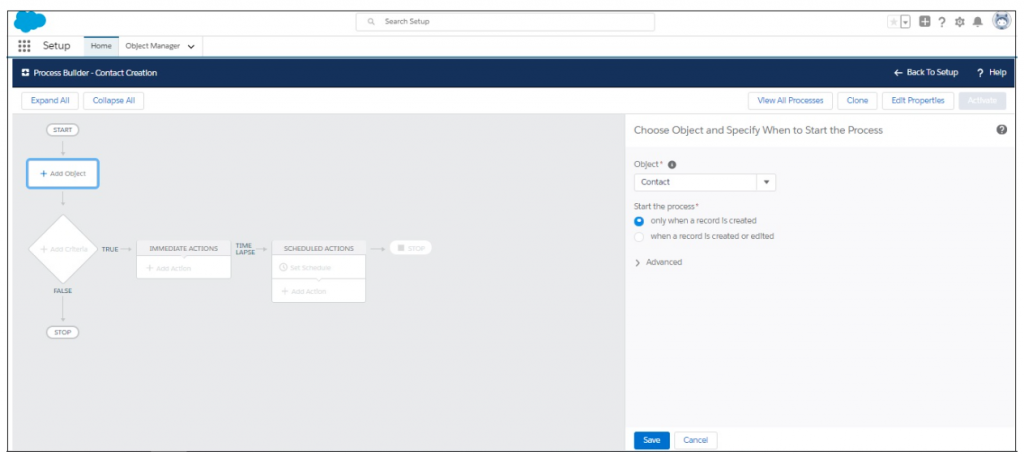
4. In the Process Builder page, click on the ‘Add Object’ button
5. Under Object, type the object that will be modified, for example, Contact or Lead
6. Click on the ‘Save’ button
7. Click on the ‘Add Criteria’ button
8. You can define the criteria as per your need, whenever a new lead is created OR Whenever record-level field capturing consent is getting updated. Here we have set up criteria as Whenever record-level field capturing consent is getting updated.
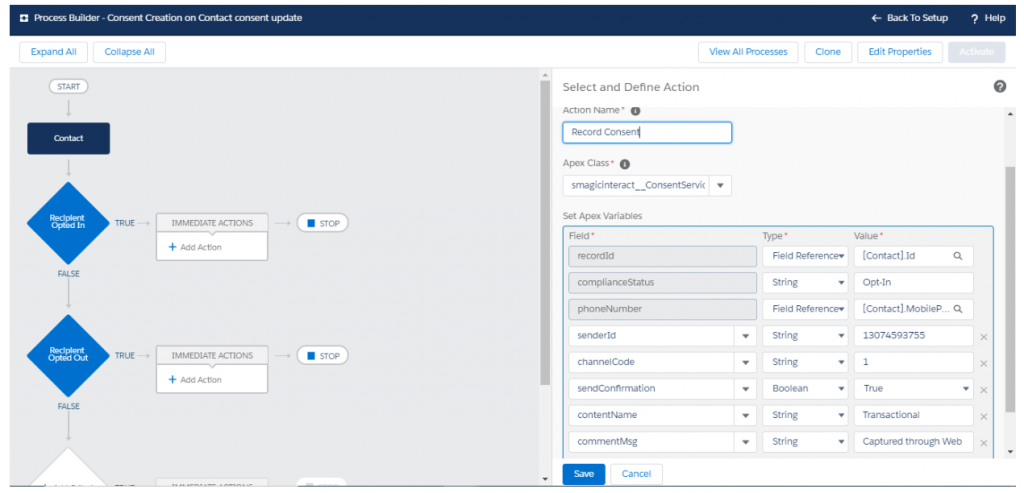
9. Click on the ‘Add Action’ button. Select Apex class – smagicinteract__ConsentService
10. Enter the details, as required. Refer to the table below for more details.
11. Click on the ‘Add Row’ button to include additional fields as given below:
Field
Description
Action
Select the non-handset source from which you want to create consent records. The current version provides Manual as the only available source.
Apex Class
Select Apex class as “smsmagicinteract__ConsentService”
Set Apex Variables as mentioned below
Mobile Number
Select the Mobile Number that is selected as the consent parameter for creating the consent record.
Sender ID
Select the Sender ID that will be used to create the consent record.This field is important only if you select Sender ID as one of the parameters for creating the consent record. You may skip this field if it has not been defined as a parameter in your compliance configurations. In such a scenario consent record will be created irrespective of the Sender ID the request is received from.
ContentName
Select the Content-type for which the consent request will be created. You may skip this field if content-type is not selected as a parameter to collect consent requests in your compliance configurations
channelCode
Pass channel code for which consent is to be created. If the channel Code is not sent, the system will by default consider it as SMS. Channel Code for SMS (1), Facebook (2), and WhatsApp (3).
sendConfirmation
Select this value as true if you do wish to send a confirmation message. Select this value as false if you do not wish to send a confirmation message.
Compliance Status
You can put the compliance status values as a string, the consent status that shall be recorded i.e. Opt-Out, Opt-In or Pending, etc.
commentMsg
Add a text on how the consent was obtained.
recordId(Object Lookup)
You need to add an object-specific reference to the record Id field.
3. Consent Details
Consents Record Details
SMS-History – Confirmation Messages sent
Create Consent Manually
|
1. Click. The app launcher appears.
2. Under ‘All Items’, click on the ‘Consents’ link. The Consent List view page appears:
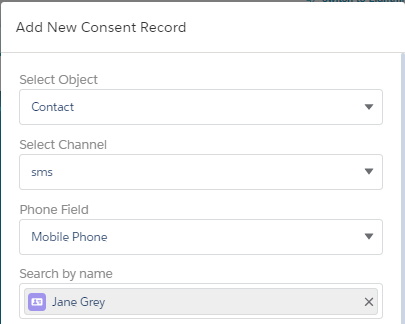
3. Click on the ‘New’ button. The Add New Consent Record pop-up window appears.
Note: If the ‘New’ button in consents record is disabled, enable the ‘Allow users to manually Add/Edit Consent Records’ option in Step 2 of the Compliance Configuration process. Enter the details as required.
4. Refer to the table below for more details on individual fields.
Field
Description
Select Object
Select the object for which you want to create the consent record.
Channel
Select the channel with which you want to create the consent record.
Phone field
Select the phone field from which consent records will be considered.
Search By name
Search the contact name for which the consent record will be created.
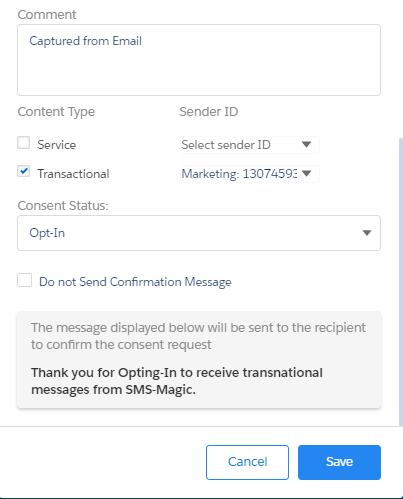
Comment
Type a comment for the record.
Content Type
Select the appropriate checkbox next to select the appropriate content type. This parameter will appear only if they have been configured in Step 1 of the Compliance Configuration process. Contact your System Admin for more details on the consent record parameters configured.
Sender ID
Select the Sender ID from which consent will be initiated. Sender ID list will be displayed based upon the channel you selected above. This is available only if Sender ID is configured as a consent record parameter in Step 1 of the Compliance Configuration process. Contact your system admin for more details on consent record parameters configured.Note: If you have selected a channel as WhatsApp or Facebook, the Sender ID field will be mandatorily triggered irrespective of your org level compliance configuration.
Consent Status
In the drop-down list select the status of your consent. The available options are: Opt-In, Opt-Out, and Pending.
Do not send Confirmation Message
Select this check-box to avoid sending a message to confirm the consent status of the customer.
Confirmation Message Sender ID
Select the sender ID that will be displayed when the confirmation message is sent to the customer.
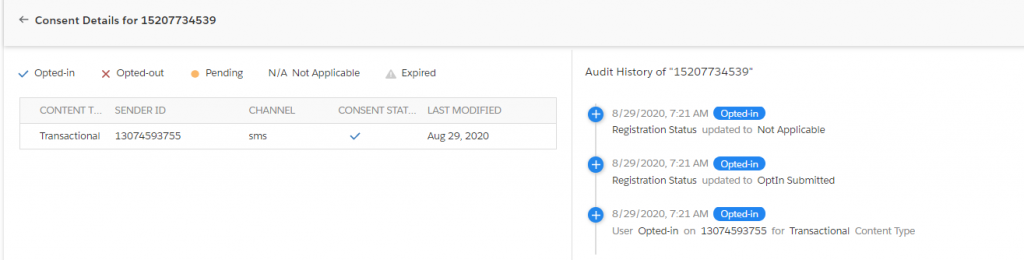
5. Click on the ‘Save’ button. The Consent Record List will be added to the consent database and appears as shown:
6. Click on the individual record and the record details can be seen as below:
7. You can check the consent confirmation message sent in SMS-History as per your double opt-in configuration set.
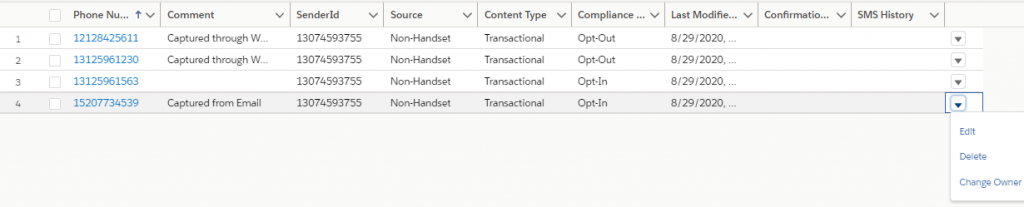
Consent Record Operations
|
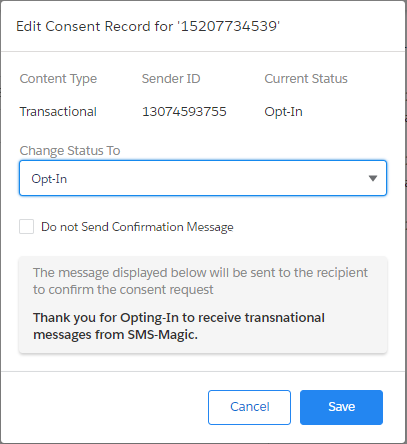
1. Edit Consent Records
Select the checkbox adjacent to the consent record you want to edit.
Click and then click on the ‘edit’ button. The Edit Consent Record for <phone number> pop-up window appears:
Edit the details as required. Refer to the table below for more details on individual fields.
Click on the ‘Save’ button. Consent Record is updated in the list view.
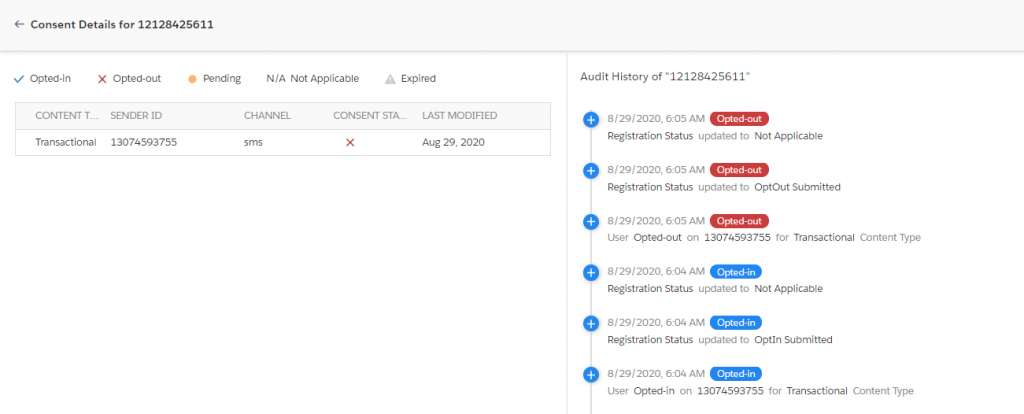
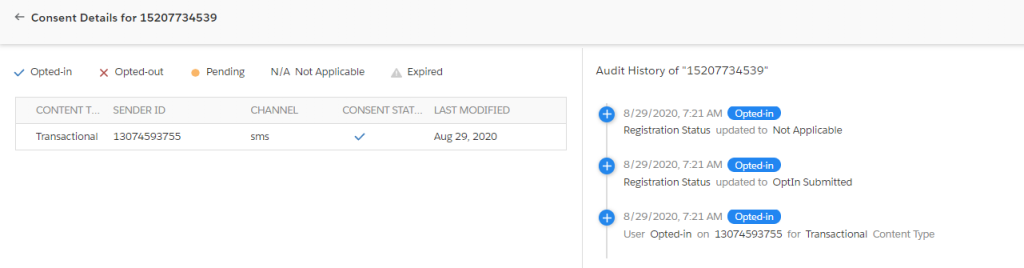
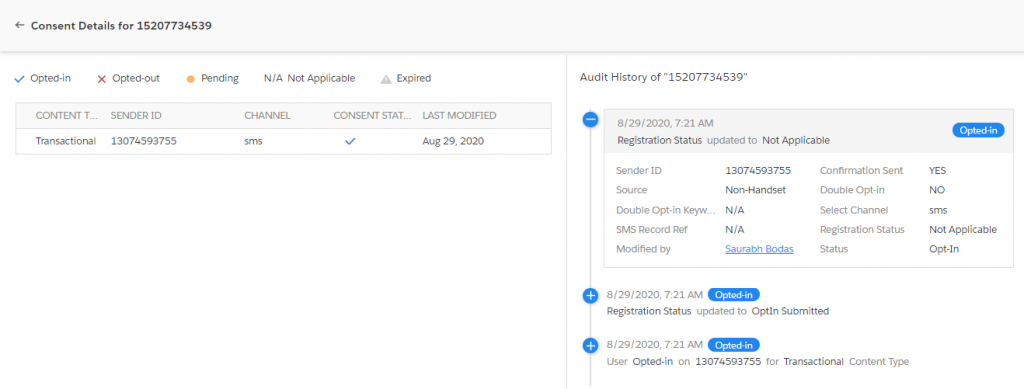
2. View Audit History
1. Click on theicon. The app launcher appears:
2. Under ‘All items’, click on the ‘Consents’ link. The Consent record page appears:
3. Click on the icon and select ‘All’ to remove filters and view all records. The All records view appears:
4. Click a consent record to view details. The Consent details page appears:
5. Click a consent status on the right to view the audit history details.
3. Change Consent Owner
1. Click on theicon. The app launcher appears:
2. Under ‘All items’, click on the ‘Consents’ link. The Consent record page appears:
3. Click and select ‘All’to remove filters and view all records. The Allrecords view appears:
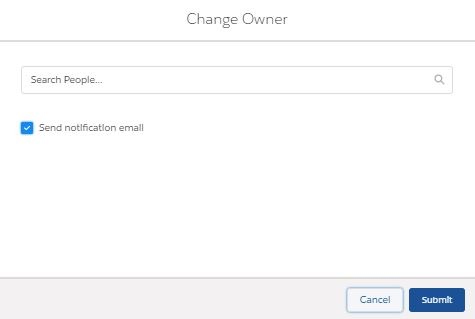
4. Click on the icon and then select ‘Change Owner’ from the drop-down list that appears. The Change Ownerpop-up window appears.
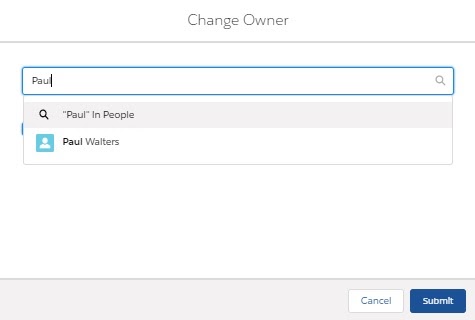
5. Type the first three letters to search for the user to whom you want to assign the consent record. The search results appear as a drop-down list:
6. Select the user
Note: Prior to selecting a user, ensure that read permissions are enabled for the current record and all related records.
7. Clear the ‘Send Notification Email’checkbox if you do not want to notify the selected user of being assigned as the consent record owner.
8. Click on the ‘Submit’ button
Importing Existing Consents
|
Prior to the 1.59 release, we used to store consent information such as Opted-In or Opted-Out on the object record detail page. The disadvantage of this way of storing consent information is when the same number exists for two lead records and one record has opted-in and another record has opted-out information, the system will block one message but will still send the message to another record.
To overcome the above problem, we maintain consent information in the Consent object and not at the object record level. These consent records are referred to when a user attempts to send messages via bulk, automated, or manually.
So, if you are upgrading from a lower version to a higher version falling under below mentioned scenarios, you will have to create/import your existing consent records using batch processing or data loader.
Customers who were on the version below v1.59 and are upgrading to v1.59/v1.60 to maintain consent information in the consent object.
Customers who were on the version below v1.59 and are upgrading to v1.64 to maintain consent information in the consent object.
Customers who were already on v1.59 /v1.60 with WhatsApp and Facebook consent information captured in the consent object and are now upgrading to v1.64 / above to maintain channel specific consent information in the consent object.
Please refer to the following list of fields, field API names, and their purpose in order to put correct values in CSV file to import consents successfully.
Lead
Field API Name
Purpose
Phone Number
Name
Select the Mobile Number that is selected as the consent parameter for creating the consent record.
SenderId
smagicinteract__SenderId__c
Select the Sender ID that will be used to create the consent record. This field is important only if you select Sender ID as one of the parameters for creating the consent record. You may skip this field if it has not been defined as a parameter in your compliance configurations.
After upgrading to v1.64 and above, when you are importing consents for channels other than SMS, Sender ID will be considered as a mandatory parameter.
Content Type
smagicinteract__Content_Type__c
Select the Content-type for which the consent request will be created. You may skip this field if content-type is not selected as a parameter to collect consent requests in your compliance configurations
Compliance Status
smagicinteract__Compliance_Status__c
You can put the compliance status values as a string, the consent status that shall be recorded i.e. Opt-Out, Opt-In or Pending, etc.
recordId(Object Lookup)
smagicinteract__Contact__c
You need to add an object-specific reference to the record Id field.
Source
smagicinteract__Source__c
Enter the consent source: Incoming SMS / Non-Handset
Channel
smagicinteract__Channel__c
Enter channel-specific record ID from the channel master object. This is only required while importing consents to version 1.64 and above.
commentMsg
smagicinteract__Comment__c
Add a text on how the consent was obtained.
Confirmation Config
smagicinteract__Confirmation_Config__c
Select the confirmation configuration ID from the Confirmation Config object
Do Not Send Confirmation
smagicinteract__Do_Not_Send_Confirmation__c
Select this value as true if you do not wish to send a confirmation message. Select this value as false if you wish to send a confirmation message