By default, the user who has installed SMS-Magic is assigned 1 trial license and that the user(admin) can assign a trial license to its users. You can add users by assigning one SMS-Magic Converse license per user. Only licensed users can access the SMS-Magic Converse. You can purchase more required user licenses after registration.
The User Management screen displays the following information:
Plan type you have purchased
The total number of licenses assigned to the Plan type
The number of available licenses
The number of licenses used
If the number of users is more than the number of licenses available, the Admin can purchase more licenses by connecting with care@screen-magic.com.
You can add more users by clicking Add New and entering at least three characters to search for the name or email addresses. After adding the new user, the following happens:
A license is consumed from the available licenses.
The new user is listed in the User’s List.
You can only add active users
You can remove a user from the User’s List and free a license for reuse. After confirming the removal of a user, the following happens:
A license is added to the available licenses.
The user is removed from the User’s List.
You can also associate user licenses directly to a profile. All users within that profile will be eligible to use that license. However, if the number of users sharing that profile exceeds the available licenses then you will have to purchase additional licenses.
Add a User
1. To assign a user to an SMS-Magic Converse license:
2. In the Converse Settings tab, click User Management.
3. Click Add New.
4. Enter at least three characters to search for the name or email addresses.
5. Select the users or profiles from the list.
6. Click Assign License to select the license type you want to assign to the user.
7. Click Add. The new user or profile shows up on the User Management List.
Remove a User
To remove SMS-Magic Converse license for a user:
1. In the Converse Settings tab, click User Management.
2. Click next to the user in the User’s List.
3. The selected user appears in the Remove User list. Click Remove.
4. SMS-Magic license is returned to the pool of available licenses.
Configure Objects to Send and Receive Messages
|
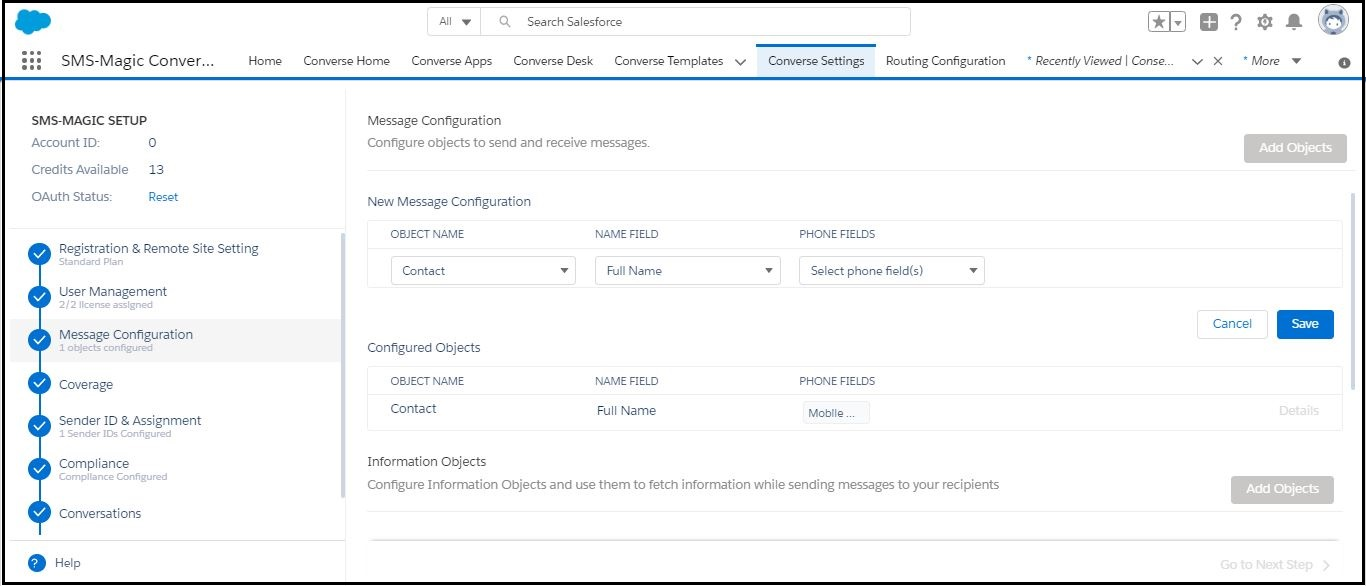
Choose who you want to Message and from which Objects. Message Objects are objects from which you can send SMS. In salesforce, you can choose your standard and custom objects from which you want to trigger SMS. You can choose one or more phone number fields to send messages to. We support up to 7 mobile phone fields on one object.
In the Message Object Configuration section, you can do the following:
Define objects for which the user defines conversation templates.
Auto-generate Conversation and Bulk Sending pages based on the objects defined.
Define the use of mobile fields and name fields.
Configure setup buttons using the pages that are generated.
You can add objects to the Object list. The system then automatically configures the Visualforce pages. These pages are then used to create buttons, such as:
Send SMS
Send Bulk SMS
Conversation View
You need to assign users access to Visualforce pages in order to send messages. For more informaton about assigning permissions, see Appendix A – Permissions.
In addition to Visualforce pages, Lookup Fields are also created for that object on SMS History, Converse App Task, and Conversation objects. These fields will be used to attach messages to a record when required by the application while building conversations. User profiles need to be provided field-level access permissions in order to refer these lookup fields while building conversations.
Users should also have access to merge/dynamic fields that are referred to in the message configuration and used in SMS templates and fields. For example, a mobile number.
To delete a Message Object or an Information Object, log in to an administrator account. You need to have the relevant permissions to perform the deletions. Deleting a Message Object or an Information Object must be carefully considered and carried out as it impacts SMS delivery throughout the application.
Before deleting the configuration of an object, the Admin must disable the following:
All Automations
Process builders
Campaigns
Add Objects
1. In the Converse Settings tab, click Message Configuration.
2. Click Add Objects.
3. Select the object name, name, and phone from the dropdown lists.
You can select more than one phone option.
4. Click Save.
Edit Objects
1. In the Converse Settings tab, click Message Configuration.
2. Click Details next to the message object that you want to edit.
3. Click Edit icon next to the object you want to edit. The edit view appears.
4. If you want to change the name, then select a different name from the Name Field.
5. If you want to change the phone, then select a different name from the Phone Fields.
The Phone Fields value cannot be empty. You must provide at least one phone option.
6. Click Save.
Delete Objects
1. In the Converse Settings tab, click Message Configuration.
2. Click Details next to the message object that you want to delete.
3. Click the delete icon. The Remove Object Configuration pop-up window appears.
4. Click Save.
Add Information Objects
1. In the Converse Settings tab, click Message Configuration.
2. In the Information Objects section, click Add Objects.
3. Select the information object from the Information Objects dropdown list. Note: You can select multiple information objects.
4. Select the primary object that will reference the information object from the Object Name dropdown list.
5. Click Save.
Edit Information Objects
1. In the Converse Settings tab, click Message Configuration.
2. Click the Edit icon next to the object you want to edit. The edit view appears.
3. If you want to change the information object, then select a different object from the Information Object list.
The Information Object value cannot be empty. You must provide at least one information object.
4. If you want to change the primary object that will reference the information object, then select a different primary object from the Object Name dropdown list.
5. Click Save.
Delete Information Objects
1. In the Converse Settings tab,click Message Configuration.
2. Click the Delete icon next to the object that you want to delete. The Delete Configuration pop-up window appears.
3. Click Delete.
Select your Destination Country
|
When you configure SMS-Magic Converse, you can choose your destination country of operation where you would want to send messages. You can choose the All option to send messages in more than one country. Messages will follow the compliance guidelines and Sender ID restrictions based on the country of coverage.
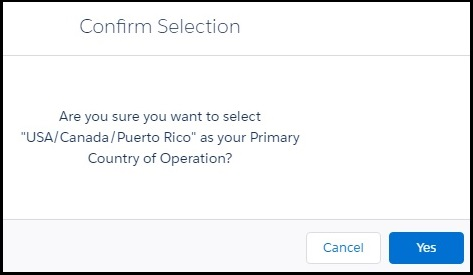
To select your Primary Country of Operation where you would want to send messages:
1. In the Coverage section, select the country from the Primary Country list.
2. Click Yes in the Confirm Selection pop-up window.
3. Click Go to Next Step.
Configure and Assign Sender ID
|
Sender ID is an alphanumeric name or number that appears on the mobile device and helps to identify the sender of the message. It can be a long code or shortcode that you assign to a single user, multiple users, or a profile. Inbound numbers should be used as the Sender Id to receive replies to your outbound messages.
There are some countries that allow you to send SMS with Alphanumeric Sender ID. To get replies you’ll need to procure an Inbound number and give reply instructions in the text of the SMS you send. For example, Dear Customer, Enjoy the Rewardz Festival on your Credit Card. To know more, SMS ‘JOIN’ to 5676756 and register now. For TnC, please visit http://bit.ly/6463nf’.
Alphanumeric sender ID is not allowed in some countries including US, Canada, and Brazil because of carrier regulations. Therefore, non-compliance to these local carrier regulations may prevent your messages from getting delivered.
You need to reach out to sales@screen-magic.com to get the sender ID added to your org. The sender ID will then be populated in the Sender ID & Assigment section in th configuration steps.
You can configure Sender IDs for different organizations, teams, or individuals or Campaigns or Messaging Programs to appear as you want on the customer’s mobile device.
Add Sender ID
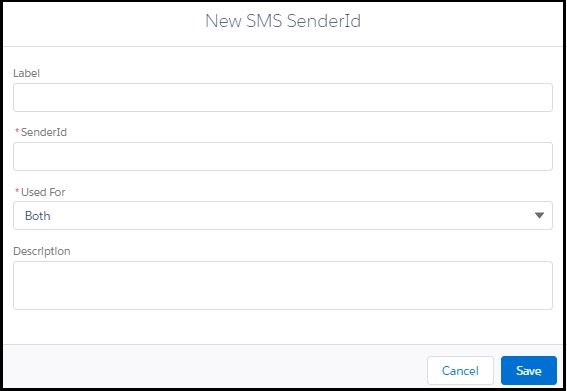
1. On the Sender ID and Assignment page, click Add Sender ID. The New SMS SenderId pop-up window appears.
2. Enter the information in each field. Fields marked with a red asterisk are mandatory. Refer to the following table for more details on individual fields.
Field
Description
Label
A name to identify the new number or Sender ID.
Sender ID
The number procured and assigned to the account.
Used For
The Admin assigns how the Sender ID is used based on the requirements of the organization. The options are:
• Both – The Sender ID is used for both incoming and outgoing messages. • Incoming – The Sender ID is used only for incoming messages. • Outgoing – The Sender ID is used only for outgoing messages.
When you select this option you can associate another number with this Sender ID for sending incoming messages.
Description
A brief description of the Sender ID.
3. Click Save.
Edit Sender ID
1. Click the Options icon next to the Sender ID you want to edit.
2. Click Edit. The Edit SMS Sender ID pop-up window appears.
3. Change the information as needed. Fields marked with a red asterisk are mandatory. Refer to the following table for more details on individual fields.
Field
Description
Label
A name to identify the new number or Sender ID.
Sender ID
The number procured and assigned to the account.
Used For
The Admin assigns how the Sender ID is used based on the requirements of the organization. The options are:
• Both – The Sender ID is used for both incoming and outgoing messages. • Incoming – The Sender ID is used only for incoming messages. • Outgoing – The Sender ID is used only for outgoing messages.
When you select this option you can associate another number with this Sender ID for sending incoming messages.
Description
A brief description of the Sender ID.
4. Click Save.
Assign Sender ID
1. On the Sender ID and Assignment page, click next to the Sender ID to which you want to assign users. The dropdown menu appears.
2. Click Assign to Users. The Assign to Users popup window appears.
3. Enter at least 3 characters to search for users or profiles.
4. Click Add. The users or profiles are assigned to the Sender ID.
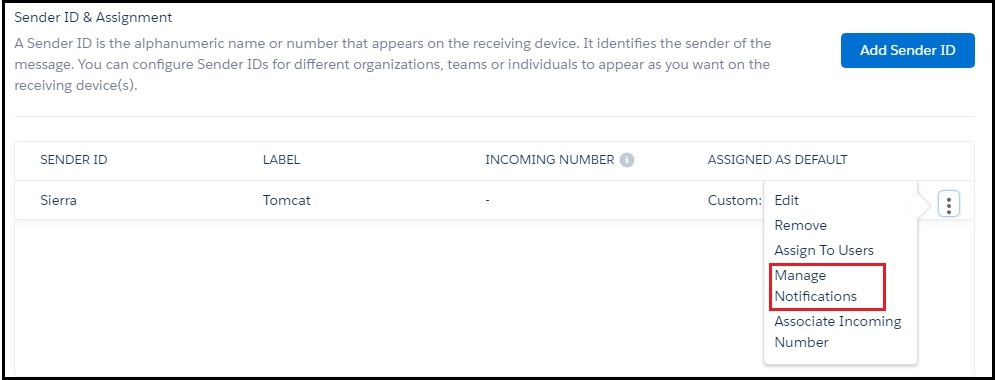
Manage Notifications
1. On the Sender ID and Assignment page, click the Options icon next to the Sender ID for which you want to manage notifications. The dropdown menu appears.
2. Click Manage Notifications.
3. In Recipient, select the recipient who will be notified of receiving an incoming message. Refer to the following table for more details on the available options for notifying recipients.
Field
Description
Don’t notify to anyone
The Sender ID does not receive a notification.
User assigned to Sender ID
The user assigned to the Sender ID receives the notification.
Last Sender
The last user of the Sender ID receives the notification. This is relevant when the Sender ID is assigned to multiple users or a profile.
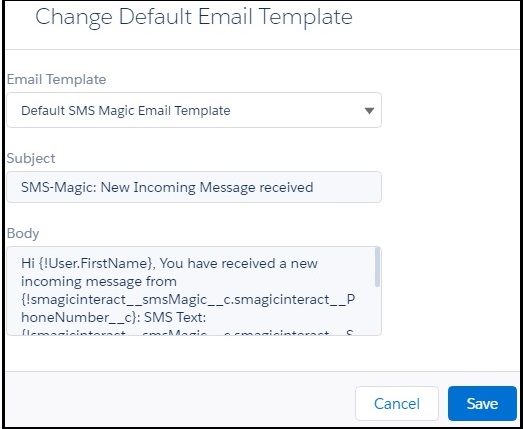
4. In Email Template, select the email template you want to send with the notification. The Subject and Description fields display the template content.
5. Click Save.
Associate Incoming Number
1. On the Sender ID and Assignment page, click the Options icon next to the Sender ID to which you want to associate an incoming number. The dropdown menu appears.
This feature is available only for Sender IDs that have been defined for use in Outgoing messages.
2. Click Associate Incoming Number. The New Alpha Sender ID Map popup window appears.
3. For both Outgoing Sender ID and Incoming Sender ID fields, do one of the following:
Click New SMS Sender ID, to create a new Sender ID.
Search for the Sender ID that you want to associate with the selected Sender ID.
4. Click Save to save the Sender ID or Save & New to save it and create another Sender ID.
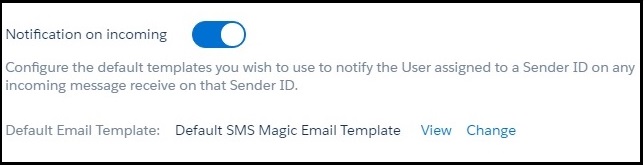
Configure Notifications
1. Use the Notification on Incoming toggle button to receive notifications for an incoming message. You can disable all notifications by sliding the toggle back.
2. Click View. The View Default Email Template popup appears.
3. Click Close. The Sender ID and Assignment page appears.
5. In Email Template, select a new email template dropdown list, if required.
6. Click Save.
Messaging Compliance
|
SMS or messaging compliance is a highly regulated industry. The applicable laws depend on the place of business, destination country of your recipients and the specific industry you are in. Telecom laws apply uniformly to any SMS sent in that particular country.
Businesses are required to obtain specific consent before messaging their prospects and customers. Each regulation such as Telephone Consumer Protection Act (TCPA), General Data Protection Rights (GDPR), Canada’s Anti-Spam Legislation (CASL), or California Consumer Privacy Act (CCPA), California or the new California law, makes it mandatory for each business to obtain specific consent. SMS Magic has created an extensive framework which serves as a guideline for you to define:
Who are you messaging?
What you are messaging and obtain specific consent for that content?
How you are obtaining Consent?
There are several considerations in choosing your consent options. We advise you to consult your attorneys before deciding on the messaging consent.
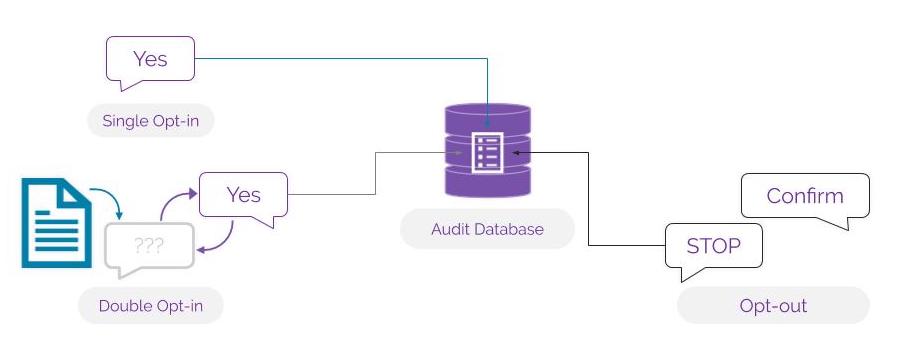
The applicable laws like TCPA and GDPR make it mandatory to obtain consent and keep records in a readily available audit database which can be used as evidence in case of a dispute. This database of Consent records needs to be maintained for 4 years (as per GDPR) from the date of its creation.
With SMS Magic you can choose how you obtain and maintain or record your consent. You can choose to get a blanket consent for sending any legally possible Content or get a specific Consent. For example, you can get blanket consent for sending any type of messages, service, transactional, or promotional; Or you can get specific consent for sending transactional messages only.
This specific consent is recorded via Sender ID and Content Type. You can choose any of the following methods:
Mobile Number Only – You Opt-in to have a blanket yes or no consent for any recipient
Mobile Number and Sender ID – You record consent for specific Sender ID’s. You always have the option to choose “All”, while creating your consent records.
Mobile, Sender ID, and Content Type – You choose to do specific consent based on Content Type.
We recommend using the Mobile number and Content Type to be specific. If you are obtaining blanket consent, then choose “All”.
The compliance feature helps you create a consent database based on all these parameters. You can also enable users to create a consent record manually. However, users need to be provided with relevant permissions to create and update the consent database.
You can define consent record parameters in the following four possible combinations:
Parameter
Description
Mobile Number
When you enable mobile number as a record parameter, all consent will be accepted only when responses are received through the default mobile number the customer provides. This is a mandatory parameter and will have to be included in every combination.
Mobile Number and Sender ID
When you enable this parameter, consent records will be registered when responses are received from the registered mobile number and by the defined sender ID of the customer.
Mobile Number, Content Type, and Sender ID
When you enable this parameter, consent records will be registered against responses received from the defined phone number of the customer, for a specified Content-Type sent to the customer, and by the Sender ID of the user.
Methods Of Input
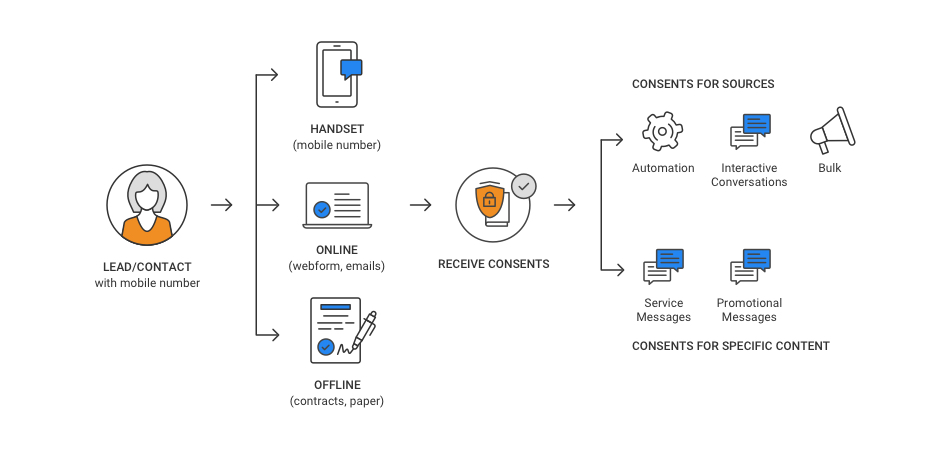
Consent is captured through text messaging, paper forms, emails or web forms. All these varied methods of input can be categorized under three areas. These are as follows:
Mobile – You can print the mobile numbers on billboards, posters or print ads in order to encourage customers to share their consent for receiving updates on your products and services. When customers send in their consent through these numbers, the input source is recorded as Mobile.
Online – All Web forms or partner sources sending in new lead information are considered as valid sources for collecting consent. However, it is recommended that you provide explicit instructions to customers to perform a specific action (like selecting a checkbox or clicking a Submit button) in order to submit their consent. Once submitted the database can record the input source as Online.
Offline – All physical forms like contracts or other paper forms can also be used to collect consent requests. Even for physical forms, you need to mention the specific action the customer needs to perform in order to send in their request. All requests collected through paper forms need to be added in the consent database with its input source as Offline.
Consent once captured in the consent database needs to mention the input source that has been used to collect it. Create a Comments field in the Consent object that will capture information on the input source for collecting the consent. Similarly, the lead or Contact object record also needs to be updated with a custom field that will comprise details on how the record is being created. This is a recommended practice for maintaining the audit details.
The Methods of Input section will also appear only the first time you are configuring the compliance details.
To Configure the Audit Database:
1. In Consent Record Setting, select the relevant parameters to define consent records.
2. In Keep Audit Report as Object, click View Sample Database. A popup window appears displaying a sample database.
3. Enable the Allow users to manually Add/Edit Consent Records option if you want to allow Agents to add consent records manually.
In addition to enabling this feature, you have to provide users with the custom permission AllowToAddManualConsent to help them create and update consent record database.
4. Click Next.
The Add Manual Consent Record button in the Consent Record will remain disabled if you do not enable the Allow users to manually Add/Edit Consent Records option. The Consent Record database will be created only after you complete the compliance settings. To send a message successfully, the combination of Mobile Number, Sender ID, and Content Type has to match (or the combination configured here has to match).
Configure Consent Method and Content
You can initiate and respond to messages from multiple messaging sources. As each message has a specific purpose, the need to ensure that consent is received for those messages prior to sending them, is therefore critical.
For example, while sending automated messages or sending messages to multiple recipients, it is mandatory that you receive an opt-in request prior to sending. This helps to ensure that your marketing efforts generate positive results.
While sending one-to-one messages, you will not be able to send messages to customers who have explicitly opted-out of your communication strategies.
SMS-Magic Converse helps you configure the consent method that is needed to send out messages through different interfaces. This is a recommended best practice that all users should follow.
The interfaces that you can configure with these consent methods can be categorized based on the type of messages that they are used for sending. The consent method can be selected from the drop-down list placed below each category name. These are as follows:
Automated Conversations – All sources like Converse Apps and Process builders that help you send automated messages.
Bulk Conversations – All sources like Record list view, Campaign Managers, reports and Salesforce Campaigns that help you send bulk messages.
Interactive Conversations – All sources like the Send Message window in Converse Desk, Converse Inbox and Record View that help you send one-to-one messages to a single customer.
There are two options for defining what you obtaining consent for:
Source Type – You can define if the source requires a prior consent or not. For example, you might not require consent for sending an Emergency message. Another scenario is that you might not be required to use SMS Magic Compliance Center because you have built your own compliance center. So you can choose, “Consent Not required”.
Content Type – Content type opt-ins are useful in ensuring that you can continue sending messages to customers for a specific content-type. Therefore, in case the customer is applying for a blanket opt-out instruction, in the opt-out confirmation message they receive, you specify the content type opt-in they can send if they wish to continue receiving messages for that specific content type.
To Create Consent for Source:
1. In Consent for Source, click the drop-down list beneath the relevant message interface name to select the consent mode. Refer to the following table for details.
Field
Description
Consent Required
If you select this mode, you can send messages to only those customers who have provided explicit Opt-In instructions. This can be used for receiving mobile-initiated consent, consent received through online (web forms) or offline (Physical forms) sources.
Consent Not Required
If you select this mode, you can send messages to all customers except those who have specifically provided Opt-Out instructions. This can only be used in countries where compliance guidelines dictate that you can continue sending messages to customers until you receive an opt-out instruction. It is not necessary to receive an opt-in request prior to sending out messages to these businesses.
Consent Not Applicable
If you select this mode, you can send messages to all customers without checking for any consent details. This can be used by businesses sending out emergency messages or those who use their own internal compliance guidelines. In all such scenarios, the existing consent status is ignored and the message is sent.
Click View Source next to the conversation interface type to view the various interfaces (for example, Campaign Manager, Converse Desk, Bulk SMS) that help you send the relevant conversations.
To Create Consent for Specific Content:
1. In the Consent For Specific Content section, click Create New.
2. Enter the customer details to create a new content type. Refer to the following table for more details on individual fields.
3. Click Next. The Configure section appears to help you add the Sender ID and keyword configurations for the new content type.
4. Enter the keyword configurations for the new content type. Refer to the following table for more details on individual fields.
Ensure that you do not use the same keywords used in the default Keyword configuration section.
5. Click Validate & Next. The Opt-out Instructions section appears.
6. Enter the following details to add an opt-out instruction to your message. Refer to Table for more details.
This is optional and you may skip appending any opt-out instructions.
7. Click Save. The new message type appears on the Content Type table.
Field
Description
Define
Content Type Name
Type the content type name. It must follow the given guidelines: It must be a maximum of 40 alphanumeric characters including underscores (_). It must start with a letter. It should not include spaces. It must not end with an underscore or contain two consecutive underscore characters.
Consent Mode
In the drop-down list select the relevant consent mode for the new content type.
Applicable Sources
Select the conversation source for which the content type will be available. The options provided are: Automated Conversation Bulk Conversation Interactive Conversation
Configure
Confirmation Message Sender ID
In the drop-down list, select the Sender ID that will be associated with this Content Type. You can send messages using this content type if you select this defined Sender ID.
Opt-In keyword
Type the specific Opt-in Keywords that you want to associate with this content type. Once configured it will override the manual message keywords created under the Compliance section Basic Settings.
Opt-In Confirmation Message
Type the message that will be sent to customers in response to the Opt-in request.
Opt-out Keyword
Type the specific Opt-out Keywords that you want to associate with this content type. Once configured it will override the manual message keywords created under the Compliance section Basic Settings
Opt-Out Confirmation Message
Type the message that will be sent to customers on receiving the Opt-out request.
Opt-Out Instructions (Optional)
Auto append opt out Instruction in every message
Select the option if you want to add an opt-out instruction to every message that is sent out.
In an Interval
Do not Auto-append opt out instructions in every message
Select the option if you do not want to add an opt-out instruction to every message that is sent out.
Opt-out Message
Type the message you want to append as an opt-out instruction
To Edit a Content Type:
On the content type page, select next to the content type you want to edit. A drop-down menu appears.
2. Click Edit. The Edit Content Type popup window appears.
3. Modify the fields as per requirements. Refer to the following table for more details.
Field
Description
Define
Content Type Name
Displays the content type name. You cannot modify the content type name.
Consent Mode
In the drop-down list select the relevant consent mode for the new content type.
Applicable Sources
Select the conversation source for which the content type will be available. The options provided are: Automated Conversation Bulk Conversation Interactive Conversation
Configure
Sender ID
In the drop-down list, select the Sender ID that will be associated with this Content Type. You can send messages using this content type if you select this defined Sender ID.
Opt-In keyword
Type the specific Opt-in Keywords that you want to associate with this content type. Once configured it will override the manual message keywords created under the Compliance section Basic Settings.
Opt-In Confirmation Message
Type the message that will be sent to customers on receiving the Opt-in request.
Opt-out Keyword
Type the specific Opt-out Keywords that you want to associate with this content type. Once configured it will override the manual message keywords created under the Compliance section Basic Settings
Opt-Out Confirmation Message
Type the message that will be sent to customers on receiving the Opt-out request.
Opt-Out Instructions
Auto append opt out Instruction in every message
Select the checkbox if you want to add an opt-out instruction to every message that is sent out
In an Interval
Do not Auto-append opt out instructions in every message
Select the option if you do not want to add an opt-out instruction to every message that is sent out.
Opt-out Message
Type the message you want to append as an opt-out instruction
4. Click Save.
To Delete a Content Type:
You can delete a content type only when it is not associated with a consent record.
1. On the Content Type page, select next to the content type you want to delete. A drop-down menu appears.
2. Click Delete. The Delete Confirmation pop-up window appears.
3. Click Confirm. The Content Type Configuration is deleted.
Configure Double Opt-in
Many times businesses obtain consent to send messages via Web forms, emails or offline methods like contracts. Many industry bodies and associations like the TCPA recommend confirming the Opt-in via handset by sending an explicit SMS asking to confirm or at least notify the recipient that they are subscribed to the text message service from your business.
The consent status of the recipients is set to pending until they use this keyword to confirm the request. On receiving the keyword from the prospect, you send a response confirming the consent. This completes the compliance process.
The consent collection process can be automated. You can set up a process builder so that whenever a new lead is created you will be able to create a new record in the consent database.
This section helps you create the configuration for double opt-in or confirmation messages for opt-ins via manual or online forms. All consent will be captured based on these configurations.
To Create a Double Opt-in Configuration:
1. In Double Opt-in & Others, click Create Configuration. The Create New Configuration screen appears.
2. Enter the details as required. Refer to the following table for more details.
3. Click Validate and Save. The Double-Opt In screen appears.
Click the Down icon next to the double opt-in record you want to view and click View Details from the dropdown list.
Click the Down icon next to the double opt-in record you want to remove and click Delete.
FIELD
DESCRIPTION
Source
Select the non-handset source from which you want to create consent records. The current version provides Manual as the only available source.
Confirmation Message Sender ID
Select the Sender ID from which the confirmation message will be sent.
OPT-IN
Send Confirmation Message
Select the option to send a confirmation message.
Double Opt-in
Select the option to enable the customer to send a double opt-in.
Opt-in Confirmation Message
Type the confirmation message that will be sent out for an Opt-in request.
Double Opt-In Message
Type the message that will be sent out to request for a Double Opt-in. This field appears only if you select the Double Opt-in option.
Double Opt-in Keyword
Type the keyword that will be used for sending double Opt-in requests.This field appears only if you select the Double Opt-in option.
Double Opt-in Confirm Message
Type the message that will be sent out to confirm a Double Opt-in request. This field appears only if you select the Double Opt-in option.
OPT-OUT
Opt-out Confirmation Message
Type the message that will be sent out to confirm an Opt-out request. This field will appear if you do not select the Double Opt-in option.
Configure Keywords
To comply with industry standards, you must respond to keywords for HELP & STOP. Any user who opts-out using the STOP keyword must be added to an opt-out list (blacklist) and must not be sent any further messages until or unless they opt back in. You can configure mandatory keywords for the three keyword types provided. These are:
Opt-out
Opt-in
Help
For each keyword type, some default keywords have already been pre-defined. You can also create new ones following industry-specific norms.
Create keywords using the following guidelines:
Use Alphabets
Do not add spaces
Do not include special characters
When a customer uses the keywords defined under the Opt-out keyword type, they will be opted out or blocked from receiving messages for all campaigns and other activities. You cannot send any more messages to all such customers.
Similarly, when a customer uses the keywords defined under Opt-in keyword type, they choose to opt-in for receiving messages from any team within the organization.
You can define separate keywords to help customers opt-in for specific content type messages, for example, notification or promotions. These keywords will be considered for receiving consent for that specific content-type.
Content-Type opt-ins are useful in ensuring that you can continue sending messages to customers for a specific content-type. Therefore, in case the customer is applying for a blanket opt-out instruction, in the opt-out confirmation message they receive, you specify the content-type opt-in they can send if they wish to continue receiving messages for that specific content-type.
To Configure Compliance Keywords:
1. Click Edit next to the Keyword type you want to modify. The Edit Keyword Configuration pop-up window appears. Refer to the table below for more details on the Keyword options.
You cannot edit the default keywords.
FIELD
DESCRIPTION
Opt-In Keywords
Displays the opt-in keywords that will be used at the organization-wide level. You can define Opt-in keywords that are specific to a content type.
Opt-Out Keywords
Displays the opt-out keywords that will be used at the organization-wide level. This will opt-out users from all the campaigns/content types.No further messages can be sent to customers from any teams in the organization.
Help Keywords
Displays the help keywords that will be used at the organization-wide level. This will redirect customers to request for support based on the keyword you provide.
2. Enter the following details to add keyword configuration.
FIELD
DESCRIPTION
Type
Displays the keyword type that you have selected to edit. For example, Opt-out, Opt-in, Help.
Keywords
Type the new keywords that you want to configure for the keyword type.You can type multiple keywords for a single keyword type.The new keywords should not be the same as the default keywords.
Message
Type the message that will be sent to customers who have sent the consent details.
Do you wish to enable this setting?
In the drop-down, select to indicate whether you want to enable the keyword type.If you disable the keyword type configuration, then customer consent sent for the keyword type will be ignored. For example, Customers who wish to Opt-out using the defined keywords will continue to receive messages if opt-out Keyword type configuration is disabled.Similarly, customers who wish to opt-in with the defined keywords will not be included in the subscription list if Opt-in keyword type configuration is disabled.
3. Click Save Changes. The Keyword Management section appears.
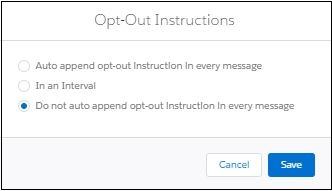
4. In Opt-out instructions, click Change next to the pre-configured instruction. The Opt-out Instructions popup window appears.
Opt-out instructions are as follows:
FIELD
DESCRIPTION
Auto append opt-out Instruction in every message
Select the option if you want to add an opt-out instruction to every message that is sent out.
In an Interval
Select this option to send messages only after the defined number of weeks. The recommended practice is to send 1 message every 4 weeks. You can select the interval period in the drop-down list that appears.
Do not Auto-append opt-out instructions in every message
Select this option if you do not want to add an opt-out instruction to every message that is sent out.
Opt-out Message
Type the message you want to append as an opt-out instruction. This field appears only if you select the Auto append opt-out Instruction in every message
5. Click Save. The opt-out instructions, if added, appears as shown.
Configure Conversations Settings
|
In the Conversations section, you can define the conversation settings for users and user profiles in the organization. You can configure the following in Conversations:
Converse Desk Layouts – Under the Converse Desk Layouts tab, you can help users configure the following:
Conversation Filters and Global Filters for specific users and profiles.
The color theme for the Converse Desk.
Conversation Topic Layout.
Message Settings – Under the Message Settings tab you can define the following:
The color theme for displaying Automated messages.
Information to be displayed under every Incoming and Outgoing message bubble.
Information to be displayed under the information lookup fields.
General Settings – Under the General Settings tab, you can disable or enable user privileges for the following features:
Send Canned Responses
Define Character Limit for Messages
Internal Note
CRM Actions
Related Conversation Setting
Configure Converse Desk Layout
Under the Converse Desk Layouts tab, you can create multiple layouts for the Converse Desk. For each layout you can:
Select the filters under the static Conversation Filters.
Select the filters under the dynamic Global Filters.
Assign the users and user profiles to the layout.
The static Conversation Filters are pre-defined. The All and Unread filters are the default filters and cannot be removed from the selection list of filters.
The dynamic Global Filters are dependent on what message objects are selected under Message Configuration.
To Create a New Layout:
1. Login to Salesforce and access SMS-Magic Converse.
2. In the Converse Settings tab, click Conversations. The Conversation page appears.
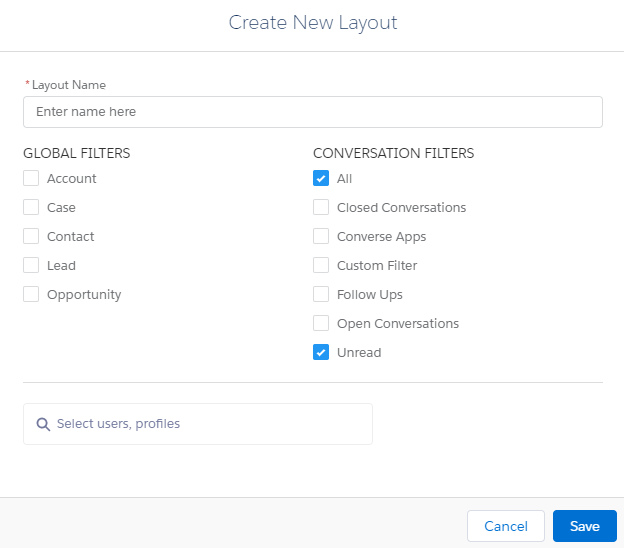
3. Under Configure Converse Desk Layout section, click Create New Layout. The Create New Layout popup window appears.
4. Type the name of the Layout.
5. Under Global Filters, select the objects for which you want to view the messages.
6. Under Conversation Filters, select the relevant filters to view messages.
7. Select the user or profile names for whom the layout will be available in the Select Users, profile field.
8. Click Save. The new layout is found in the Configure Converse Desk Layout list.
9. Click Save Changes at the bottom of the Converse Desk Layouts tab page.
To Select the Desk Theme:
1. the Converse Desk Layouts section, slide the toggle button to enable the Color feature. The Color section appears as shown.
2. Select a color or pattern for the desk theme.
3. Click Preview Theme. A separate popup window displays a preview of the Converse Desk.
4. Click Save Changes at the bottom of the Converse Desk Layouts tab page.
To Customize the Conversation Topic View:
1. In the Converse Desk Layouts section, go to Conversation Topic.
2. Select the relevant template from the Template Name list.
3. Select the relevant name for the field from the Field Name list.
4. Click Save Changes at the bottom of the Converse Desk Layouts tab page.
Configure Message Settings
In the Message Settings tab, you can configure the following:
The color theme for displaying automated messages
The information that appears below every Incoming and Outgoing message bubble
The information that appears below the information lookup fields
To Configure Color for the Automated Message:
1. In the Message Settings tab, browse Display Automated Message.
2. In Display Automated Message, slide the toggle button to enable the feature.
3. Select a color.
4. Click Save Changes at the bottom of the Message Settings tab page.
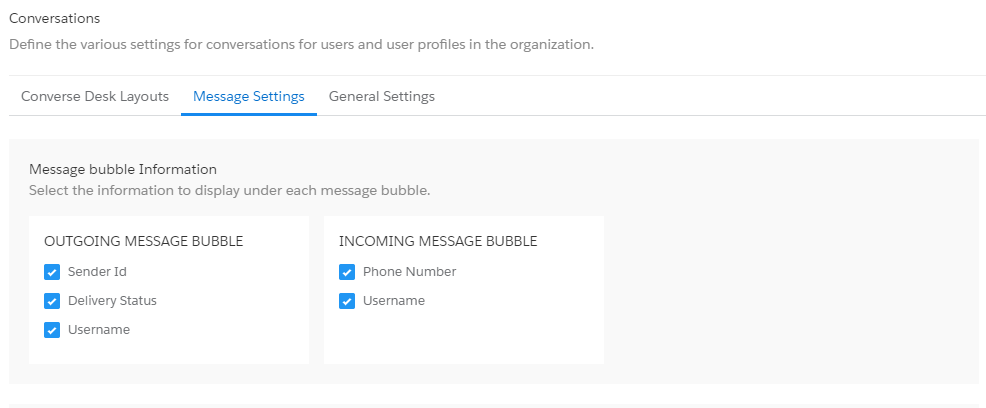
To Define Message Bubble Information:
1. In the Message Settings tab, browse Message Bubble Information.
2. In Message Bubble Information select the relevant checkboxes to define the information to be displayed under each message bubble.
3. Click Save Changes at the bottom of the Message Settings tab page.
To Define Lookup Field Information:
1. In the Message Settings tab, browse Lookup Fields Display and Configuration.
2. In Lookup Fields Display and Configuration, slide the toggle button to enable the feature. The information to be displayed under Lookup fields appear.
3. Select the appropriate information to be displayed in the information lookup field.
4. Click Save Changes at the bottom of the Message Settings tab page.
Configure General Settings
In the General Settings tab, you can disable or enable user privileges for the following features:
Send Canned Responses
Define Character Limit for Messages
Internal Note
Configure CRM Actions
Configure Related Conversation
To Enable Usage of Canned Responses:
1. In the General Settings tab, browse Reply Using Canned Responses (Templates Only).
2. In Reply Using Canned Responses (Templates Only), slide the toggle button to enable the feature.
The feature is disabled by default. If you enable it once it will remain enabled for subsequent logins. In the disabled state, none of the fields shown in the screen above will be visible.
3. Click Create New. The Reply Using Canned Responses (Create New) popup window appears.
4. In Users and Profiles, type any three letters of the User name or profile and select the relevant name from the list that appears.
5. In Do you want to enable Canned Responses? Select Yes if you want to enable this feature for the selected user or No if you want to disable this feature for the selected user profile.
6. Click Save.
To Define the Message Character Limit:
User profiles for which you have enabled the Reply with Canned Responses feature are not able to create and send custom messages. Therefore, it will overwrite all character limits you may have defined for the same user profile. Do not enable the Reply with Canned Responses feature if you want to define character limits for any specific user profile.
1. In the General Settings tab, browse Character Limit of a Message.
2. In Character Limit of a Message section, slide the toggle button to enable the feature.
3. Click Create New. The Character Limit of a Message (Create New) popup window appears.
4. In Users and Profiles, type any three letters of the User name or profile and select the relevant name from the list that appears.
5. In Enter Character Limit type the maximum number of characters each message sent by the selected user profiles can contain.
6. Click Save.
If you want to edit or delete the character limit, then in Action, click the Down icon and then click Edit or Delete to make the required changes.
To Enable Internal Note:
1. In the General Settings tab, browse Internal Note.
2. In the Internal Note section, slide the toggle button to enable the feature.
The feature is disabled by default. If you enable it once, then it will remain enabled for subsequent logins. In the disabled state, none of the fields shown in the screen above will be visible.
4. In Users and Profiles, type any three letters of the User name or profile and select the relevant name from the list that appears.
5. In Do you want to enable Internal Note? Select Yes if you want to enable this feature for the selected user profile or No if you want to disable this feature for the selected user profile.
6. Click Save.
If you want to edit or delete the internal note, then in Action, click the Down icon and then click Edit or Delete to make the required changes.
To Configure CRM Actions:
1. In the General Settings tab, browse Configure CRM Action.
2. In Configure CRM Action section, slide the toggle button to enable the feature.
The feature is disabled by default. If you enable it once, then it will remain enabled for subsequent logins. In the disabled state, none of the fields shown in the screen above will be visible.
3. Identify the object for which you want to add CRM actions.
4. In Action, click the Down icon and then, click Edit.
5. In the Configure CRM Actions for <Object Name> popup window, select or clear the relevant CRM actions checkbox for the object.
6. Click Save Changes. The General Settings tab page appears displaying the CRM action configurations for the selected Object.
Create a Consent Database
|
Consent records are the most important prerequisites for sending messages to your customers. It defines the necessary permissions that are required for you to send messages to customers.
Double opt-in consents are another essential requirement in order to continue your messaging practices. These are received in response to requests sent to customers using non-handset sources, like web forms or emails, to record their compliance.
As per regulatory guidelines, all consent, collected through non-handset sources or created manually needs to be maintained and recorded in a database.
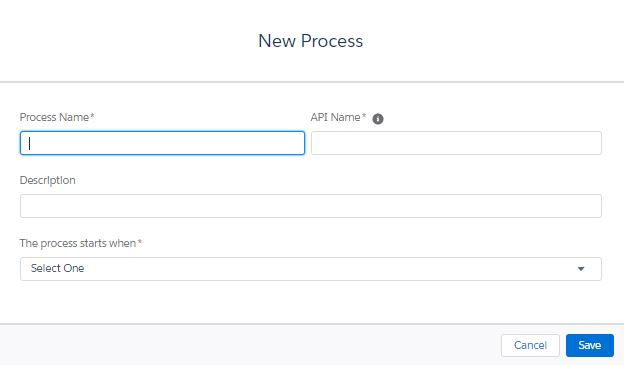
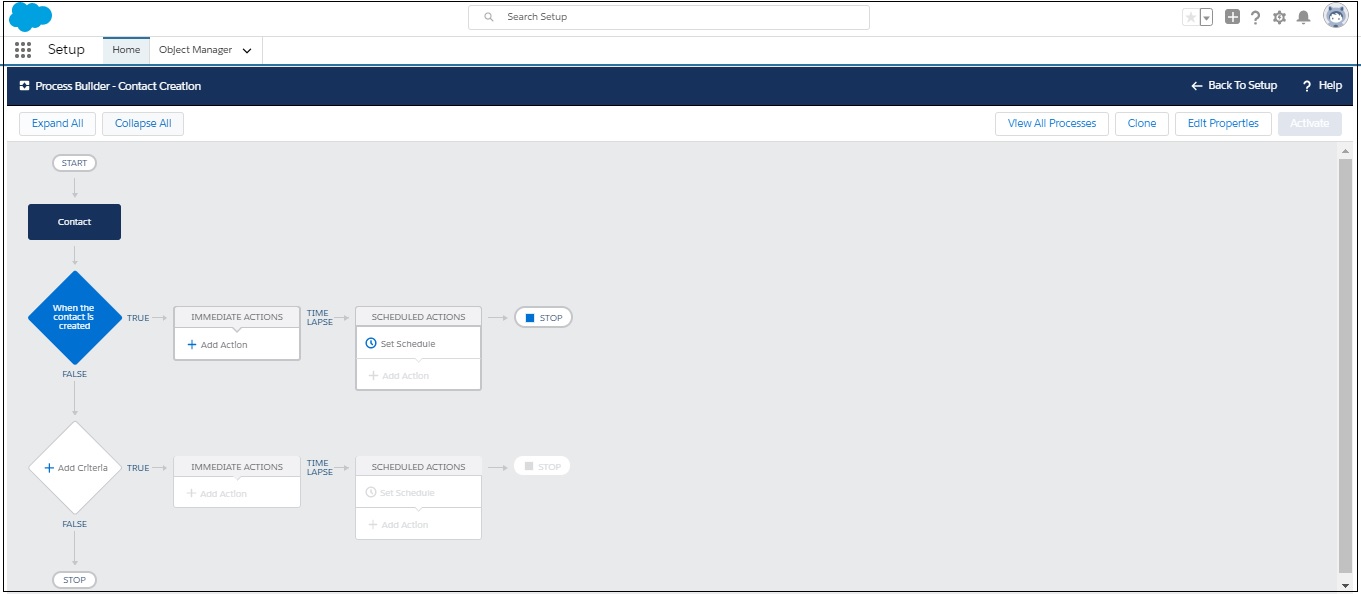
Under Setup, click Process Builder and then click New. The New Process pop-up window appears
.
Enter the following information.
The Process Name
The API name
A Description of the process
The Action trigger indicating when the process will begin
Click Save.
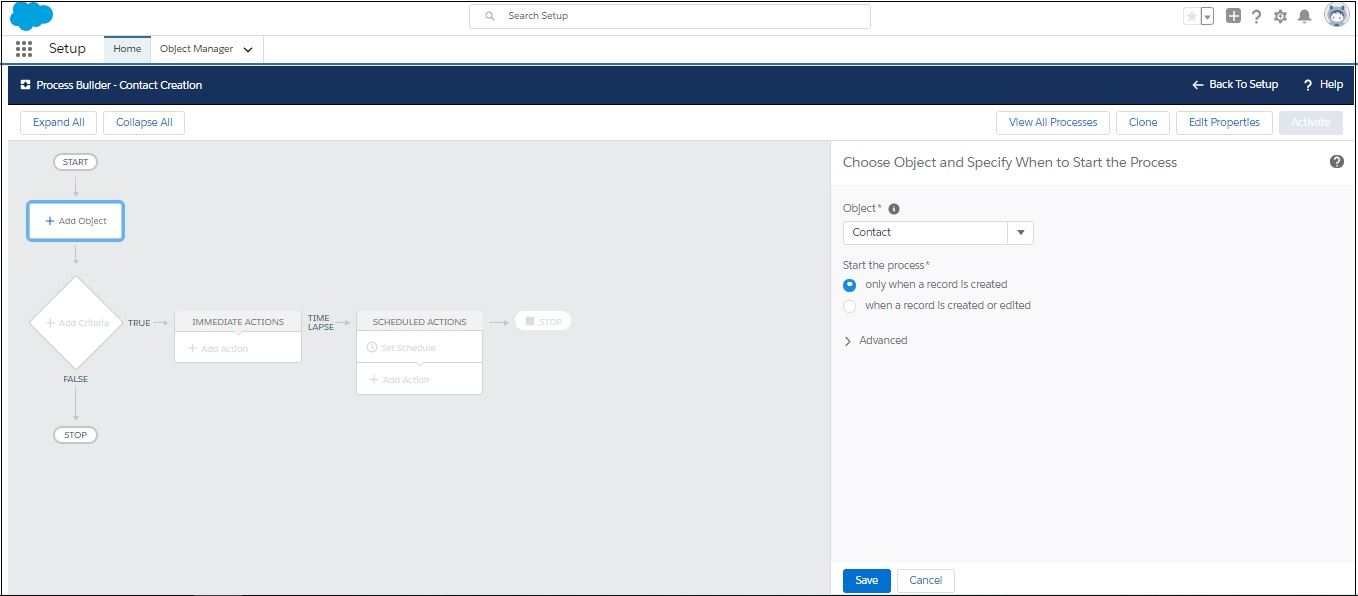
In the Process Builder page click Add Object.
Under Object, type the object that will be modified, for example, Contact or Lead.
Click Save.
Click Add Criteria.
Define the criteria as Whenever a new lead is created for the action group.
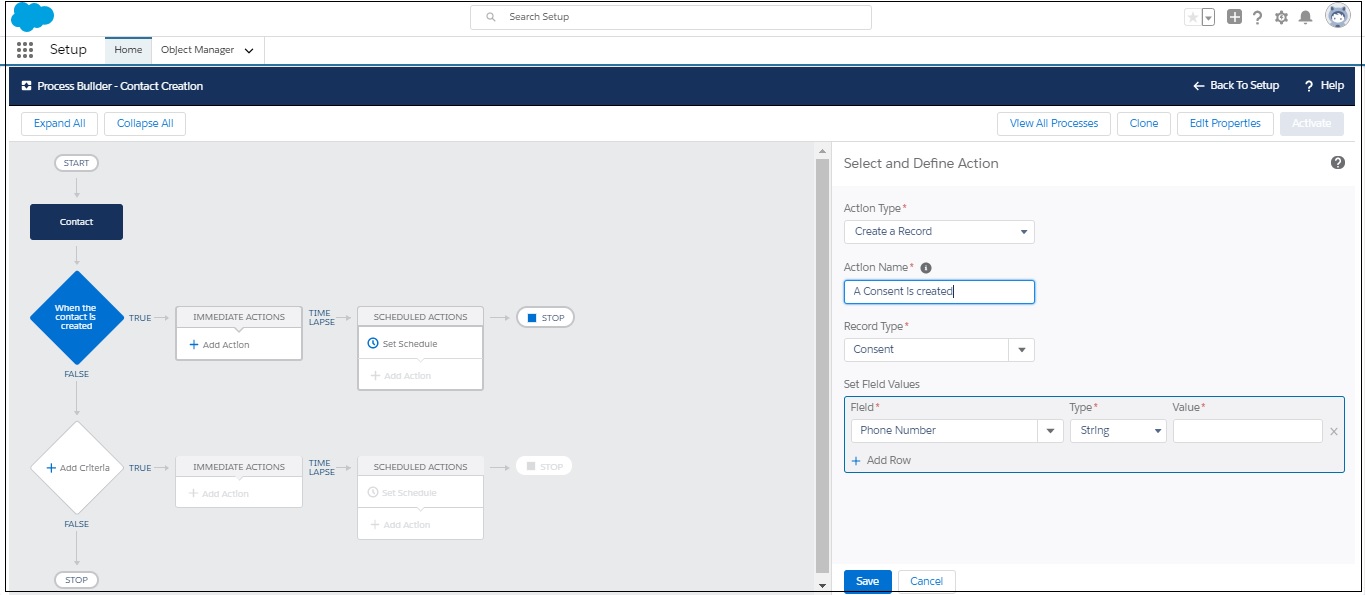
Click Add Action . The Action fields appear.
Enter the details, as required. Refer to the table below for more details.
Click Add Row to include additional fields.
FIELD
DESCRIPTION
Action
Define the Action as: Create a Record.
Action Name
Provide a name for the Action.
Define Fields these fields need to be configured during the Compliance Configuration process.
Mobile Number
Select the Mobile Number that is selected as the consent parameter for creating the consent record.
Sender ID
Select the Sender ID that will be used to create the consent record. This field is important only if you select Sender ID as one of the parameters for creating the consent record. You may skip this field if it has not been defined as a parameter in your compliance configurations. In such a scenario consent record will be created irrespective of the Sender ID the request is received from.
Content
Select the Content type for which the consent request will be created. You may skip this field if content type is not selected as a parameter to collect consent requests in your compliance configurations.
Confirmation Config
Select the confirmation configuration ID from the Confirmation Config object. This ID comprises the Sender Id from which the confirmation message will be sent. This configuration is completed in Step 3 of the compliance configuration process and will be displayed for Opt-in, optout and double opt-in consent requests.
Do Not Send Confirmation
Select this value as true if you do not wish to send a confirmation message.
Compliance Status
Select the consent status that shall be recorded i.e. Opt-Out, Opt-In, etc. You will need to create multiple process builders to generate consent records with different compliance status.
Source
Select the source for generating the consent and set the value as Non-handset
Lead
Select Lead as a record field and select the value for the lead lookup. This can also be contact depending on which object you are selecting.
Click Save.
Click Activate and then click Confirm.
You can also import consents by creating a CSV with all the fields mentioned above. Click Import to start importing consents.
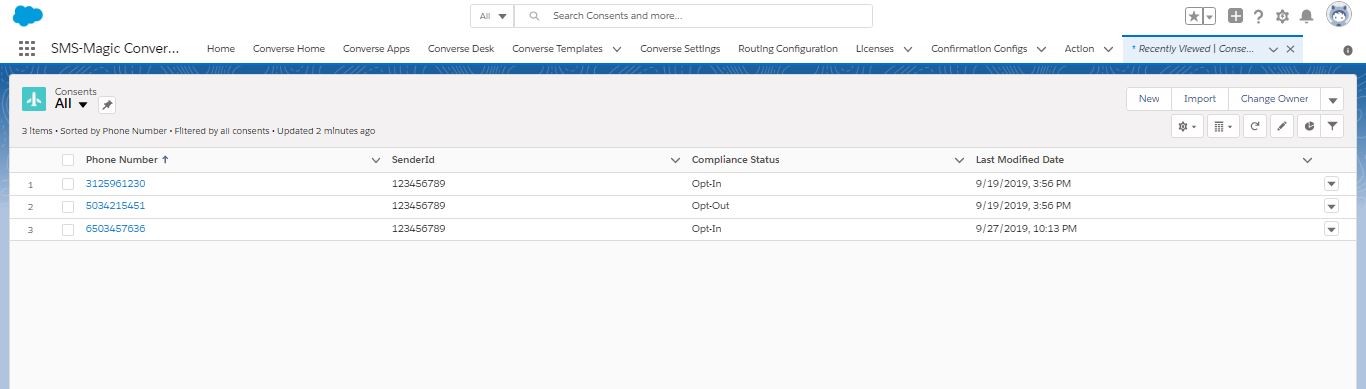
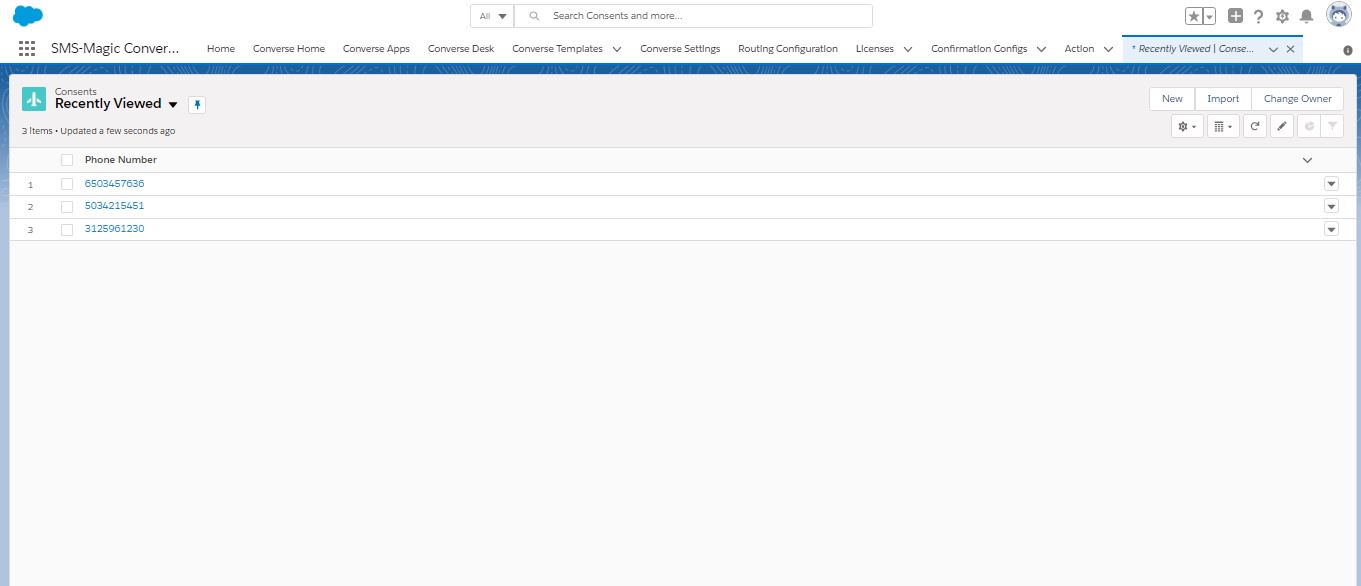
Create Consent Manually
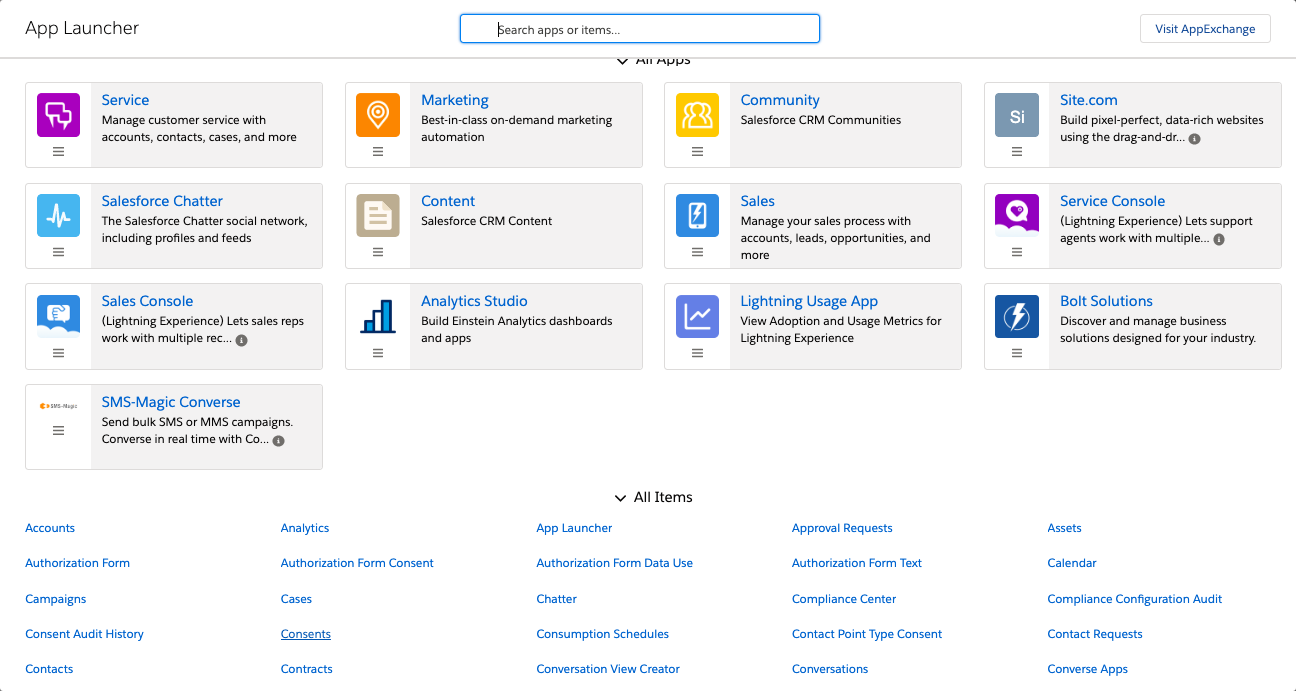
Click. The app launcher appears.
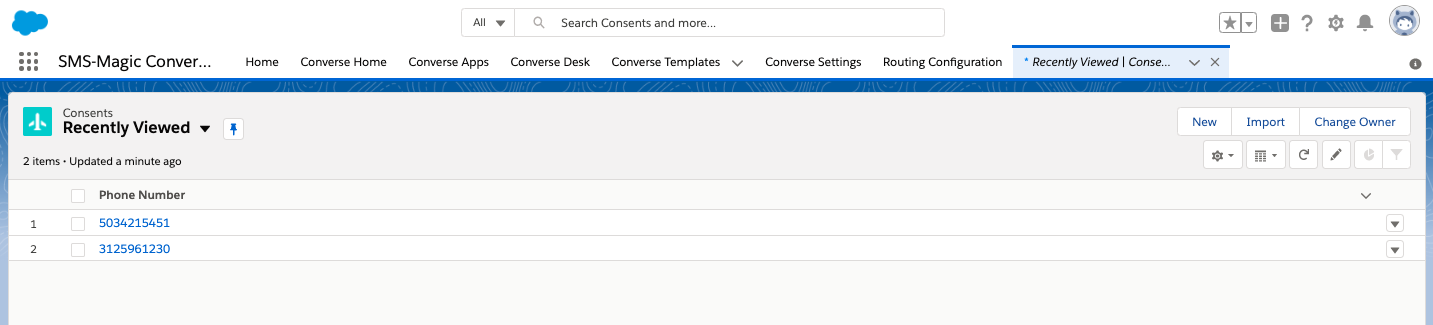
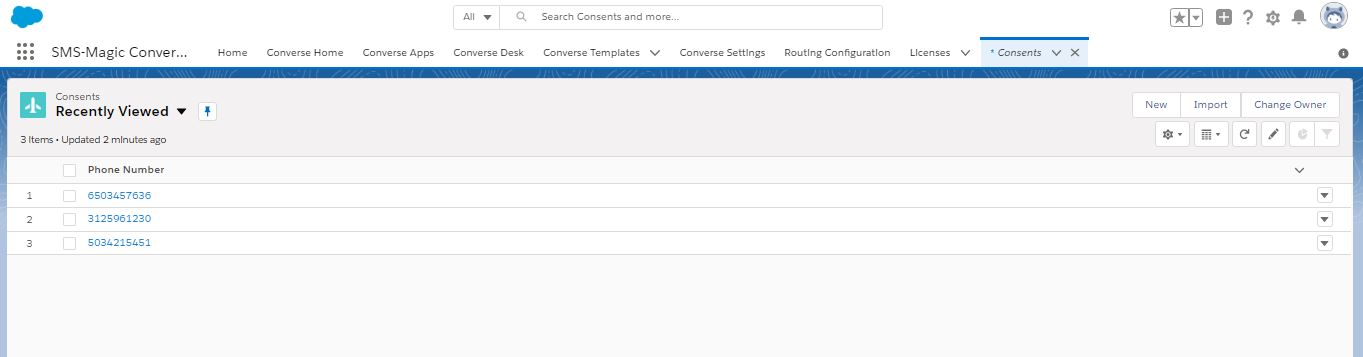
Under All Items, click Consents. The Consent List view page appears.
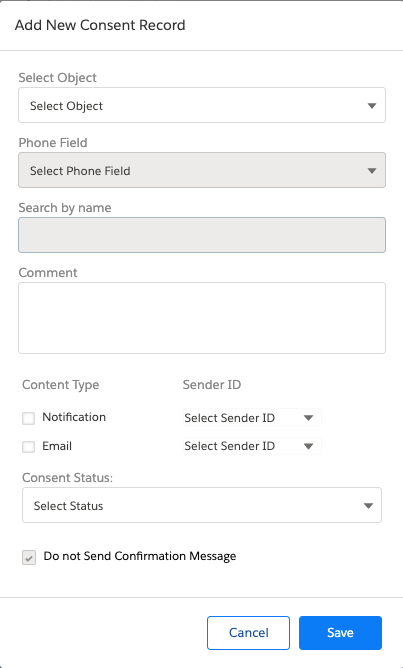
Click New. The Add New Consent Record pop-up window appears.
If the button is disabled, enable the Allow users to manually Add/Edit Consent Records option in Step 2 of the Compliance Configuration process.
Enter the details as required.
Refer to the table below for more details on individual fields.
Click Save. The Consent Record List is added to the consent database and appears as shown.
Click individual record and the record details appears as shown.
FIELD
DESCRIPTION
Select Object
Select the object for which you want to create the consent record.
Phone field
Select the phone field from which consent records will be considered.
Search By name
Search the Contact name for which the consent record will be created.
Comment
Type a comment for the record.
Content Type
Select the appropriate checkbox next to select the appropriate content type. This parameter will appear only if they have been configured in Step 1 of the Compliance Configuration process. Contact your System Admin for more details on the consent record parameters configured.
Sender ID
Select the Sender ID from which consent will be initiated. This is available only if Sender ID is configured as a consent record parameter in Step 1 of the Compliance Configuration process. Contact your System Admin for more details on consent record parameters configured.
If Sender ID is not configured then consent will be created from any Sender ID. Once the consent record is created, a confirmation message is sent back to the same Sender ID to complete the process. If a Sender ID is configured then consent will be created only when request is received from the specified Sender ID.
Consent Status
In the drop-down list select the status of your consent. The available options are: Opt-In, Opt-Out, and Pending.
Do not send Confirmation Message
Select this check-box to avoid sending a message to confirm the consent status of the customer.
Confirmation Message Sender ID
Select the sender ID that will be displayed when the confirmation message is sent to the customer.
Edit Content Records
Select the checkbox adjacent to the consent record you want to edit.
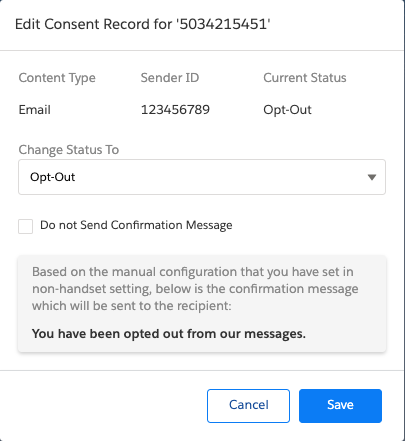
Click and then select edit. The Edit Consent Record for <phone number> pop-up window appears.
Edit the details as required. Refer to the table below for more details on individual fields.
FIELD
DESCRIPTION
Content Type
Displays the content type for which consent has been added.
Sender ID
Displays the default Sender ID for receiving the consent.
Current Status
Displays the current consent status.
Change Status To
Select the new consent status.
Do not send Confirmation Message
Select this check-box to send a message confirming the consent status of the customer.
Confirmation Message Sender ID
Select the Sender ID that will be displayed when the confirmation message is sent to the customer.
Opt-out confirmation message
Type the confirmation message that will be sent in case the consent status is set to Opt-Out.
Click Save Changes. Consent Record is updated in the list view.
Click on the list view to edit the record phone number. Click and then select Delete to delete a consent record.
Click the record number. The Consent Details appear.
FIELD
DESCRIPTION
Content Type
Displays the content type for which consent has been added.
Sender ID
Displays the default Sender ID for receiving the consent.
Current Status
Displays the current consent status.
Change Status To
Select the new consent status.
Do not send Confirmation Message
Select this check-box to send a message confirming the consent status of the customer.
Confirmation Message Sender ID
Select the Sender ID that will be displayed when the confirmation message is sent to the customer.
Opt-out confirmation message
Type the confirmation message that will be sent in case the consent status is set to Opt-Out.
Change Consent Record Owner
Log in to Salesforce.
Click . The App Launcher pop-up window appears.
Under All items, click Consents. The Consents record page appears.
Click and select All to remove filters and view all records. The All records view appears.
Select the checkbox adjacent to the consent record you want to edit.
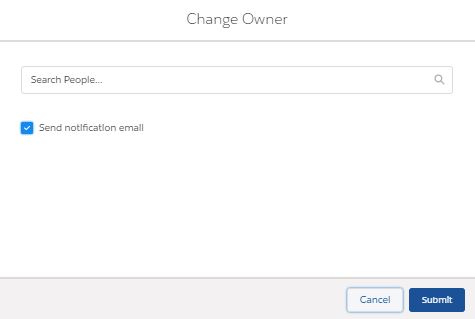
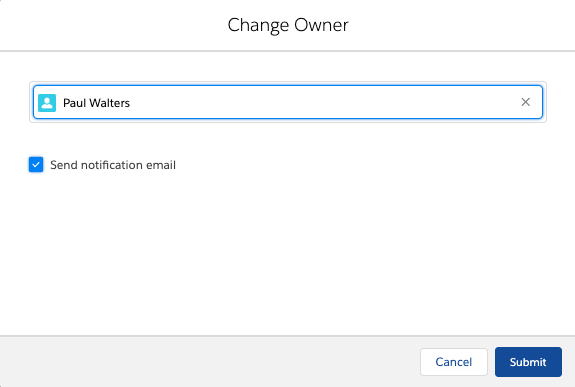
Click and then select Change Owner. The Change Owner pop-up window appears.
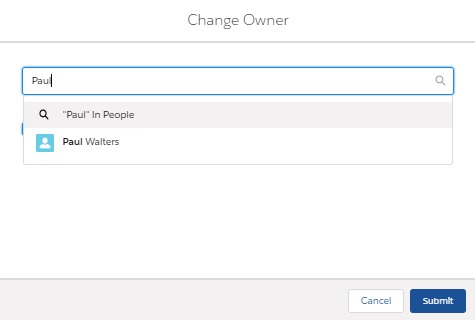
Type the first three letters to search for the user you want to move the consent record. The search results appear as a drop-down list.
Select a user.
Prior to selecting a user, ensure that read permissions are enabled for the current record and all related records.
Clear the Send Notification Email checkbox if you do not want to send an email to notify the selected user of being assigned as the consent record owner.
Click Submit.
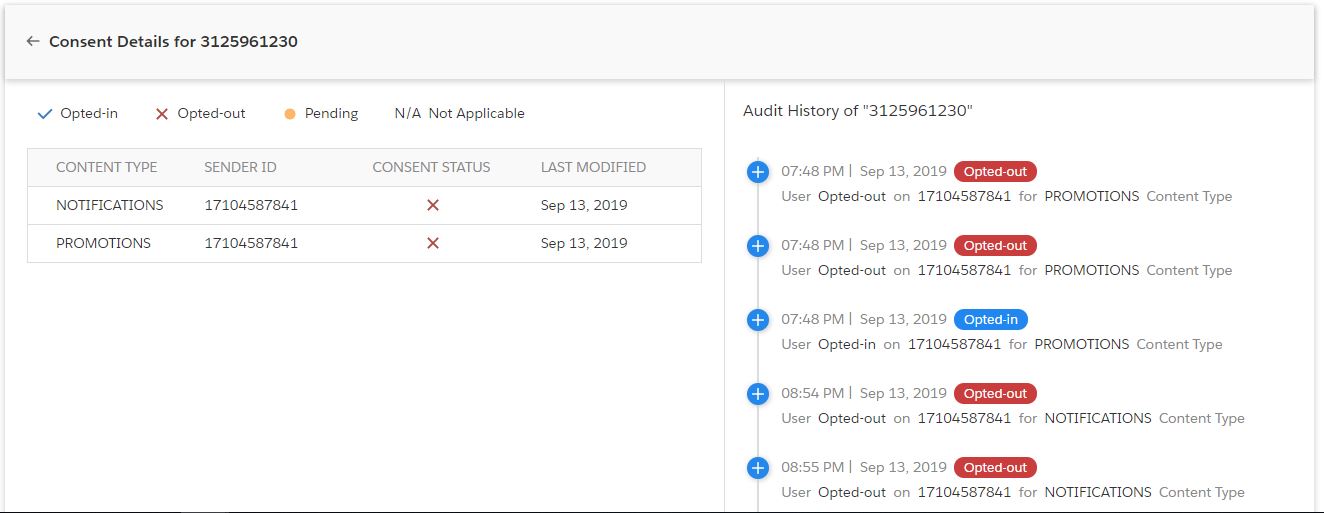
View Audit History
Log in to Salesforce.
Click . The App Launcher pop-up window appears.
Under All items, click Consents. The Consents record page appears.
Click and select All to remove filters and view all records. The All records view appears.
Click a consent record to view details. The Consent details page appears.
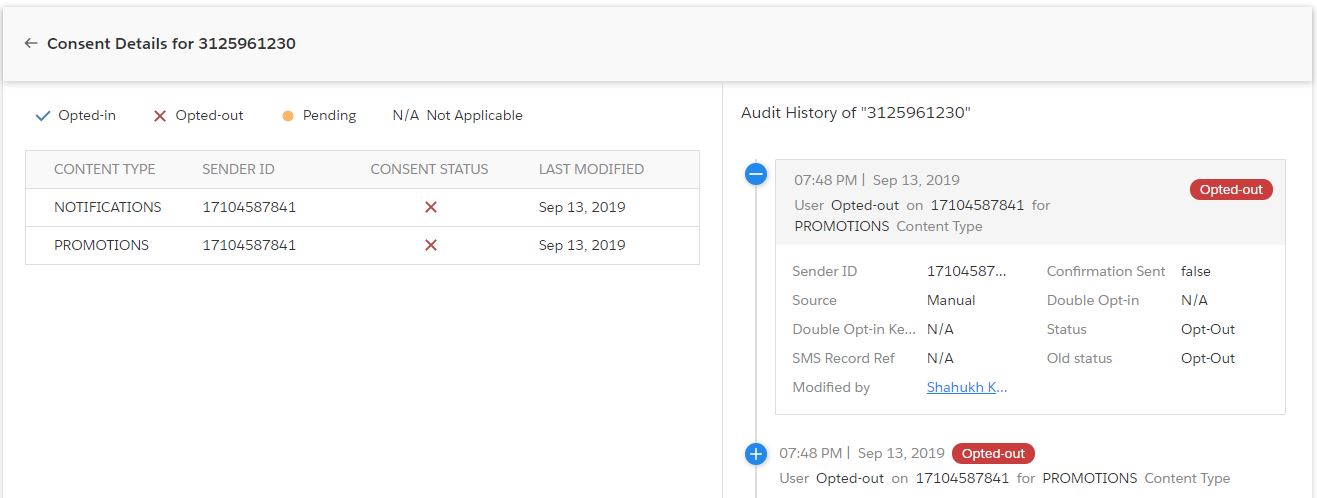
Click a consent status on the right to view the audit history details.
Refer to the table below for more details on individual fields.
FIELD
DESCRIPTION
Sender ID
Displays the Sender ID who sent the consent.
Confirmation Sent
Displays whether a confirmation message has been sent out for the consent received.
Source
Displays the source from which the consent is received.
Double Opt-In
Displays whether a double opt-in request is sent to the customer.
Double Opt-in Keyword
Displays the Double opt-in keywords that is shared with customer. This field displays value only if the Double opt-in request is sent to customers.
Status
Displays the current consent status of the record. For example, Opt-in, Opt-out or Pending.
SMS Record Reference
Displays the reference number of the SMS History record.
Old Status
Displays the previous consent status of the record.
Modified By
Displays the ID of the user who modified the record.
Change Consent Owner
Log in to Salesforce.
Click . The App Launcher pop-up window appears.
Under All items, click Consents. The Consents record page appears.
Click and select All to remove filters and view all records. The All records view appears.
Select the checkbox adjacent to the consent record you want to edit.
Click and then select Change Owner from the drop-down list that appears. The Change Owner pop-up window appears.
Type the first three letters to search for the user to whom you want to assign the consent record. The search results appear as a drop-down list.
Select the user.
Prior to selecting a user, ensure that read permissions are enabled for the current record and all related records.
Clear the Send Notification Email checkbox if you do not want to notify the selected user of being assigned as the consent record owner.
Click Submit
Upload Existing Consent Database
Why do I Need to Create a Consent Record for Using SMS-Magic Converse with the Compliance Feature?
We store the consent record in Converse 1.59 differently as compared to the previous version of SMS-Magic Converse.
Prior to the 1.59 release, we used to store consent information like Opted-In or Opted-Out on the object record detail page. The disadvantage of this style of storing consent information is that if the same number exist for two lead records and one record has opted-in and another record has opted-out information. The system will block one message but will still send the message to another record.
To overcome the above problem, we maintain consent information in Consent object and not at the object record level. These consent records are referred to when a user attempts to send messages via bulk, automated or manually. So, for example, the Bulk source, the Consent Required is configured, the system will always check for an Opt-In entry in Consent object.
When Do I Need to Create or Migrate Consent Records?
Consent migration is required for the following scenarios:
If you have explicit consent obtained via the website, email or mobile handset captured at the object record level.
If you have explicit consent obtained via contract or paper forms.
Consent Obtained via Website, Email, or Mobile Handset
You have explicitly obtained consent for the recipient via Web, Email or Mobile Handset and stored at the object record level. SMS-Magic Converse have no information where and how the consent information is stored. In order to map this consent information with the SMS-Magic Converse, admins need to create these records in Consent object along with consent type (Opt-in or Opt-Out).
To create consent records previously obtained from the recipient’s mobile numbers, you need to create a CSV file with all the fields mentioned below.
FIELD
DESCRIPTION
Phone Number
The mobile phone number from which the consent is obtained.
SenderId
The phone number or virtual number used by SMS-Magic customers to obtain consent.
Content Type
If the consent has been obtained for a specific program.
Compliance Status
Opt-In or Opt-Out or Pending (In case of double opt-in).
Lead, Contact or Custom Object
Lookup Id for lead, contact, or any custom object.
Confirmation Config
Id of confirmation configuration created in Step 3 of the compliance setup.
Do Not Send Confirmation
When set true, no confirmation message will be sent to the recipient mobile number.
Comment
Add text on how the consent was obtained.
Once the consent record is created for the recipient from whom the consent is obtained. The next step is to define the configuration when the record is created in CRM so that the consent record is automatically created.
Consent Obtained via Contract or Paper Forms
Steps remain the same as above for creating consent via contract or paper forms.
How to Ensure that Consent Records are Created Automatically for a New Contact?
Again, you would need to create a consent record for contacts for the following scenarios:
Explicit consent obtained via the website, email or mobile handset captured at the object record level.
Explicit consent obtained via contract or paper forms.
Explicit Consent Obtained via Website, Email, or Mobile Handset
We recommend that you use a process builder and create the consent record when the record is created or edited. Write a process builder on record creation and create a consent record with the below fields.
FIELD
DESCRIPTION
Phone Number
The mobile phone number from which the consent is obtained.
SenderId
The phone number or virtual number used by SMS-Magic customers to obtain consent.
Content Type
If the consent has been obtained for a specific program
Compliance Status
Opt-In or Opt-Out or Pending (In case of double opt-in)
Lead, Contact or Custom Object
Lookup Id for lead, contact or any custom object
Confirmation Config
Id of confirmation configuration created in Step 3 of the compliance setup.
Do Not Send Confirmation
When set true, no confirmation message will be sent to the recipient mobile number.
Comment
Add text on how the consent was obtained.
Please note, when records are created via non-mobile handset like web forms, one needs to get the opt-in via a mobile handset. This process of confirming consent via mobile handset by contact created by web forms is called as Double Opt-in.
To initiate double opt-in, the admin needs to use Confirmation Config field and add Compliance Status to Pending to initiate a double opt-in process. One can find Confirmation Config Id under Converse Settings > Compliance > Double Opt-In & Other > View Details.
Explicit Consent Obtained via Contract or Paper Forms
If you need to capture the consent on a continuous basis and whenever the records are created or edited. We recommended the same process as mentioned above. You must use the comment fields when creating a consent record so that during the audit process you can confirm the source of the consent.
Manage User Permissions
|
In the Permission Management section, you can see what permissions are set for the user’s organization. The permissions are set so that there is access control for users of the Salesforce Org interacting with SMS-Magic Converse.
The Permission Sets are preset by SMS-Magic while the Custom Permissions are customized permissions based on the requirements of the user’s organization.
Permission are of the following categories:
Permission Sets – For users to access various features and functions of SMS-Magic Converse the Admin defines a set of configurations. These permission sets can be found in the user’s profiles. Users can have only one profile but can have multiple permission sets depending on the Salesforce edition. As Admin, you can assign permission sets to various types of users, regardless of their profiles.You can assign the following permission sets to users:
Permission
Description
SMS Converse Conversation User
Enables the user to send messages, using SMS-Magic Converse.
SMS Converse Template Author
Enables the user to edit and create an SMS template, using SMS-Magic Converse.
SMS Converse Permission Set
Enables the administrators to access all objects and fields in SMS-Magic Converse. The permission is a superset of the other permission set.
Custom Permissions You can define custom permissions for specific types of processes and apps that cannot be accessed with permissions and profiles defined in Permission Sets. For example, for a time-off manager app, a permission set is defined to enable all users to be able to submit time-off requests. However, only a smaller set of users will be able to approve time-off requests with the help of custom permissions defined for them.
Permission
Description
AllowToChangeConversationOwner
Enables the user to assign the conversation. (The Assign conversation feature on the converse desk will be available only if this feature is enabled)
AllowToUseSMSInsight
Enables the User to send messages from Converse Desk.
AllowToChangeMessageGranularity
Deprecated after version 1.48
AllowToSendBulkMessage
Enables the user to send bulk message
AllowToSendCampaignMessage
Enables the user to send messages from Campaigns
AllowToSendListViewMessage
Enables the user to send messages from List View Configuration.
AllowToSendMMS
Enables the user to send MMS
AllowToScheduleMessage
Enables the user to schedule a message.
AllowToScheduleRecurringMessage
Enables the user to create a Recurring Schedule for a message
AllowToChangeOptout
Enables the user to change the default behavior of opt-out settings when sending a message.
AllowToChangeTemplateSelection
Enables the user to edit the contents of an SMS template used when sending a message
AllowToEditSMSSettings
Enables the user to view converse settings
AllowToSendSingleMessage
Deprecated after version 1.48
AllowToTakeActionOnConversation
Enables the user to view the CRM actions on converse desk
AllowToUseSf1
Deprecated after version 1.48
AllowToViewSMSSettings
Deprecated after version 1.48
For more information about custom permissions and how to create, edit, and remove permission sets, see Custom Permissions.


 .
.


 and select All to remove filters and view all records. The All records view appears.