Conversation is an interactive communication between two or more people. It is a thread of messages between customers and agents. It is important to track these messages to monitor and streamline the customer relationship journey of your business.
Converse Desk provides you an intuitive, easy-to-use interface. It features a familiar Inbox style, making it simple for users to begin messaging with little or no training. The Converse Desk also features intelligence that guides users to effectively manage and respond to any volume of messaging conversations.
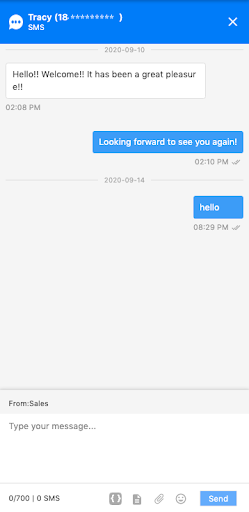
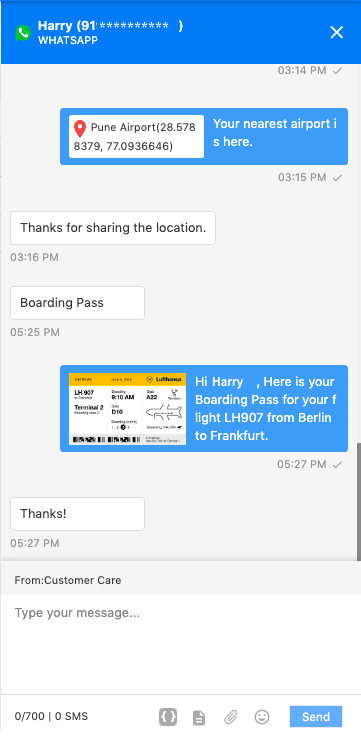
You can send SMS and WhatsApp messages over Converse Desk.You can identify SMS and WhatsApp Conversations easily via the SMS and WhatsApp icons as seen in the screenshot below.
Initiate a New Conversation
|
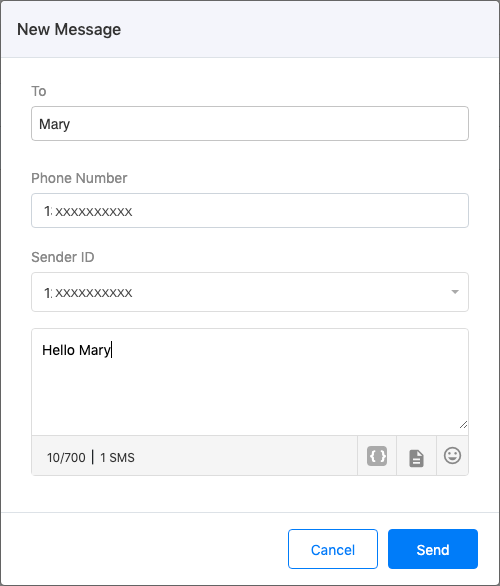
You can initiate a new conversation with an existing contact from ContactsList or type in a PhoneNumber directly.
Follow the below steps to Send a new message –
Type in FullName. (Contact suggestions are displayed while typing a name)
Select the Country Code (ISD Code) from the dropdown and type in the number. example, Select 1 for USA and type in 85********. (This is auto-populated if a Contact is selected from Contacts List)
Select SenderID
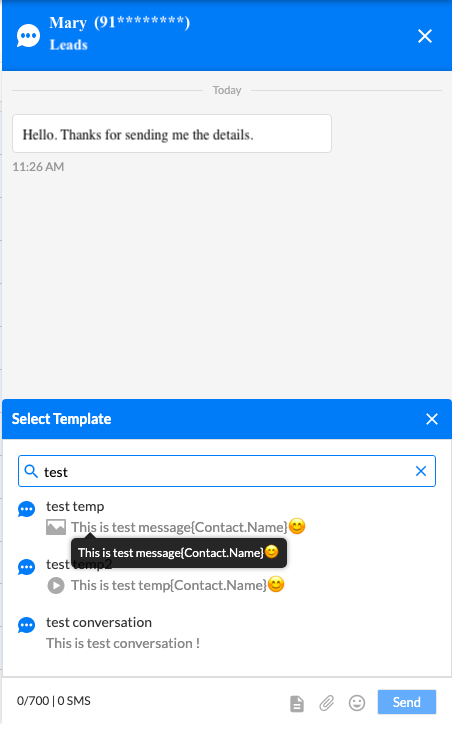
Type in a Message or use pre-defined Templates to converse. You can search from the available Conversation type templates for the selected Channel.
You can also add Media files and add Emoticons to your message
Click on the ’Send’ button
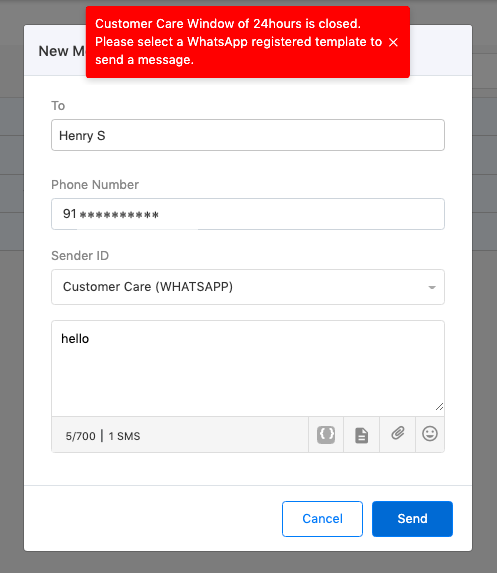
If you are initiating a conversation with a customer via WhatsApp channel, you can send a registered WhatsApp template. Make sure that you have already uploaded the consent of the customer in Consent Management.
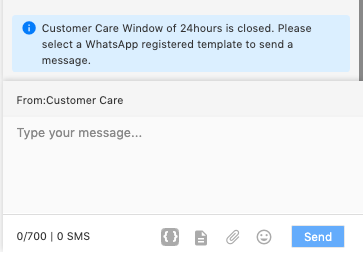
If you send a custom message or select a non-registered WhatsApp template, you can get an error in case the Customer Care Window of 24hours with that customer is closed.
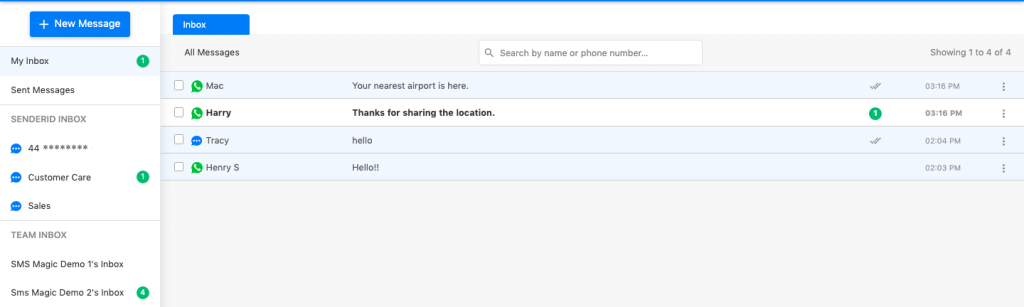
Inbox
|
My Inbox
All conversations with at least one incoming message will appear in My Inbox.
For the Sender ID/s owned only by you, all the incoming messages will be shown in your Inbox.
In case of Shared Sender ID, i.e., when a Sender ID is shared with one or more Standard Users, the incoming message will be added in the conversation from which the last message was sent using that Sender ID.
For messages coming from an unknown recipient for the first time, the messages will be synced to i.e. shown in Admin user’s inbox. Other incoming messages will be shown in the inbox of the user who last sent an outgoing message or was assigned the conversation.
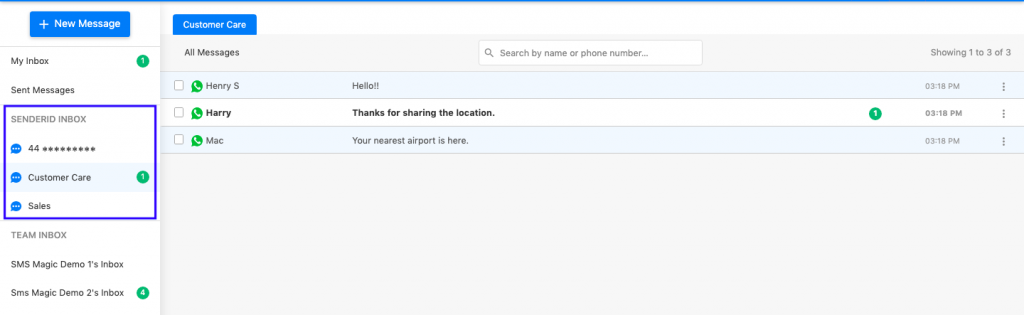
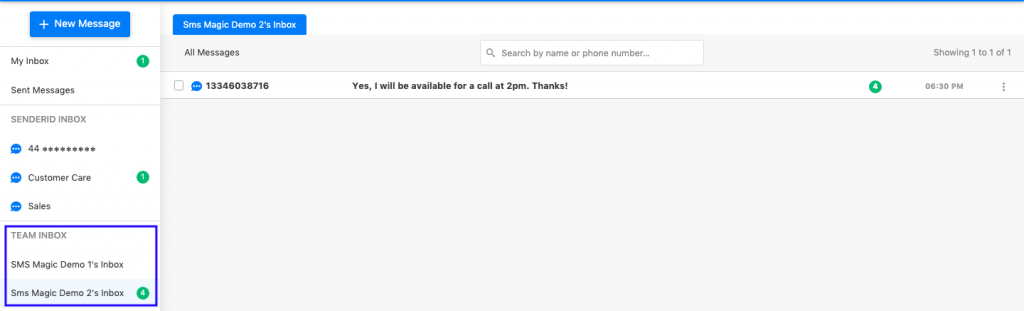
Sender ID Inbox
Alongwith the Inbox, where you see all your conversations at one place, we provide you with a Sender ID inboxes, filtered to show the conversations happening on a single Sender ID. You will see separate Sender ID inboxes for each Sender ID if you own/have access to more than one sender ID.
Team Inbox
This feature enables the Admin user to view the Inbox of all the Standard users. This way, the Admin user is aware of all the customer conversations done by the agents (standard users).
All the Standard users who have a Portal license, their Inbox will be listed under Team Inbox. Admin Users can click on a Standard user’s Inbox to see the conversations done by that standard user.
A standard user cannot see the Team Inbox section in Converse Desk.
Sent Messages
|
All the conversations initiated or replied to, by you, will appear in Sent Messages.
Email Notification on Inbound Messages
|
1. Email Notification Overview
Now you can enable Email Notifications for Inbound Messages on the SaaS Portal.
When an account is created for the SaaS Portal and when an inbound message is received on a Sender ID, and if the Email Notification setting is enabled, a notification will be sent to the conversation owner about the inbound message.
This setting will be enabled by default for new users who sign up for the free trial and will get disabled after the Trial plan is converted to a Payee. This feature will be accessible only to users who have a Portal license.
When the setting is enabled, it will be applicable to all Sender IDs. Whenever an inbound message is received on any Sender ID, it would send an email notification to the conversation owner. But the user will have the option to edit and select a specific Sender ID. Email notifications will be applicable for all channels but will not get triggered for conversations where the bot is active.
2. Enable Email Notification for Inbound Messages on SaaS Portal
Follow the below steps to enable email notification settings for inbound messages on the SaaS Portal:
Login to SaaS Portal and access the Notification section
Note: This setting will be enabled by default for the new users who sign up for the free trial and will get disabled after conversion of the Trial plan to a Payee.
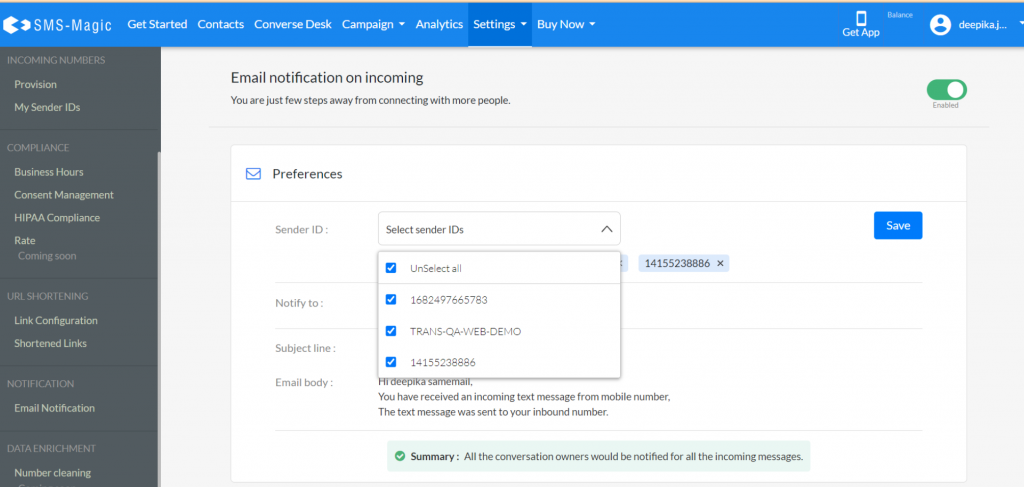
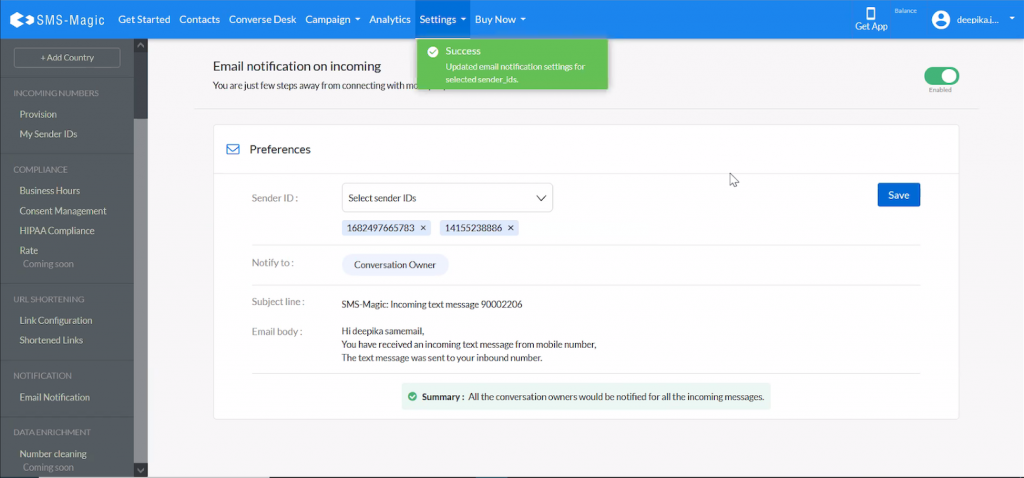
As shown in the image below, select the Sender IDs from the Sender ID drop-down:
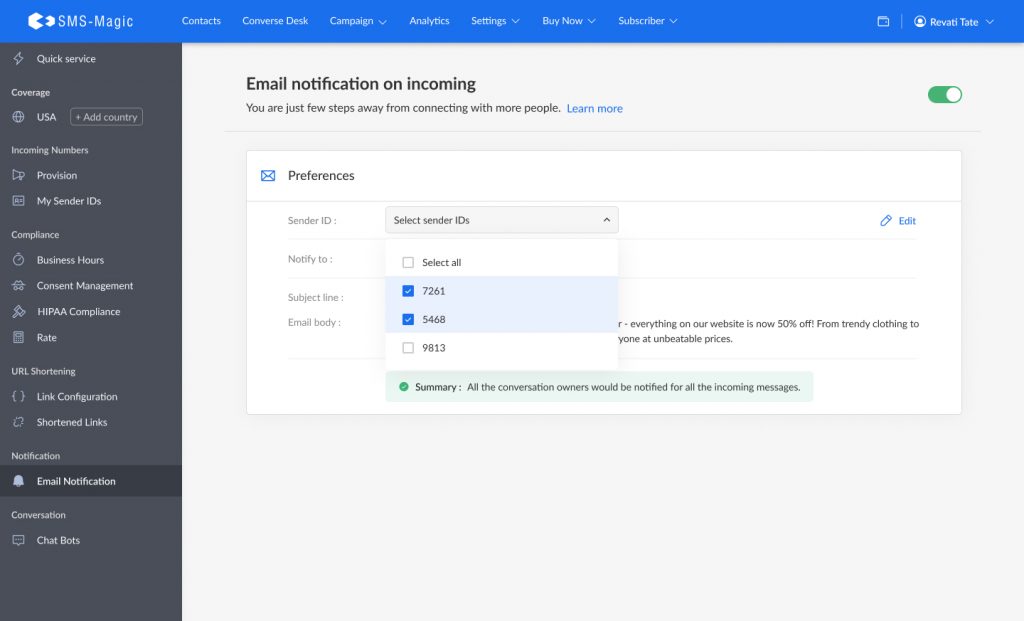
All the selected Sender IDs will be listed, as shown in the image below:
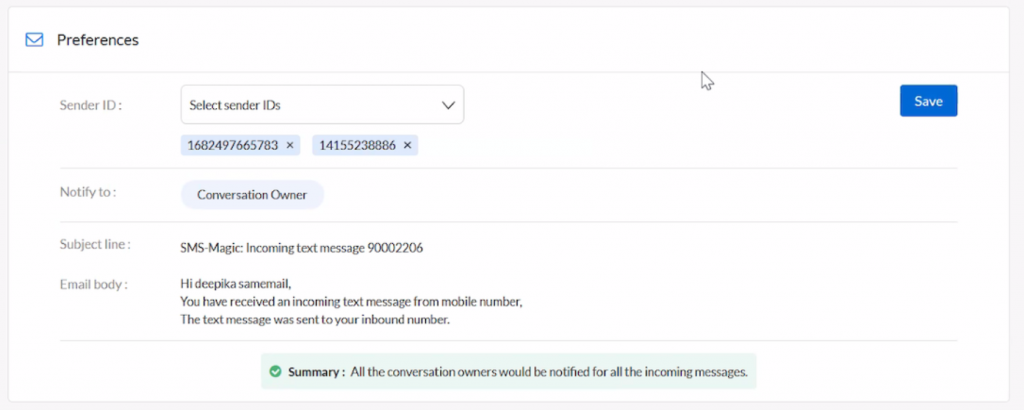
You can de-select Sender IDs from the list. Once done, the changes will be saved and you will get a pop-up message as shown in the image below:
Click on the Save button
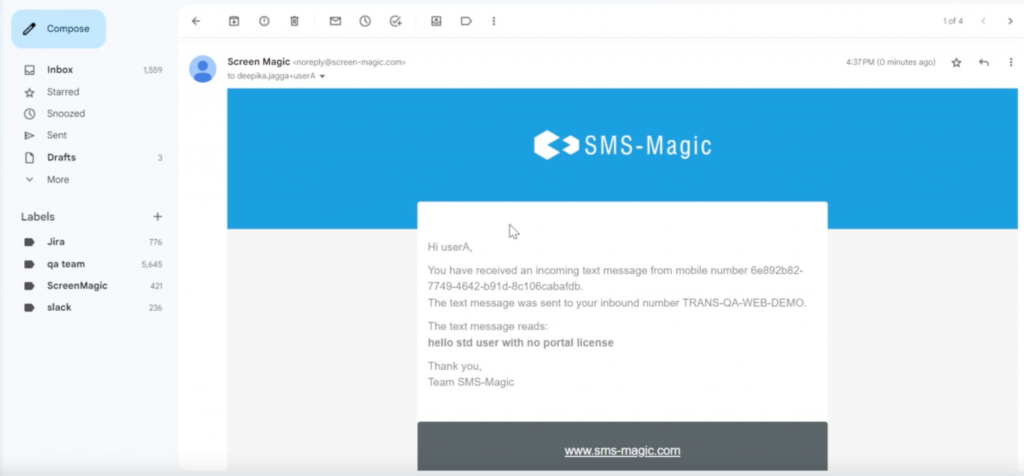
Once a message is sent, the conversation owner will get the notification email for every message, as shown below:
Note: This message template is pre-defined in the settings section. As soon as a message is sent to the user, the user receives an email notification in this message template.
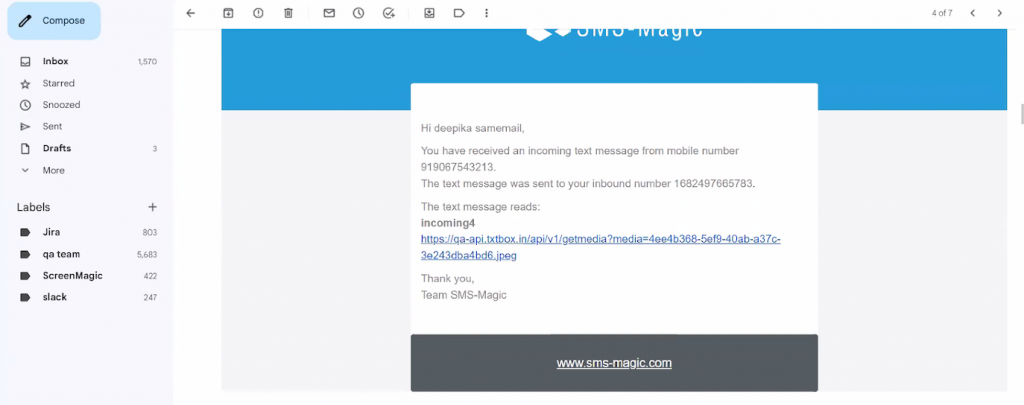
An email notification will also be sent to the conversation owner for every inbound MMS, as shown below:
Note: This MMS message template is pre-defined in the settings section. As soon as an MMS is sent to the user, the user receives an email notification in this message template.
Manage Conversations
|
You can manage your conversations and take a few actions as per your need for one or more conversations.
Conversation Window
This is a chat interface to communicate easily with a customer. You can see the outgoing and incoming messages in a selected conversation. Follow the below steps to open the conversation window for a conversation and start chatting.
Click on the conversation in My Inbox/Sent Messages/Team Inbox you wish to view or send a message
You can view the outgoing and incoming messages in this conversation separated with Date and Time
You can type in your message in the compose box, at the bottom of the Conversation Window and Send the message
You can add Media files and Emoticons while composing the message
You can use saved Message Templates of type Conversation. You can search from the available list of templates.
You can see the status of the sent messages update on the window. The status can be interpreted as-
Single tick – Message Sent successfully
Double tick – Message Delivered
Blue Double tick (for WhatsApp) – Message Read by the recipient
Red Triangle Icon – Message not sent
Clock Icon – Message is queued. This can be because of the network traffic or when you try sending a message outside the set Business Hours.
Conversation over SMS Channel
For having a conversation with your customers via the SMS channel, you can send text or media messages over the SMS channel to your customer.
Conversation over WhatsApp Channel
For conversing with your customers via WhatsApp channel, during an Active Customer Care Window, you can send text or media messages over WhatsApp to your customer. You can select WhatsApp registered or non-registered templates to send the messages.
In case, your Customer Care Window is closed, you will not be able to send a custom message. You can only send a WhatsApp registered template.
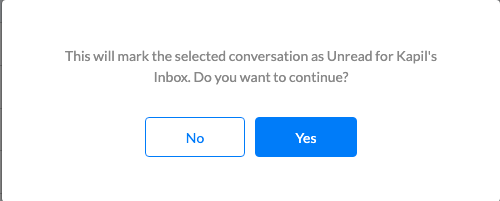
Read/Unread Conversation/s
You can mark your conversations as Read/Unread in My Inbox and Sent Messages. Select one or more conversations to mark them as Read/Unread.
Admin Users can read the conversations in Team Inboxes without affecting the read status of the conversations for the Standard User’s Inbox.
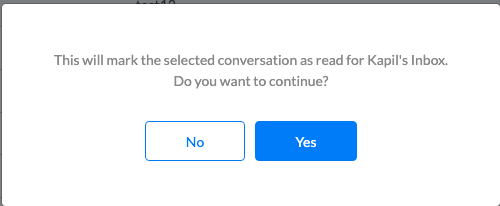
Admin users can manually read/unread a conversation in the Team Inbox to change the status of the conversation in the Standard User’s Inbox. A confirmation dialog appears as shown below:
Search for Conversations
You can type in Name or Mobile Number to search a conversation in My Inbox and Sent Messages. Hit Enter or click on the Search Icon to begin the search.
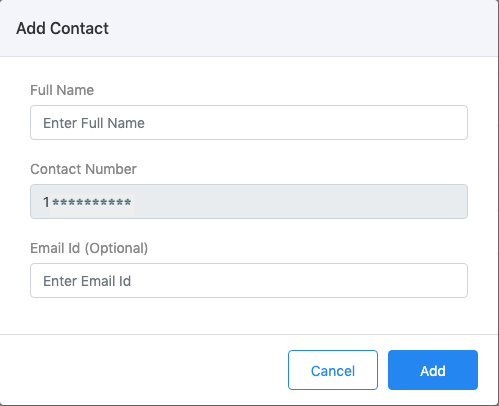
Save / Edit a Contact
For a conversation from/to an unknown recipient in My Inbox and Sent Messages, if required, you can directly save that recipient as a contact in Contacts Manager.
You can also edit an existing contact from the Converse Desk directly.
Assign Conversation/s
Admin Users can assign one or more conversations from My Inbox and from Inboxes of Standard users to any other standard user.
You can select the standard user you want to assign the conversation to from the dropdown in the Assign Conversation dialog box.
Once the conversation is assigned, it will be moved to the assigned user’s Inbox, thus transferring the ownership of the conversation to the assigned user. The assigned conversation/s will be marked unread in the User’s Inbox so that the user can easily identify the new conversations in their Inbox. A notification of the assignment will also be visible to the standard user on the browser tab when Converse Desk is open.
Note:
Conversations are created in Converse Desk, only when an incoming is received on the sent Campaign message
Messages are not sent to Opted-out recipients
Messages are not sent outside Business-Hours
You cannot Delete Conversations
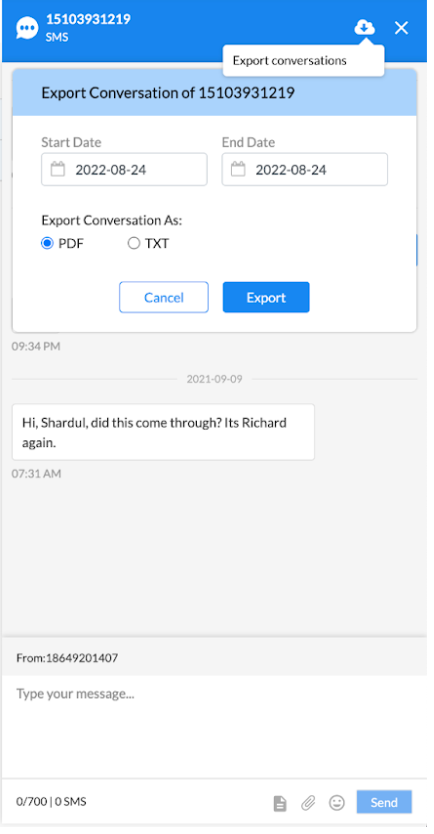
Export a transcript of your conversation
Users can now export a transcript of their conversation and download the same, making it convenient for you to share it with others or maintain a record of it.
To export and download the conversation, follow a few simple steps as listed below:
Go to the converse desk and click on any conversation
At the conversation window, at the top right corner, click on the export conversation icon and download the conversation.
The conversation will be exported in .pdf and .txt mode.
Note: Admin users or the users who are assigned the conversation can export and download the conversations.
Media files in the conversation, such as images, pdf, videos, audio, etc. are referred to as symbols in the .pdf and .txt files. These individual files can be downloaded directly from the conversation window by downing the download icon which is placed on the top right corner of every media file.
Limitations
Converse Desk Tab on Web Portal needs to be active/selected, to receive Browser tab incoming notifications. Then, you can switch to other Browser tabs, and still receive incoming notifications.