Only Admin Users can access Messaging Services, SMS Services menu in the application, and perform the required setup.
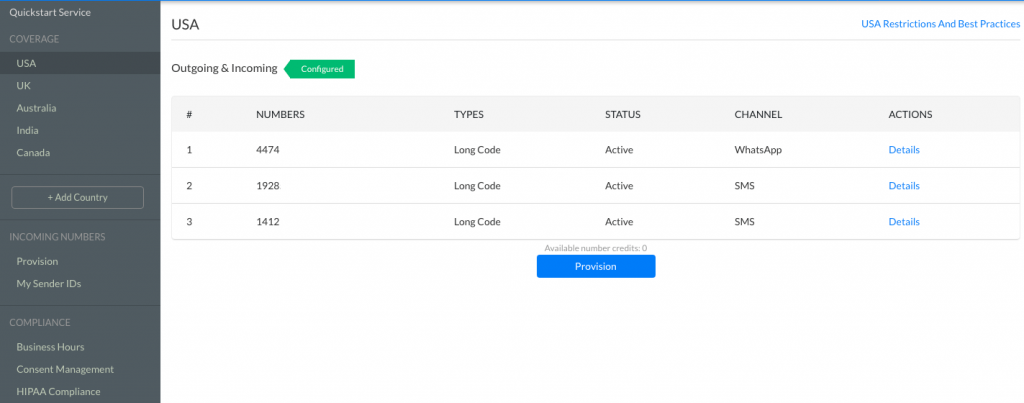
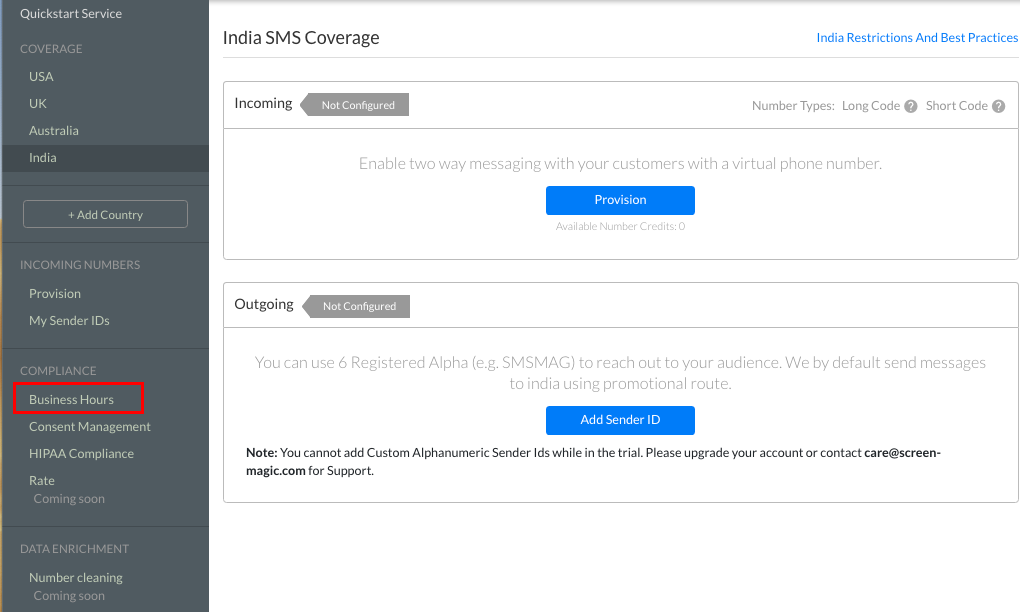
SMS Services covers Coverage, Provision, My Sender IDs, Business Hours, Consent Management, HIPAA Compliance sections, as seen on the left bar in the below screenshot.
Coverage
|
This section helps you in managing the Coverage of your account. In Coverage, you can add the countries where you wish to send messages.
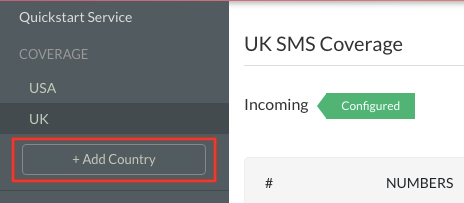
Follow the below steps to add a Country-
Click on the +Add Country
Select the ’Country’ you want to conduct business in
Click on the ‘Save’ button
Setup Outbound and Inbound Sender IDs
|
You can setup outbound or inbound Sender IDs for the countries you have added in Coverage. You can Provision Incoming Numbers from SMS-Magic and also create your own Outgoing Sender IDs based on the country you have selected.
You can use Incoming Numbers of the following types –
Long Code – SMS Long Codes are 10 Digit Numbers and are tied to an Area Code, For E.G. (XXX) XXX- XXXX.
Short Code – SMS Short Codes are 5-6 Digits (Look Like ‘69488’ Which Pizza Hut Uses) and can only be used to Send And Receive SMSs, Not Faxes or Calls.
Toll-Free Number – Text enable your toll-free numbers to use voice and text both.
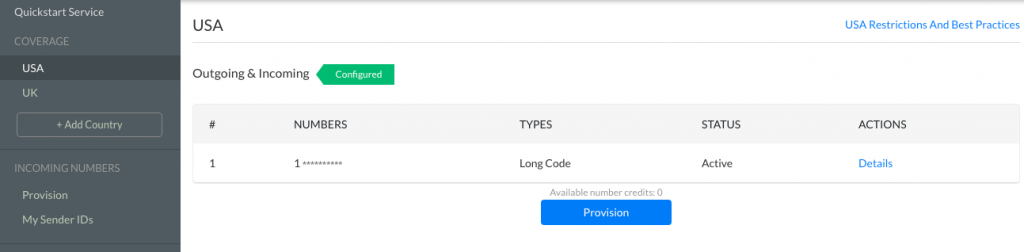
Follow the below steps to Provision an Incoming Number (Sender Id) of type Long Code-
Click on a Country on the Left Panel under the Coverage section
You will see the list of Numbers you own
Click on Provision to get a new number from SMS-Magic
The page to Provision Incoming numbers will open
Select the country for which you want to get an Incoming number
In case of the USA, you can add a preferred Area Code to filter out the Number list based on it
Select Type as Long Code and Click on the ‘Search’ button
You get a list of Numbers as per your search. Select the check-boxes of the Numbers you want to use for your business and click on the ‘Provision’ button.
You need to have Number Credits for the selected country to provision an Incoming Number from SMS-Magic. Please contact care@screen-magic.com to buy Number Credits.
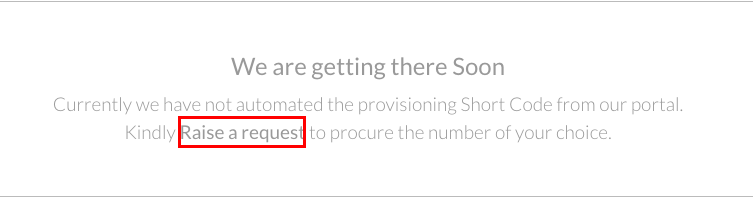
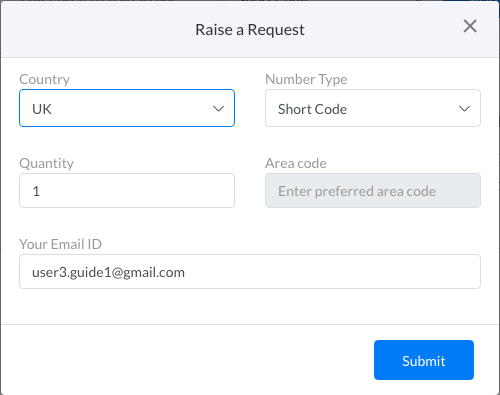
Follow the below steps to Provision an Incoming Number (Sender Id) of type Short Code or Toll-Free Number –
Click on the Country on the Left Panel under the Coverage section.
You will see the list of Numbers you own
Click on Provision to get a new number from SMS-Magic
The page to Provision Incoming numbers will open
Select the country for which you want to get an Incoming number
Select Type as Short Code or Toll-Free Number and Click on the ‘Search’ button.
Click on Raise a request, fill the form and our Customer Success team will get back to you shortly.
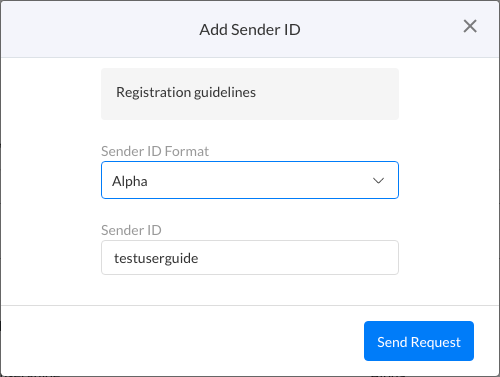
Based on the Regulations of the Country you have selected, you will get an option to Add an Outgoing Sender Id. Follow the below steps to add a Sender Id.
Click on Add Sender ID if applicable for your selected country
Sender Id format allowed by the country will be listed in the dropdown for Sender Id format. For example, Alpha (i.e. Your company name) and Numeric (+44 07031903280).
Enter the Sender Id you want to add
Click on the ‘Send Request’ button
Refresh the page, to see the Sender ID added in the Outgoing list.
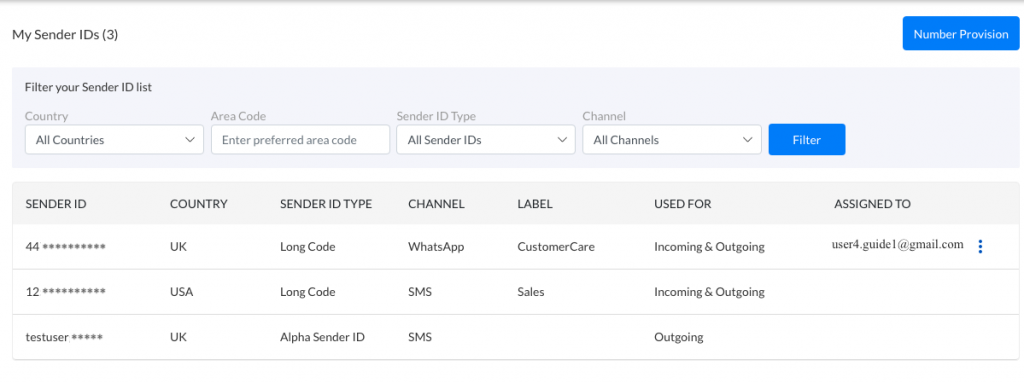
Manage your Sender IDs
|
You can check the Sender IDs added to your SMS-Magic account by clicking on My Sender IDs. You can filter your Sender ID List by Country, Area Code, and Sender ID type.
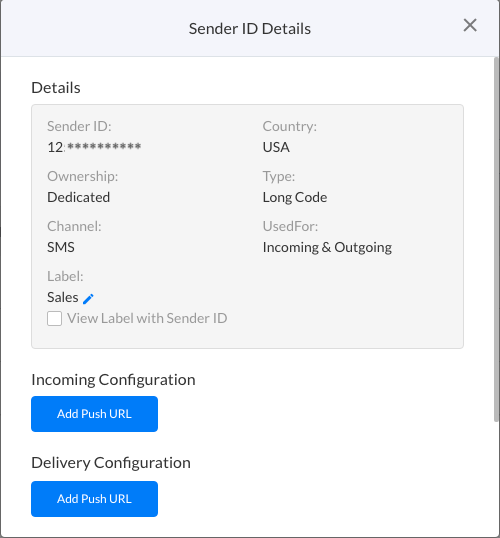
To get more details about a Sender ID, hover over the Sender ID and click on the ‘View Details’ button.
A Short Code can be shared by different accounts. The Ownership in this case will be Shared. Also, a Keyword to identify your account will be set by us. Your customers need to use that keyword to contact you on this Incoming Number. Please contact care@screen-magic.com for more details and to buy a Short Code from SMS-Magic.
Incoming and Delivery Configuration
Add a whitelisted Webhook URL on which you wish to receive the Incoming messages and the Delivery Reports of the Outgoing messages.
Assign Sender ID Labels
You can assign a Label to your Sender ID to identify the purpose or users of the Sender ID while sending messages.
Follow the below steps, to assign a Label to Sender ID,
Click on Ellipsis icon. Click on View Details.
Click on the Edit icon below Label.
Enter a Label for your Sender ID.
Click on Save to save the Label.
Click on Cancel to cancel the Edit action.
Once you assign a Label to a Sender ID, the Label of Sender ID will be visible to you in Sender ID selection while sending messages, as seen in the screenshot below.
If you wish to see the Sender ID along with the Label, please check the View Label with Sender ID checkbox below the Label field in Sender ID Details.
You will see the Label (Sender_ID) i.e Sales(12**********) as seen in the screenshot below for the respective Sender IDs.
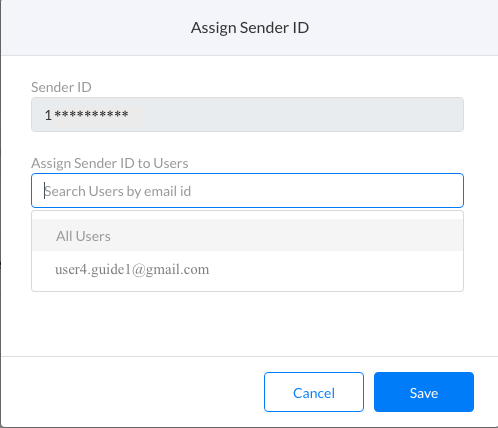
Sender ID Assignment
Sender ID Assignment allows Admin users to control the access privilege of the Sender IDs that the Standard users can have. Standard users can make use of the assigned Sender ID to send and receive messages, view the message history for that Sender ID.
Admin Users can assign a Sender ID to one or more Standard Users. All Admin users by default have access to all the Sender IDs.
Follow the below steps to assign a Sender ID to Standard users-
Hover over the required Sender ID and click on the Eliipsis icon. Click on Assign Sender ID.
Check if the selected Sender ID is seen under the Sender ID field.
Enter the email address of the Standard User you wish to assign the Sender ID to. Select the user from the dropdown.
The user will get added to the list below. Add more standard users if required.
You can also select the ‘All Users’ option if you wish to allow all users to have access to the Sender ID.
Verify the Users list and click on the ‘Save’ button.
Click on the ‘Cancel’ button, to cancel the operation and close the dialog box.
Note: You can access this feature only if you have the User Roles feature enabled for your account. Please contact care@screen-magic.com if you wish to avail this feature.
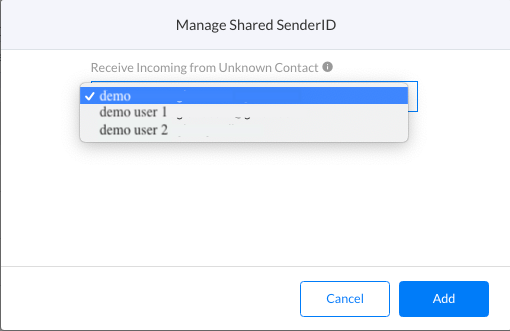
Manage Shared Sender IDs
Admin user can configure the owner of the incoming conversation initiated by a customer.
The default configuration for Manage Shared Sender IDs is –
If Sender ID is assigned to only one Standard User then the default owner is that Standard User
If Sender ID is assigned to multiple Standard Users then the default owner is the Admin User
If all the Users in the account are Admin then the default owner is the Admin User who created the SMS-Magic account
The default setting can be overridden to configure the required user to receive the messages in a new incoming conversation initiated by a customer. From Standard users who have the Sender ID assigned to them and all the Admin Users in the account, anyone can be made the owner of such Customer Initiated new Incoming conversations.
To change the default setting of Manage Shared Sender ID, follow the below steps –
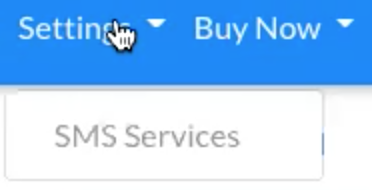
Go to Settings -> SMS Services
Click on My Sender IDs
Hover on any Sender ID that you want to configure
Click on the Ellipsis Menu and then click on Manage Shared Sender ID
All the Admin Users and the Standard Users who are assigned this Sender ID will be shown in the dropdown as shown below:
As shown in the above screenshot, demo user 1 and demo user 2 are standard users. The demo user is the admin user. This Sender ID is assigned to demo user 1 and demo user 2. So, the default value was set to the demo user.
You can change this demo user 1, if you want demo user 1 to receive all the new incoming conversation initiated by a customer on this Sender ID.
This setting ensures that the conversations initiated by your customers appear in the Inbox of the users who will be conversing with them.
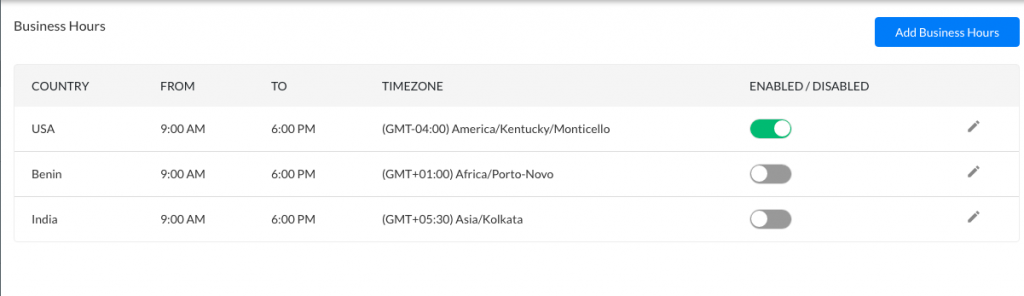
Setup Business Hours Compliance
|
This section helps you set Business Hours for your offices based in the Countries you send messages to.
The messages will not be sent outside the specified timeline that you choose for your business for the specified countries. The messages will be queued for the next day and sent once that country is open for business.
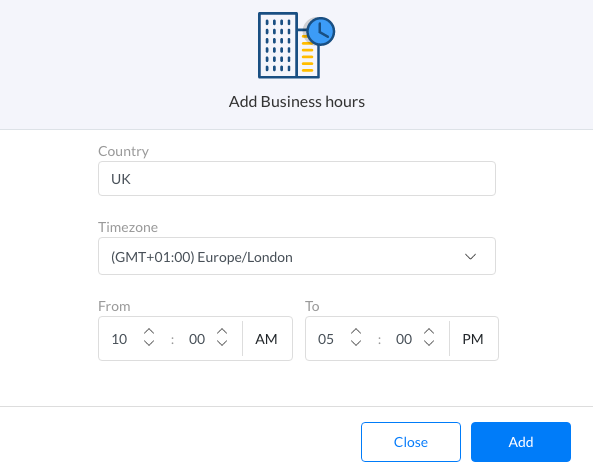
To Add Business Hours, follow the below steps –
Click on Add Business Hours
Select the Country of your Business
Select the Time zone
Select the duration of Business Hours
Click on the ‘Add’ button
The Business Hours will get added to the list. You can enable/disable the Business Hours by using the toggle button.
You can edit the time zone and duration of Business Hours by clicking on the Edit button.
We do not support multiple time zones from the same country.
Out of Office (OOO) Auto Reply
You can now set up an Out Of Office Auto Reply message, to let your customers know that your Working Hours are complete for the day and you will reach out to them the next day. This Auto-Reply gets triggered on receiving a message from your customers outside the set Business Hours based on your Customer’s country (Mobile Number’s Country code).
To set the business hours, Out of Office (OOO) auto-reply, users need to follow the below steps:
Step 1
Under the ‘Settings’ menu, click on the ‘SMS Services’ option. The following page will appear:
Click on the ‘Business Hours’ section under the ‘Compliance’ menu on the left. Users will be redirected to the following Business Hours section:
Here, users will have to first set up an auto-reply message by selecting a message template of type Automation and then enable the OOO auto-reply option.
Step 2
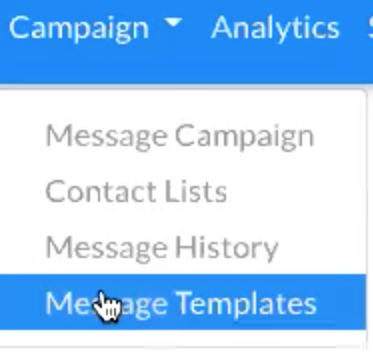
First, the user needs to create a message template. To create a template, click on the ‘Message Templates’ option from the ‘Campaign’ drop-down list:
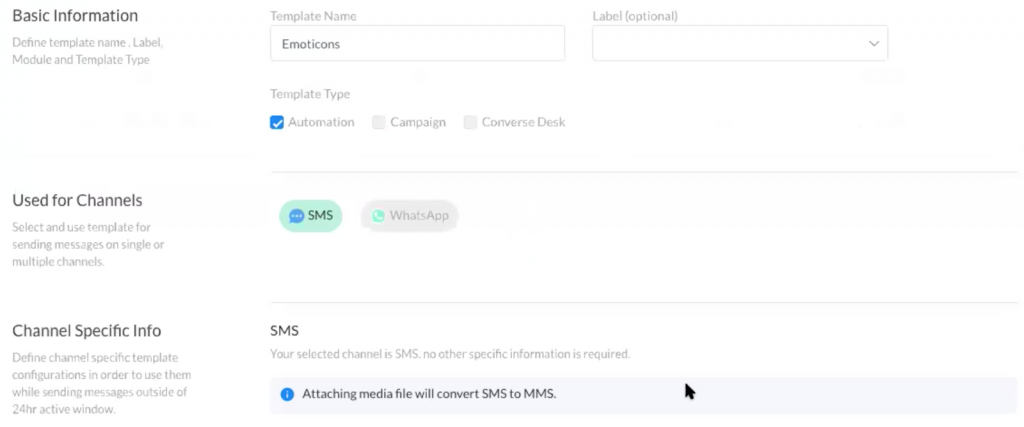
The following template creation window will appear:
You can select the available templates or create a new one. To create a new template, click on the ‘Create New’ button. The following window will appear:
Fill the details in all fields, select the template type as ‘Automation’, enter a text to be sent as Auto Reply and click on the ‘Save’ button to save the template. Once the template is created, the user can set the auto-reply.
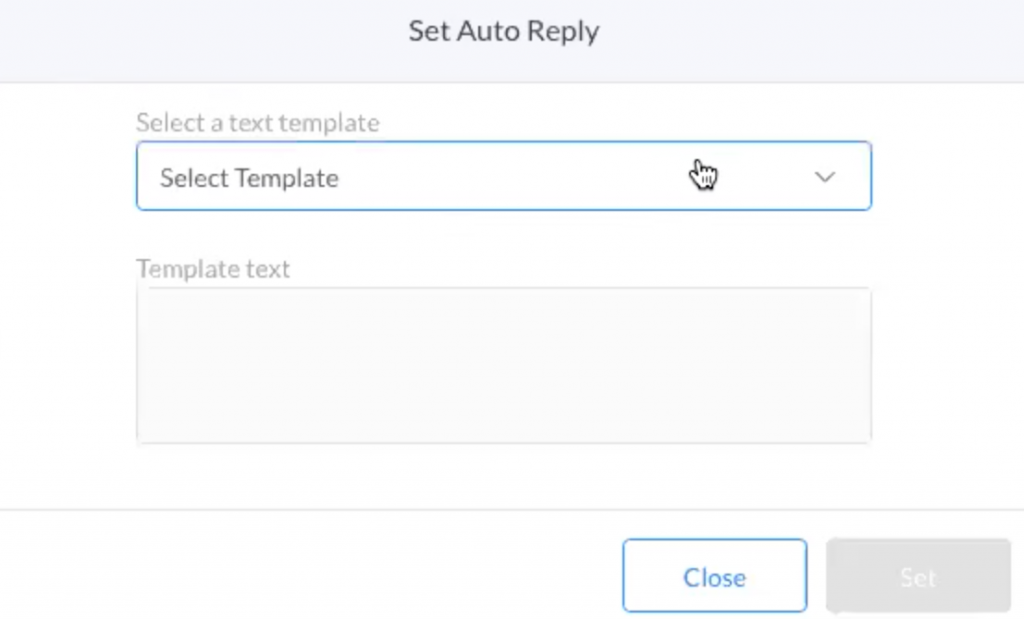
Step 3
Click on the ‘Set Auto Reply’ button. The following message template window will appear:
Here, the user can select the SMS text template from the drop-down list and click on the ‘Set’ button.
Click on the ‘toggle button on the right to enable the auto-reply. Once the auto-reply is set, it will be sent to the recipients who send you messages outside the set business hours.
For instance, if you have set your office hours from 9.00 am to 6.00 pm, India time, so this auto-reply will be sent to any message that you receive from 6.00 pm to 9.00 am. Even if you receive messages from a particular mobile number multiple times outside your set office hours, the auto-reply will be sent only once in 24 hours.
Similarly, you can set business hours for any country and once you enable the OOO, it will send an auto-reply if a message is received outside the business hours set for that country. You can change the message template by clicking on the ‘Edit Auto Reply’ button.
Note: Out Of Office (OOO) Auto Reply can be set for only SMS channel.
Setup Consent Management
|
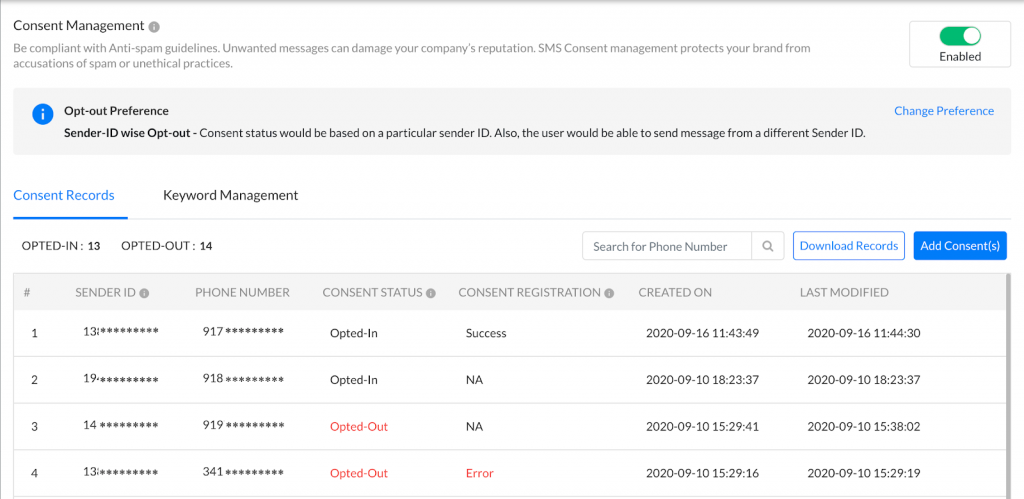
This section helps you keep a track of the status of your recipient’s consent to receive messages from your business. You can track the opted-in customers and manage your keywords at the same time.
Being compliant with Anti-spam guidelines makes sure that you only send messages to customers who have subscribed to your services. Consent management protects your brand from accusations of spam or unethical practices.
Enable or Disable the Consent Management using the toggle button in the top right corner of the screen.
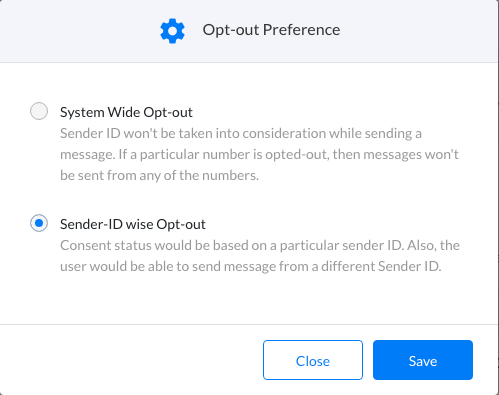
SMS-Magic allows you to choose an Opt-Out preference, based on which the customers will be considered opted-out and we will not be sending messages to them from your account.
1. System Wide Opt-Out
Sender ID won’t be taken into consideration while sending SMS. If a particular number has opted-out then messages won’t be sent from any of the Sender IDs. Similarly, when a particular number has opted-in, messages can be sent from any of the Sender IDs.
2. Sender-ID wise Opt-Out
Consent status would be recorded for a particular sender ID. Also, the user would be able to send a message from a different Sender ID.If a particular number has opted-out for a particular Sender ID, you can still send a message to that number from a different Sender ID.
Note: In the case of Multi-Channel Consent Management, or Consent Management for any channel other than SMS, it is mandatory to set Sender-ID wise opt-out preference.
Consent Management for WhatsApp Channel
WhatsApp recommends obtaining consent from your customers, before reaching out to them on the WhatsApp channel. You can record the WhatsApp consents of your customers in any of the two ways as mentioned in the next section.
SMS-Magic registers the Consents recorded for WhatsApp channel to the WhatsApp Provider. The status of this registration can be viewed under the Consent Registration column. Below are the Consent Registration status –
Consent is submitted to Provider
Consent Registration = Pending
Consent is successfully registered to Provider
Consent Registration = Success
Consent Registration to Provider failed
Consent Registration = Error (You can hover over the error value to view the error message as sent by the WhatsApp Provider.)
Consent Registration is not applicable for SMS, WhatsApp Providers – Nexmo, and Twilio.
Consent Registration = NA
WhatsApp messaging is slightly different than normal text messaging, featuring two types of messages.
WhatsApp Session Message: WhatsApp Session messages are any messages sent and received in response to a user-initiated message to your business. A messaging session starts when a user sends your business a message and lasts for 24 hours in the most recently received message. You can wait for users to message to your app, or you can send a Template Message to invite the user to respond. Regular text messages or media messages (i.e., any non-template messages) can only be delivered in this 24-hour active window.
WhatsApp Template Message : WhatsApp Template messages use pre-approved message templates called MTMs or Registered templates for outbound notifications such as delivery alerts and appointment reminders. They cannot be used for marketing. You must use a WhatsApp Template Message if more than 24 hours have elapsed since the user last responded to you. Any other type of message will fail.
SMS-Magic Web Portal allows you to initiate a conversation or reach out to your customers using WhatsApp Registered templates when the Consent Status is Opted-In and Consent Registration is Success or NA. In all other cases, we do not allow you to send WhatsApp Registered templates, to make sure you comply with the Compliance policies.
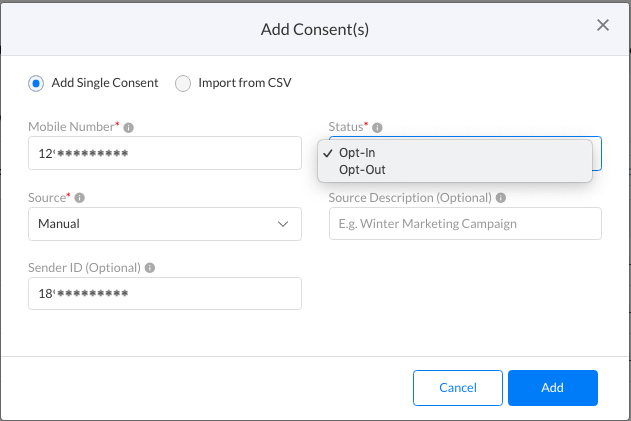
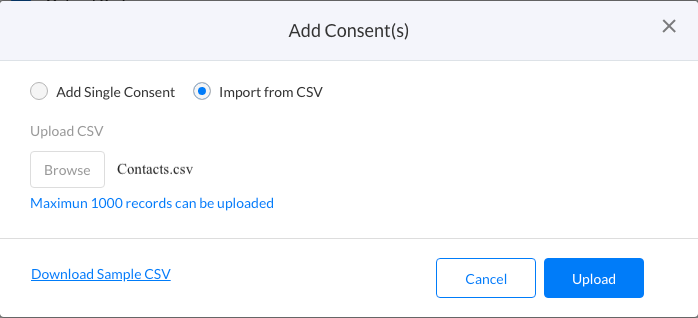
To import a CSV of Consents, follow the below steps –
Click on Add Consent(s)
Select Import from CSV
Upload a CSV file
You can upload a CSV file with a maximum of 1000 records.
Download the Sample CSV file to upload a CSV which is in the same format as the Sample file.
Click on the ‘‘Browse’’ button
The summary of the number of Successful and Failed upload of records will be shown
You can search using a Phone or a Mobile Number in the Consent Records, to find out the Consent status of a desired customer. A count of opted-in and opted-out customer is shown on the top of the records.
You can Edit the existing Consents manually.Hover over on the record that you want to edit. Click on Ellipsis icon and click on Details. Click on Details in the Action column. Change the Consent Status from the drop-down of ConsentStatus field. Click on Save.
To view the Consent History of a Customer for a particular Sender id, hover over on the required record, Click on Ellipsis icon and click on Details. View the timeline under the History section.
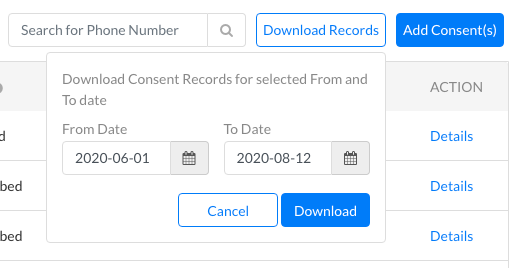
Download Consent Records
The consents of your customer can be downloaded in CSV file format using Download Consent Records capability. You can download Consent Records for a desired range from the available Consent data.
Follow the below steps to download your Consent Records created over a period of time –
1. Click on Download Records
2. Select From Date and To date.
3. Click on Download.
The CSV file of Consent Records for the selected time period will be emailed to the email address of the logged in user.
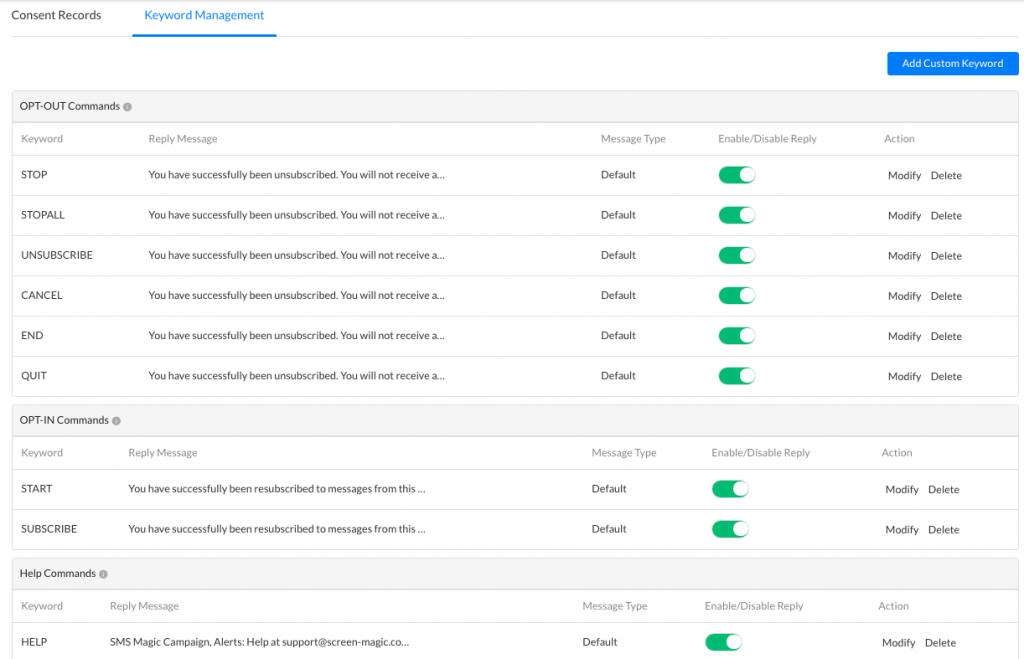
Keyword Management
You can manage your Consent by defining keywords. When you receive a keyword in the incoming message the Consent is registered against the response automatically.
The defined auto-responses will be sent as per the keywords received.
You have a few pre-existing Keyword of following types–
On receiving any of the above Keywords, the customer is marked as Unsubscribed.
2. Opt-In – START, SUBSCRIBE
On receiving any of the above Keywords, the customer is marked as Subscribed.
3. Help – HELP
On receiving the above Keyword, the auto-reply set will be sent. The customer’s mobile number will not be added to the Consent Records.
You can see the Auto Replies defined at each Keyword. Enable or Disable the Auto-Reply by using the Toggle Button given next to each Keyword.
To Modify the Auto-Reply message, click on Modify. Add a Custom Reply for the Keyword and click on the ‘Save’ button.
To Delete the Keyword, click on the ‘Delete’ button. Click Yes on the Confirmation dialog.
Add Custom Keyword
To add a Custom Keyword follow the below steps –
Click on Add Custom Keyword
Select the Keyword Type from the values Opt-Out, Opt-In, and Help
Enter a Keyword and a Custom Reply
Click Add and the Custom Keyword will get added in the list below the selected Keyword type.
Setup HIPAA Compliance
|
The Health Insurance Portability and Accountability Act (HIPAA) establishes the standards for accessing, storing, and transmitting medical data and ensuring the privacy and security of Private Health Information (PHI). HIPAA suggests that no PHI is stored at the organization’s end if a customer opts in for this compliance.
SMS-Magic complies with all HIPAA standards for HIPAA-enabled Accounts configured using Salesforce or Zoho CRM. As the below features require storing of data, SMS-Magic does not support them for HIPPA enabled accounts:
MMS
Rate Limiting
Resend Failed Messages
SMS History
Campaigns
Conversations
Business Hours
Subscription Management
NOTE:
This is a one-time setting. Once HIPAA Compliance Setting is enabled, the user cannot turn it off.
Users will have to create a new SMS-Magic account if they do not want HIPAA Compliance once it is enabled. They can either create a new account altogether or use our Master-Child account support to create a child account.
SMS-Magic does not support sending messages through WhatsApp and Facebook for HIPPA-enabled accounts as they are not HIPAA compliant
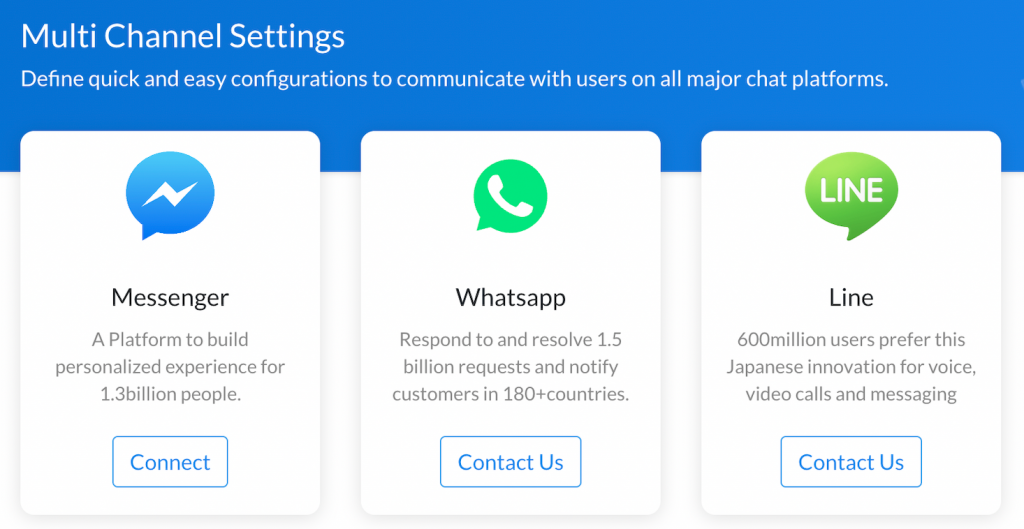
Setup Multi-Channel Integrations
|
This section helps you set up Integrations for multiple messaging channels such as Facebook, WhatsApp, Line, WeChat, etc. Support for WhatsApp and Facebook Integration is available on the SMS-Magic Web Portal. Support for integrating other channels will be available soon.
For WhatsApp Integration, please Contact Us. For Facebook Integration, follow the steps mentioned in the next section.
Facebook Messenger Integration
Facebook Messenger helps in seamless conversations using the renowned social media messaging services. This can now be integrated with Converse Desk of SMS-Magic Converse Application on Salesforce for managing conversations from all ends. Integrating Facebook Messenger with Converse desk expands the customer outreach via social media. Gathering leads via comments and posts and managing conversations using Converse desk gets easier once the integration is complete.
Note:
Integration of Facebook Messenger works only for SMS-Magic Converse Application on Salesforce.
Only Admin User has access to Multi Channel Settings
Facebook Messenger subscribers are acquired only when the customer initiates the conversation through the Facebook Page that is integrated with the Customer Portal.
Prerequisites
A valid Facebook profile for authentication.
A minimum of 1 valid Facebook Page for integration.
1. To Integrate Facebook Messenger via Portal
Log in to SMS-Magic Portal (https://app.sms-magic.com)
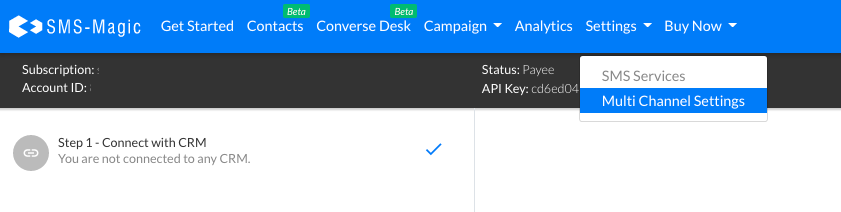
On the top menu bar, click Settings. Click Multi Channel Settings. The integration page appears.
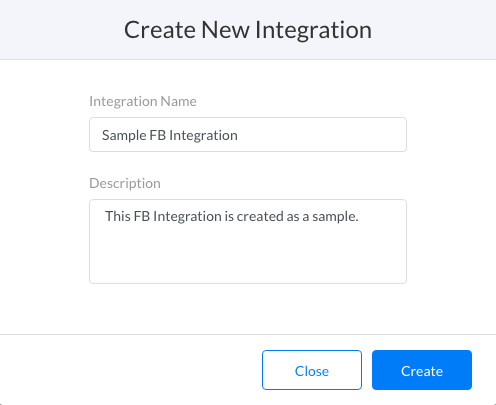
Click Connect on the Facebook Messenger tile. The Create New Integration pop-up window appears.
Under Integration Name assign a name for the integration.
Type a brief description.
The Integration Name is mandatory. The description field is optional.
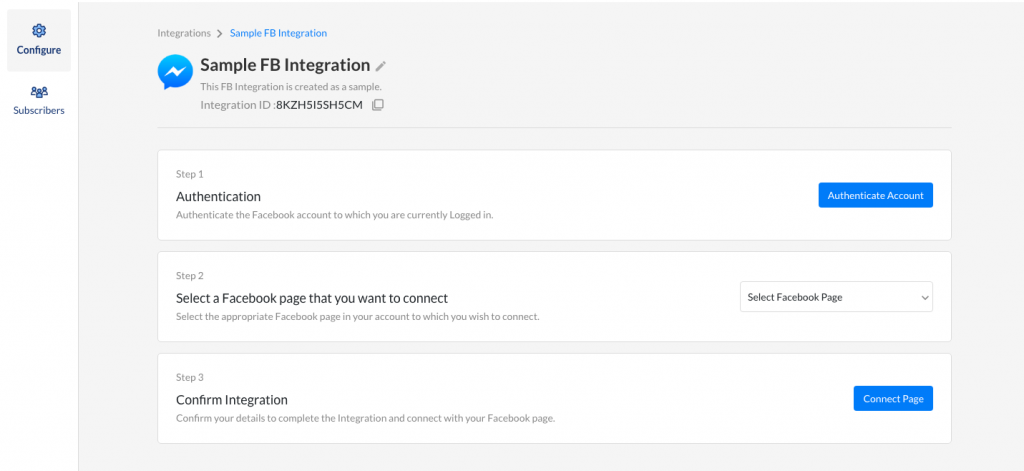
Click Create. The Messenger Integration page appears.
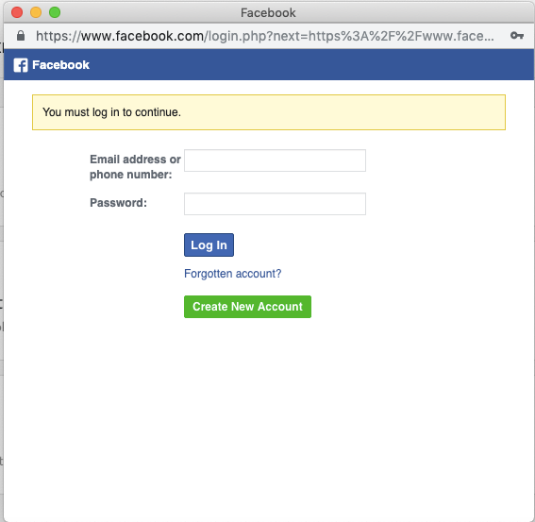
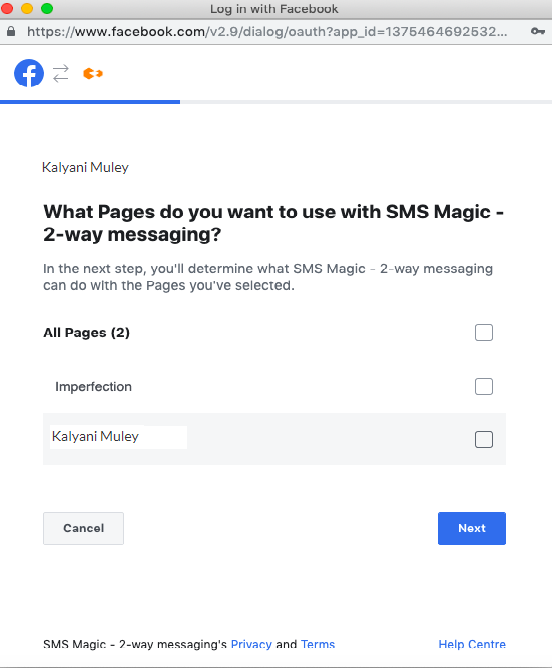
Click Authenticate Account on the right to authenticate using your Facebook credentials. The Facebook Login page appears.
Figure 4: Facebook Login Page
Log in to the Facebook account. The Facebook page selection pop-up window appears.
Figure 5: Enable Facebook Page
On the Facebook pop-up window, click the pages for which you want to enable permissions.
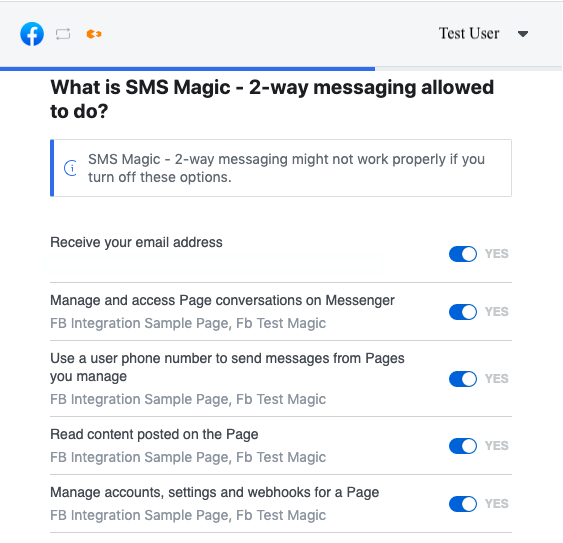
Click Next. The Permissions section appears.
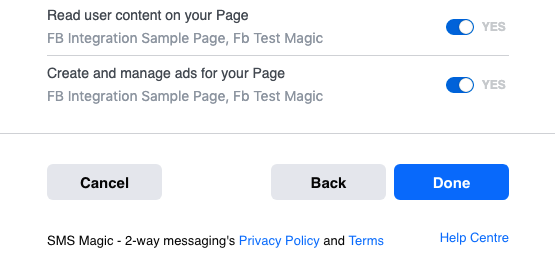
Toggle the button to enable or disable the relevant permissions.
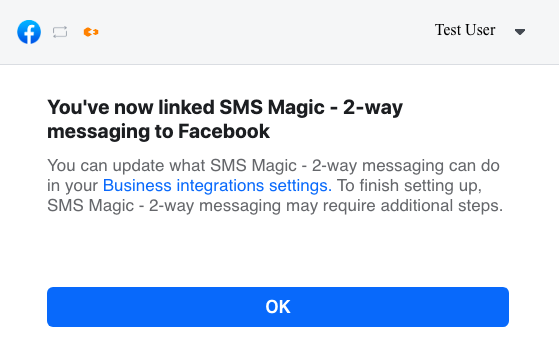
Click Done. The Facebook confirmation page appears.
Click OK. The authenticated Facebook account appears.
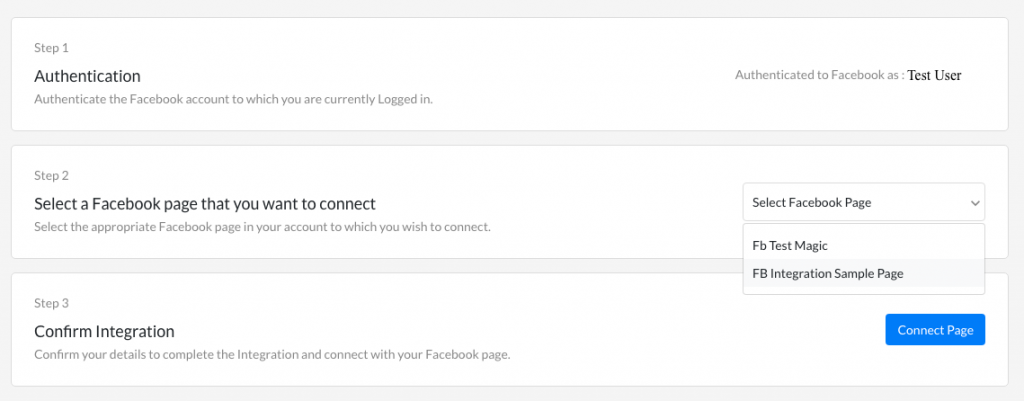
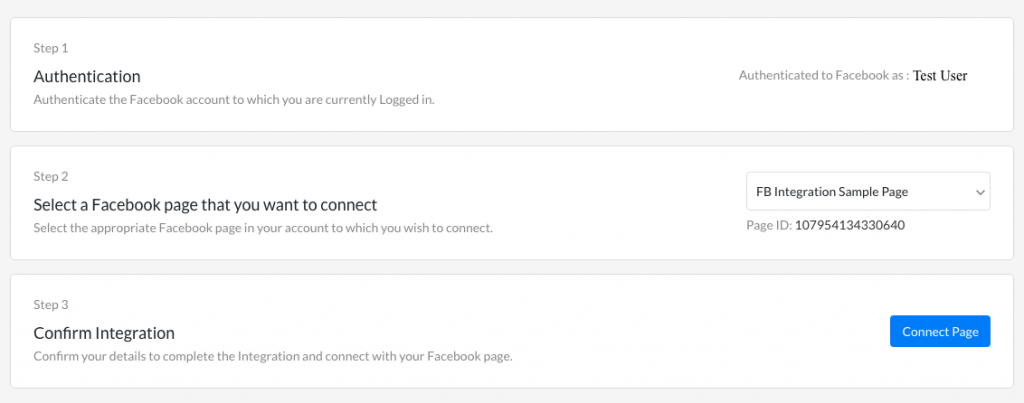
On the Integration page, under Step 2, select the Facebook page from the drop-down list. The Page ID appears indicating the selected page.
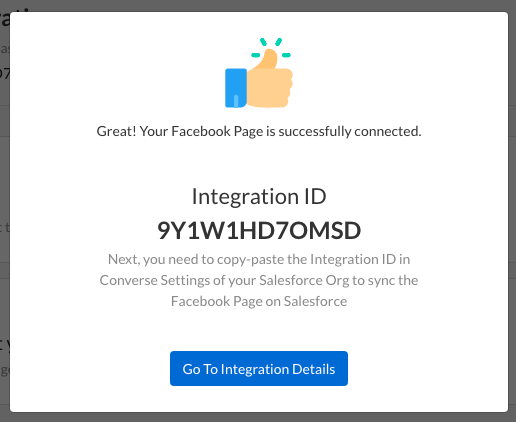
Under Step 3, click Connect Page. The Facebook page integration is complete.
Click Disconnect this Page and then click Disconnect from the drop-down list to delete the page connection.
Click Disconnect this Page and then click Delete Integration from the drop-down list to delete the existing integration.
Click Delete Configuration at the bottom of the page to delete the Facebook Page configuration and the account authentication.
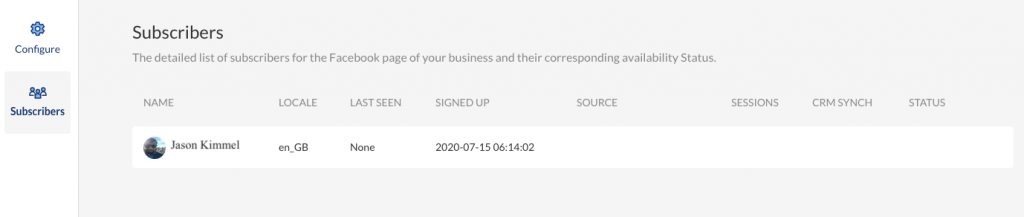
Click Subscribers. The Subscribers section appears.
View the list of customers who are added as subscribers.
All customers sending a message for the first time to the Facebook page that you have integrated are added as subscribers.
Hover over the subscriber row and click to send messages to the Subscribers.
2. Manage Message History
You can view and manage all Facebook messages received and sent from within the Message History section. This section also comprises text messages under the SMS Tab. You can view all the Facebook messages under the Facebook Messenger tab.
On the menu bar click Campaign and then select Message History. The Message History page appears.
Click Facebook Messenger. The Outgoing Messages tab appears displaying all the messages that has been sent to subscribers from the portal.
Click Incoming Messages. The list of incoming messages appears displaying messages that the portal receives from subscribers for all the Facebook pages that have been integrated for the business.
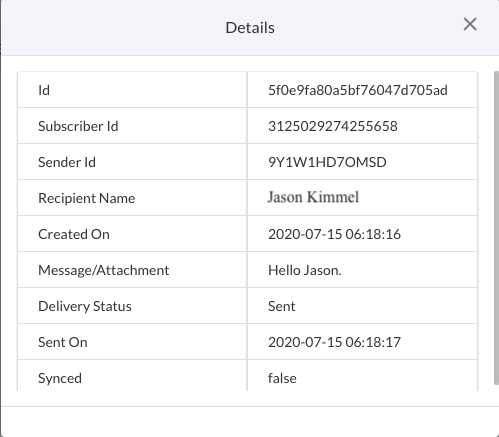
Click to view additional details about a specific incoming or Outgoing message. The Details pop-up window appears.