Send a SMS Message from Apex
Prerequisites
The developer will need proficiency in:
- Salesforce.com Object model
- Apex Programming
The APIs’ can be worked on via this link
Apex is a strongly-typed, object-oriented programming language that allows developers to execute flow and transaction control statements on the Salesforce Lightning Platform server, together with calls to the API.
Object & Fields Information
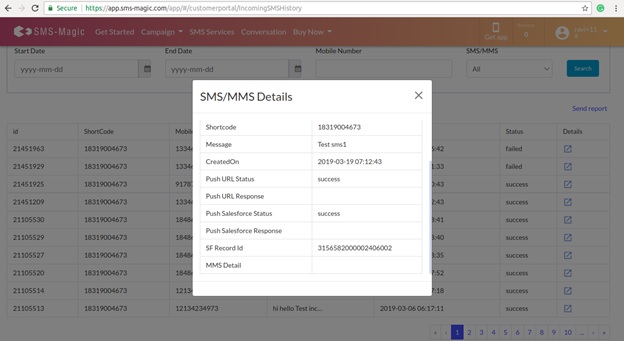
There is a custom object in the SMSMagic Interact Managed package known as SMS History, and the corresponding API name is smagicinteract__smsMagic__c. This object stores SMS message data. Considering the need for complex customization for implementing various business workflows, we have provided a simple way to send SMS from Apex code.
The following table contains fields that must be populated to successfully send messages from Apex:
| Name | Field API name | Purpose | Required |
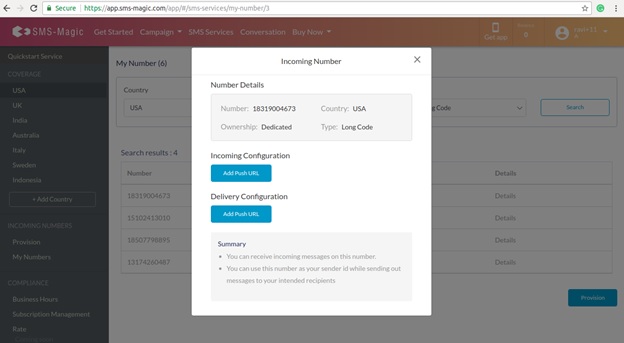
| SenderID | smagicinteract__SenderId__c | Phonenumber or business identity of your business | Yes |
| Mobile Number | smagicinteract__PhoneNumber__c | Phone number of Contact/Lead to whom you are sending the message. | Yes |
| Name | smagicinteract__Name__c | Name of person to whom you are sending this message. | No |
| SMSText | smagicinteract__SMSText__c | Content of message | Yes |
| Disable SMS on Trigger | smagicinteract__ disableSMSOnTrigger__c |
This is used to control triggers. If set 1, the trigger is deactivated, so the message won’t be sent, only a record will be created. If set to 0, a message will be sent. It should be 0 by default. | Yes |
| External Field | smagicinteract__external_field__c | This is indexed and unique field used as a reference to update delivery reports. | Yes |
| Object Type | smagicinteract__ObjectType__c | Identifier of the object from which the message will be sent | No |
| Direction | smagicinteract__Direction__c | With 1.49 onwards, this new field is used to indicate whether it’s an outgoing or incoming message. Set its value as “OUT” for sending messages. | Yes |
Send an SMS message from Apex code
The developer would first create an instance of the SMS History object, populate all required fields, and then insert the instance of that object using a database insert. SMS-Magic provides a custom trigger that will (a) execute after the insertion of the record and (b) send out messages to the Mobile Number. The trigger will also populate other fields in the SMS History object instance with default values.
This sample code sends SMS messages. Feel free to copy it and modify it according to your environment.
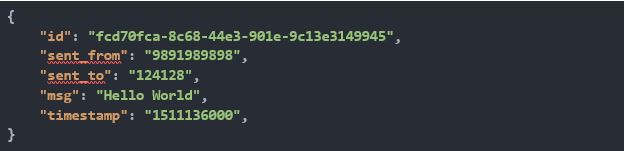
List  smsObjectList = new List ();
String senderId = 'smsMagic'; // Please replace the 'smsMagic' with your relevant sender ID.
String templateText = 'test SMS by Screen Magic'; // you can fetch the template text by querying the record on smagicinteract__SMS_Template__c object
smagicinteract__smsMagic__c smsObject = new smagicinteract__smsMagic__c();
smsObject.smagicinteract__SenderId__c = senderId;
smsObject.smagicinteract__PhoneNumber__c = contact.MobilePhone;
smsObject.smagicinteract__Name__c = contact.Name; // records name
smsObject.smagicinteract__ObjectType__c = 'Contact'; // record type
smsObject.smagicinteract__disableSMSOnTrigger__c = 0; // this field either be 0 or 1, if you specify the value as 1 then sms will not get send but entry of sms will get create under SMS History object
smsObject.smagicinteract__external_field__c = smagicinteract.ApexAPI.generateUniqueKey();
smsObject.smagicinteract__SMSText__c = templateText;
smsObjectList.add(smsObject);
Database.insert(smsObjectList, false);
Troubleshooting
If you encounter any problems, consider the following:
- Ensure that your code is not invoked from a scheduled method of any other trigger.
- A user on whose behalf this code is executed must have permission to use SMS History objects.