Effortlessly manage one production account and multiple sandbox accounts with flexible options to add and collaborate. Enjoy centralized management, easy access to details, and enhanced transparency with audit logs. Streamline your account processes with Workspace!
When you create a new account, the default country will be set to match the initial country of its parent account.
You can have one production account along with multiple sandbox accounts in our platform.
Both new and existing separate accounts can easily be added to our system.
You have the flexibility to add multiple sandbox accounts under the production account or even add a production account for the sandbox account.
Enjoy a consolidated view of all connected accounts, providing a seamless and efficient experience.
Access account details directly from the workspace page, making it convenient to manage your accounts.
All existing child account admins will have access to the workspace page, enhancing collaboration and accessibility.
Stay informed with audit logs for each account, accessible under customer activities, ensuring transparency and accountability.
Please note that the option to purchase credits and numbers is exclusively available from the production account.
Workspace User Manual
|
1.Workspace Overview
Now effortlessly manage one production account and multiple sandbox accounts with flexible options to add and collaborate with the SMS-Magic Workspace. Enjoy centralized management, easy access to details, and enhanced transparency with audit logs. Streamline your account processes with Workspace!
Here’s a user guide on the procedure for connecting accounts, transferring numbers, and transferring credits through SMS-Magic Workspace. Follow the steps below to effectively utilize these features.
2. Connecting Accounts
Now, with the Workspace, you can check all your existing connected Salesforce accounts and connect new accounts with ease.
Login to Salesforce Org using your credentials.
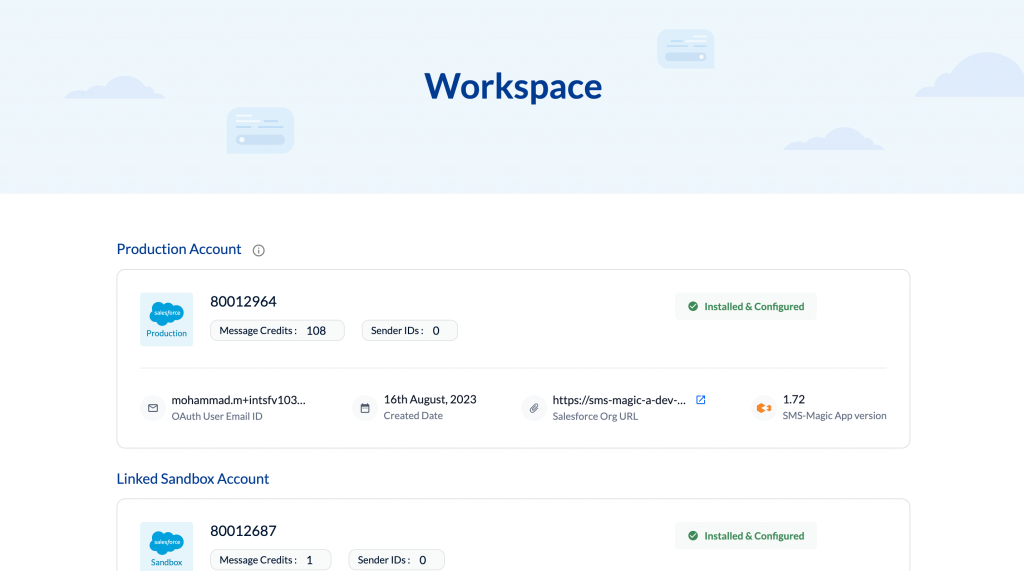
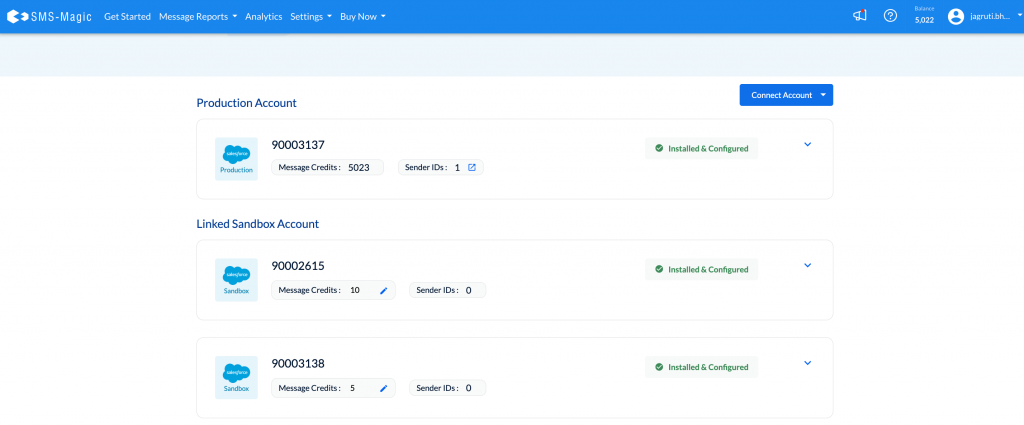
Once you’re logged in, you will be redirected to the Workspace page, from where you will be able to see the Production Account and all the Linked Sandbox accounts, and an option for adding new accounts.
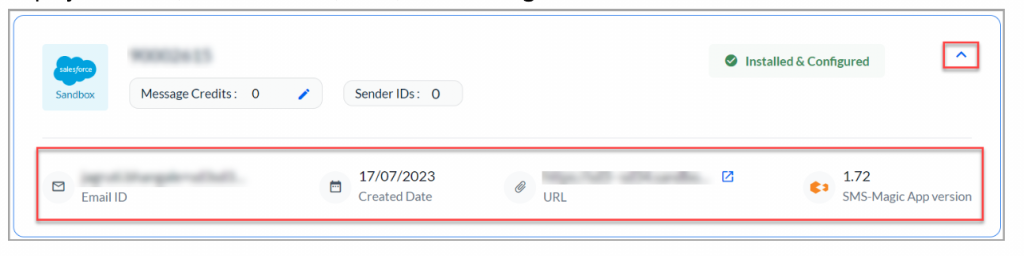
Click the Expand button to view detailed information about individual accounts. This will display Email ID, Created Date, URL, and Package Version.
You can install and configure the SMS-Magic Converse app for your Salesforce Org by clicking on the Install and Configure link.
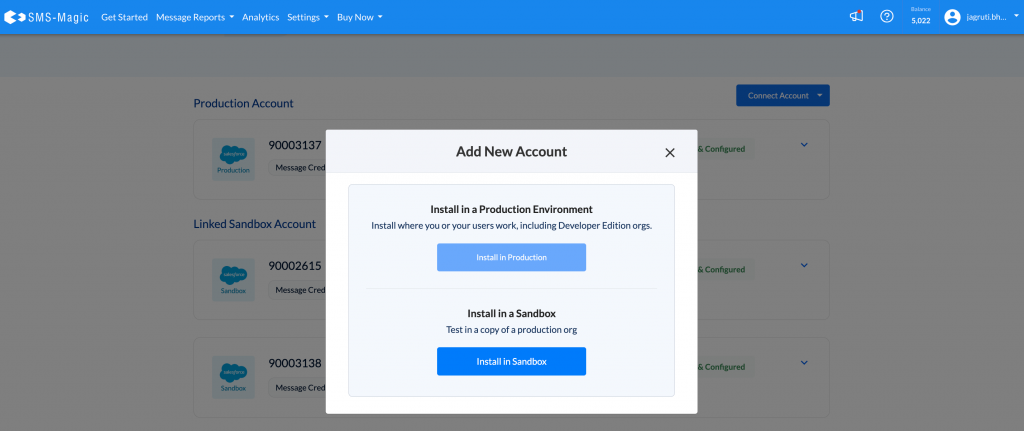
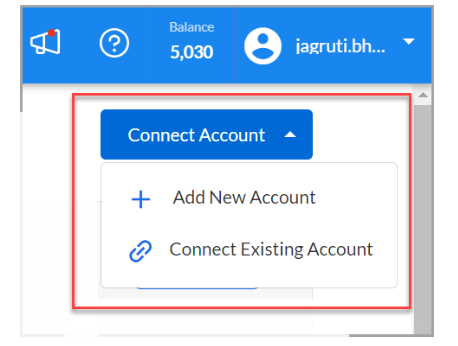
To connect a New Salesforce Account, click on the Connect Account drop-down menu.
The Connection Type drop-down menu offers two options:
Add New Account: This allows you to install SMS-Magic Converse App in either the Production or Sandbox environment. NOTE: You can have one production account and multiple Sandbox accounts.
Connect Existing Account: To connect an existing Salesforce account, select this option.
2.1 Adding a New Account
Adding a new Salesforce account to SMS-Magic Workspace is a straightforward process. This allows you to extend SMS-Magic functionality to a new account in either the Production or Sandbox environment. Here’s a brief procedure for adding a new account in SMS-Magic Workspace:
To add a New Salesforce Account from the Workspace, locate and click on the Connect Account drop-down menu.
Choose Add New Account from the drop-down menu.
A dialog box will appear, presenting two options to select the environment:
Install in Production: Choose this option to install SMS-Magic Converse App in your Salesforce Production environment. This is typically used for your live, operational Salesforce environment.
Install in Sandbox: Select this option to install the SMS-Magic Converse App in your Salesforce Sandbox environment. Sandboxes are used for testing and development purposes and allow you to experiment without affecting your live data.
After selecting your desired environment, follow the on-screen prompts to complete the installation of SMS-Magic for the new account.
You will receive a confirmation once the installation process is successful. Your new Salesforce account is now connected to SMS-Magic Workspace.
You have successfully added a new Salesforce account to SMS-Magic Workspace. You can now manage SMS-Magic features for this account as needed. NOTE: Ensure that you have the necessary permissions and access rights in your Salesforce Org to install the SMS-Magic Converse App for the chosen environment (Production or Sandbox).
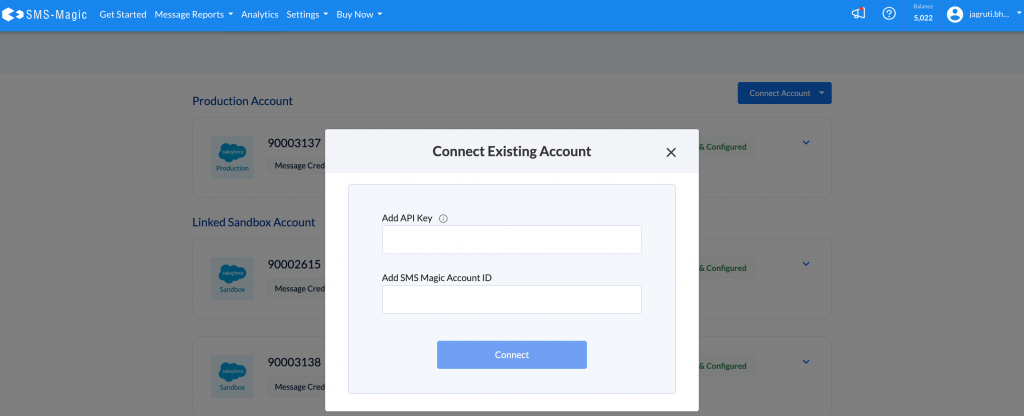
2.2 Connecting Existing Account
Connecting an existing Salesforce account to SMS-Magic Workspace is a straightforward process. This allows you to extend SMS-Magic functionality to an existing account in either the Production or Sandbox environment. Here’s a brief procedure for connecting an existing account to SMS-Magic Workspace:
To connect an existing Salesforce Account from the Workspace, locate and click on the Connect Account drop-down menu.
Choose Connect Existing Account from the drop-down menu.
A Connect Existing Account dialog box will appear.
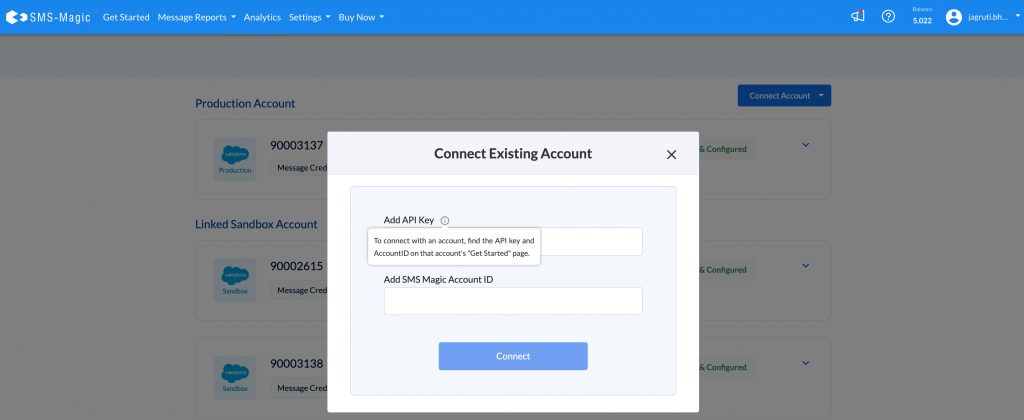
Enter the API key in the Add API Key field.
Enter the SMS-Magic account ID in the ‘Add SMS Magic Account ID’ field.
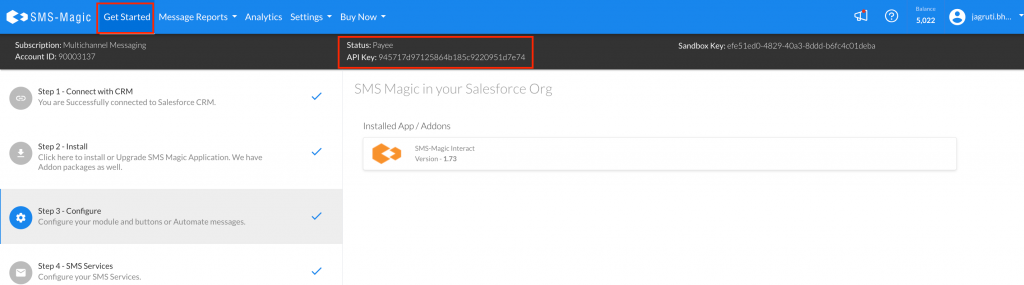
You need to enter the API key and account ID of the account that you want to connect. You get this information from the ‘Get Started’ section
After entering the required information, click on the ‘Connect’ button to establish the connection.
This concludes the process of connecting accounts in SMS-Magic Workspace. You can now seamlessly manage your Salesforce accounts, transfer Sender IDs, and control credit transfers as needed.
3. Number Transfer
Now, with SMS-Magic Workspace, you can seamlessly move and manage your Sender IDs from the production account to the Sandbox account. You need to be on the Payee plan and not on the Trial plan to do so.
Here’s the procedure for transferring a Sender ID from a Production account to a Sandbox account in SMS-Magic Workspace:
Step 1: Verify Account Type
Before proceeding with the Sender ID transfer, ensure that you have a paid or licensed account as this operation cannot be performed with a Trial plan.
Step 2:Access Connected Salesforce Accounts
Login to Salesforce Org using your login credentials.
On the Workspace page – you can see the list of Connected Salesforce Accounts.
Step 3:View and Edit Sender IDs
Within the Connected Salesforce Accounts section, you will see the Sender IDs options for each account.
Review the current values of Sender IDs associated with your accounts.
To make changes to Sender IDs, click on the Link next to the Sender ID of your Production account. You need to have at least one Sender ID to transfer it from the Production account to the Sandbox account. This action will navigate you to the Settings tab.
Step 4:Transfer Sender ID
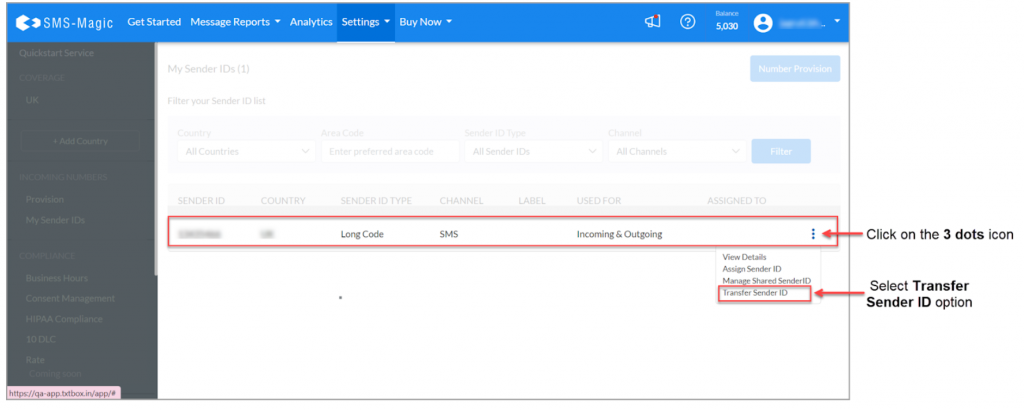
From the Settings tab, you will see a window with My Sender IDs.
From the available list of Sender IDs, select the one you wish to transfer.
Click the three dots (⋮) button associated with the selected Sender ID to access additional options.
From the options that appear, choose Transfer Sender ID. This action will trigger a dialog box to appear.
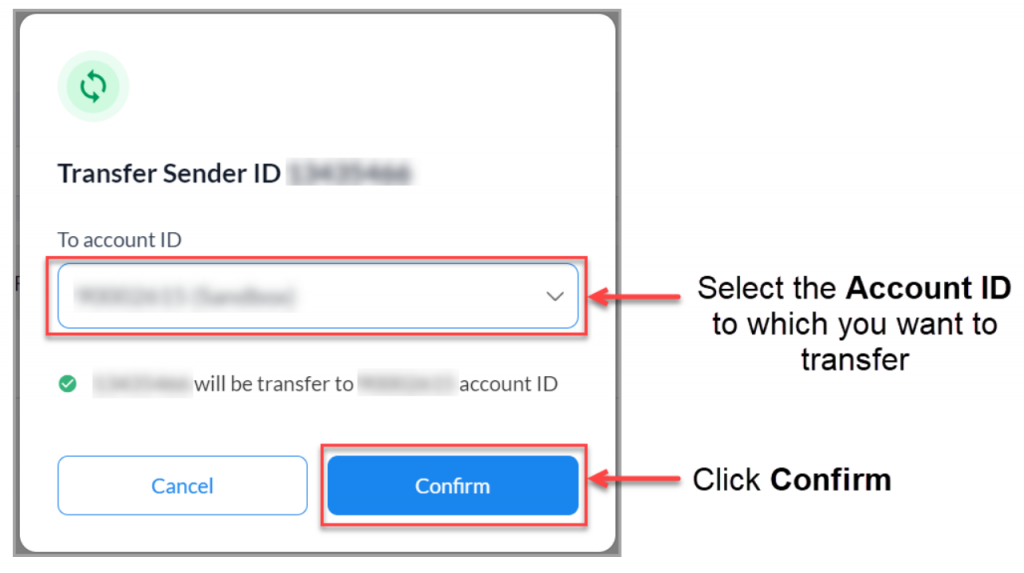
Step 5: Specify Transfer DetailsIn the dialog box, locate the Select Account ID drop-down menu and choose the Account ID of the Salesforce account to which you want to transfer the Sender ID.
After selecting the destination account, click the Confirm button to initiate the Sender ID transfer.
Step 6:Confirmation
You will receive a confirmation message once the Sender ID transfer is successful.
You have successfully transferred a Sender ID from a Production account to a Sandbox account in SMS-Magic Workspace. Ensure that you have chosen the correct destination account for the transfer to avoid any disruptions in your SMS messaging operations.
4. Credit Transfer
Now, with the SMS-Magic Workspace, you can transfer credits from your Production Salesforce account to the Sandbox account. Please note that you can transfer only upto 10% of the total available credits in production.
Here’s the procedure for transferring Message Credits from a Production account to a Sandbox account in SMS-Magic Workspace:
Step 1: Verify Account Type
Before proceeding with the Message Credit transfer, ensure that you are on a Payee plan, as this operation cannot be performed with a Trial plan.
Step 2: Access Connected Salesforce Accounts
Login to Salesforce Org using your login credentials.
You will be redirected to the SMS-Magic Workspace within your Salesforce Production environment.
Step 3:View and Edit Message Credits
Within the Connected Salesforce Accounts section, you will find the Message Credits options for each account.
Review the current values of Message Credits associated with your accounts.
To initiate a Message Credit transfer, click on the Edit option next to the Message Credits you want to transfer.
Step 4:Enter Message Credits
After clicking Edit, enter the number of Message Credits you wish to transfer.
Step 5:Confirmation
Upon successful transfer, you will receive a confirmation message indicating that the Message Credits have been released from the source account and transferred to the designated account(s).
You have successfully transferred Message Credits from a Production account to other accounts in SMS-Magic Workspace. Ensure that you have chosen the correct accounts and the appropriate Message Credit amounts to avoid any disruptions in your SMS messaging operations.
Credit Transfer
|
Transferring Credits: A Guide to Credit Transfer
By understanding these simple rules, you can effectively manage your credits and make the most of your account!
You can buy credits only in the main production account.
Once you have purchased credits, you can choose to move them to a sandbox account, but there are some limits on how much you can transfer.
You have the flexibility to move credits back and forth between the production account and the sandbox account.
The maximum amount you can transfer at a time is 10% of your total credits.
Please note that you can only edit credits in the sandbox account.
If you edit credits in the sandbox and make it 0, all credits will be transferred back to the production account.
Number Transfer
|
Number Transfer: Seamlessly Move and Manage Your Sender IDs
By following these simple guidelines, you can efficiently manage your Sender IDs and enjoy a smooth experience with our platform!
On the workspace page, you can easily view the total number of assigned Sender IDs for each account, helping you keep track of your Sender IDs.
You can purchase Sender IDs from the main production account and transfer them to a sandbox account based on the allowed limit.
However, it’s essential to keep at least one Sender ID in the production account before moving others to the sandbox for testing purposes.
Admins have the authority to transfer Sender IDs between connected accounts, giving them control over number management.
Additionally, users have the option to select the specific Account ID where they want to move a chosen Sender ID, adding flexibility to the process.
Deploy Use Cases
|
Now you can deploy Use Cases in Salesforce Org from Workspace. Customers can enhance their Salesforce (SF) org’s functionality by deploying multiple business use cases directly from the Workspace Page.
Customers gain the following capabilities:
Custom Configuration Selection: During project setup, the user interface will now display a comprehensive list of available custom Configuration Use Cases. This enables users to effortlessly select the use cases that align with their organization’s unique needs.
Multi-Use Case Deployment: Customers can seamlessly deploy multiple use cases within their organization, streamlining the setup process for enhanced efficiency and productivity.
Clear Error Handling: In the event of any technical issues or errors during deployment, our system will provide clear and informative error messages. Additionally, users will receive recommended steps to help resolve these issues promptly.
User-Specific Visibility: The deployed use cases will be visible and deployable only to the currently logged-in user, regardless of whether they are using a production or sandbox environment. This ensures that access is restricted to authorized users.
Clickable Logged-In Account: Only the logged-in account will be clickable, simplifying the selection process and avoiding confusion.
Simplified User Experience: To maintain simplicity and clarity, we have removed the “Learn more” options from the user interface, ensuring a seamless and intuitive experience.
Version Compatibility: Users with a version earlier than 1.72 will not see the “Use case” option until they update to the compatible version. This ensures a consistent and stable experience for all users.
Supported Use Cases
Customers can deploy a variety of use cases that enhance their SF org’s capabilities. Here are the supported use cases and their descriptions:
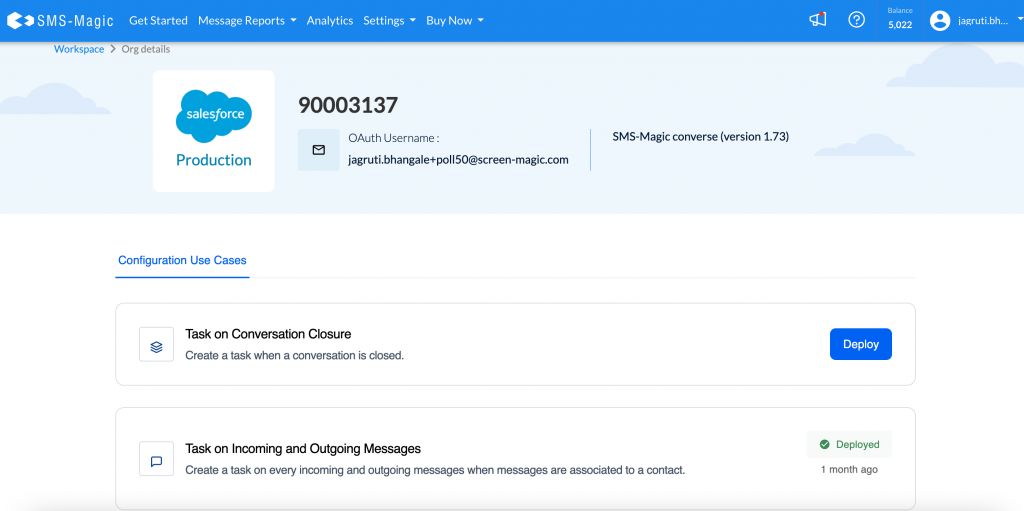
TaskonMsgs (Message-square)
Name: Task on Incoming and Outgoing Messages
Description: Automatically create a task for every incoming and outgoing message when those messages are associated with a contact.
TaskonClosure (3-layers)
Name: Task on Conversation Closure
Description: Automatically create a task when a conversation is closed.
Omni (Grid)
Name: Route Conversations via Omnichannel
Description: Efficiently route conversations to the appropriate queue using Omnichannel, ensuring optimal customer support.
OrphanConv (Bell)
Name: Email alert for unknown conversations
Description: Automatically assign unknown conversations to a default user and send email alerts when the owner of the conversation changes.
How to Deploy Use Cases
To leverage this new feature and deploy use cases within your SF org, follow these straightforward steps:
Log in to your Salesforce org.
Access the Workspace Page.
During project setup, you will see a list of available custom Configuration Use Cases. Select the use cases that best suit your organization’s needs.
Click the Deploy button to initiate the deployment process.
In case of any errors during deployment, our system will provide clear instructions on how to resolve them.